Showing posts with label Deer Fencing. Show all posts

Tuesday, October 27, 2020

Oh Deer

Even though as winter sets in deer metabolism slows and feeding/browsing damage becomes less obvious, deer still manage to cause some major damage to the landscape


A willow, Salix discolor, that has suffered multiple deer attacks, yet has survived. 
The trunk guards were put on after the fact.


Last February I came to the realization that if I wanted to grow new trees, especially conifers, I would need to protect them from the deer, especially the males during mating season. Here in the Mid-Atlantic November brings on rutting season, the time when white tailed deer mate.  During rutting season male deer rub their antlers against trees and shrubs to remove the velvet from the newly grown horns.  They also will rub trees to mark their territory and to take out their heightened aggressions as mating season kicks in.  What deer prefer for this rubbing behavior are trees and shrubs 1-4” in diameter with smooth bark, like willows and magnolias.  Aromatic cedar and other conifers are also favorites.  Once a tree is marked they will often return to the same one.  At one time I had a nice little Canaan fir, Abies balsamea var phanerolepis,  that I surrounded with chicken wire after it had been rubbed a little.  Two days later all that was left was a bare splinter of a tree.  Now is the time to put up some protection to save some of our precious young plants before they are destroyed.  Following are some of the actions I've taken.

Trunk Protection
Last year I tried horizontal fencing for the first time and did not have great results.  It did not protect a young magnolia from rubbing, but a number of small evergreens did not take any damage.  Based on the photos I have, the deer appeared to skirt the areas with fencing lying on the ground. 

The pink flags indicate where I have put 2"x4"welded wire fencing on the ground around this little Canaan fir tree. 
The idea is that it creates unstable footing that the deer don't like.  The flags help me avoid the fence when mowing. 
I want to add some block underneath to lift the fencing further off the ground.

This year I have plastic mesh poultry fencing wrapped around the trucks of most of the stag-susceptible trees.  For others I have a heavier duty  4” drain pipe around the trunk.  (I’m a little concerned about heat build up under these black tubes.  For that reason I drilled ¾” holes every 6”to aid in ventilation.)  I also used some paper tree wrap on some smaller specimens.  One product that looks very good to me is a white spiral plastic.  It looks like it will protect the bark from rubbing and is open enough to prevent heat build up and not harbor insects.  I haven't bought any of that, yet.  A welded wire barrier surrounding the tree trunk has also proven very effective.  This is most efficient with single trunked trees with few lower branches.  Chicken wire may do a good job of limiting browsing but I've seen it ripped away from small trees that had been rubbed by a buck.

I wrapped the trunks of this fringe tree, Chionanthus virginicus, with plastic poultry fencing. 
It's easy to cut and can be tied together with zip ties or wire.  This material should protect the bark,
but will not support the trunk.


Here I am using a spiral cut 4" drain pipe to protect the trunk of this persimmon tree,
Diospyros virginiana.  I drilled holes in it every 6" to reduce heat build up.  This is
pretty tough material and should hold up to attack.


This Sassafras is being protected with a conventional welded wire cage. 
It's been here 4 years, but now it's of prime size for a deer attack. 
Hopefully the large size cage will be a good deterrent. 
I pulled the cage away during the summer to strengthen the trunk.  
  
Except for the open mesh materials it is a good idea to remove bark protection in the spring.  Heat and moisture build up can damage the bark and in some cases can harbor insects.  Also too much rigid support can keep a tree from developing a strong trunk.  I found this with my young sassafras.  It was getting floppy and the truck was not able to support the top growth on its own.  I pulled away the support this past spring and now the truck is much firmer.

Here  on this willow I'm comparing a variety of protection devices. 
On the right is a paper tree wrap.  Not sure how that would hold up versus a buck.


Repellents
In winter deer’s metabolism slows down, but they are still out there browsing.  Evergreens, branch tips and leaf buds are at risk.  Fencing and cages are effective at keeping deer far enough away to prevent browsing.  Burlap warps that are used to prevent winter burn on arborvitae should also work.  Repellents are also helpful.  In colder weather taste-based repellents have an edge because they do not need to be volatile.  It is often recommended to alternate among different repellants through the season so that deer don't get used to any one of them.   So far I haven't done that.  

Reading about all the different recommendations for deer repellants, as well as deer resistant plants, it has become clear that not all deer are the same in regards to their likes and dislikes. Be flexible and try different recipes and products.  I've had good success using Bobbex which contains a variety of taste and odor deterrents. 


Planning Ahead
I’ve seen a number of people on Facebook ask about starting gardens in areas with lots of deer.  My deer seem to test every new plant that goes in the garden.  For new shrubs I usually put a chicken wire cage around them.  As far as planning an new large planting, I like the advice I’ve read in ‘Deerproofing Your Yard & Garden’ by Rhonda Hart.  She recommends fencing in the new garden space before doing any planting.  This is because deer are creatures of habit.  If they have never found anything of interest in an area, then they are not likely to return.  But, once they have found something tasty there, they will make every effort to return.


On the Bright Side?
Deer browsing results in some unsightly damage to many landscape plants.  It is not uncommon to find hedges of arborvitae and junipers chewed back up to about four feet off the ground.  There are some aspects of deer browsing behavior that could be considered beneficial.  The following two photos show where deer have pruned away branches from the lower 4 feet of a yew and a rhododendron.  This sort of pruning opens up the ground plane for lower growing herbs to fill in. In the absence of deer these would be mounds of foliage.  I've also seen this with spicebush, Lindera benzoin, in the woods. This can happen when there is not excessive deer pressure.  Had there been more deer here say 10 years ago these shrubs may not have grown more than a foot tall before being destroyed, unless they were being protected with cages and repellants.

The lower branches of this yew have been munched away over the years.

This rhododendron has been 'limbed up' by deer.

What methods have worked for you during rutting season?  I'd love to hear about them.


Wednesday, April 25, 2018

Preping the Garden

Last year's garden did not do so well.  On reflection there are a number of reasons, some of which are in my control.  Others, not so much.  To do well all plants need sunlight, nutrients and water.  And in my location, protection from pests.  In my mind I was providing all those, but in practice I was coming up short.

Here's the garden half-way through: last year's growth raked out, garden mowed low,
3 beds weeded with scuffle-hoe and rake.  Note the log pile just beyond fence,
all that remains of the big box elder, Acer negundo.

I have been adding compost, shredded leaves and a little organic fertilizer in the past. Last spring I sent samples for a soil test and learned that levels of most nutrients were too high: phosphorus, potassium, calcium and magnesium.  On the positive side, there was an increase in the organic content and cation exchange capacity (a measure of fertility). So this year I will only add an organic nitrogen fertilizer to the soil.  Of the organic choices that had minimal phosphorus and potassium I considered soybean meal and feather meal, both with about 7% nitrogen.  I opted for the soybean meal because I could by it from the feed store for about 25 cents a pound.  One warning with the soybean meal that I read was that it could inhibit the germination of small seeds.  So I'm not using that in the beds where I am planting lettuce, collards, chard or arugula.  I'm hoping that the beans, peas, spinach and others will be OK.  I got all the fertilizer down now (mid-April) and that should give it some time to be digested by the soil biota and have food ready for the bulk or the planting in mid-May.

As far as sunlight goes, I thought that I had good exposure.  That may have been the case 5 years ago, but the trees have been growing taller and eventually cutting a couple of hours of direct sun from the garden area.  While I hate to remove trees, there was a big box elder just south of the garden that appeared to be causing most of the trouble.  Since box elders are pretty common here, it was only with a little difficulty to say good-bye to that tree.

We usually have good rain here and I have a soaker hose to put in place for supplemental water.  So for moisture, I should be in good shape.

The last problem is the critters.  Every time I think I have a solution, they seem to adapt, or another problem crops up.  The double fencing seems to keep the deer at bay and the buried chicken wire slows the ground hog down; however I think it can still climb over the chicken wire when it really wants to.  Last year many seedlings were getting eaten and I'm not sure who to blame.  This year I have a motion activated trail camera to use so I can get a clue as to what is getting into the garden.  I am also expecting that the thicker layers of wood chip mulch will make it more obvious where any burrowing is taking place.

Other garden preparations:
I cut back the long tips of the wild blackberries growing on the outer fence. 
This improves fruit quality and gives more space to move around.

I've allowed wild blackberries to grow along the outer fence of the garden.  This re-enforces that area against deer.  I've read that by pruning the side branches to 4-8 leaf buds the fruit quality is improved.  I've been doing that for a couple of years now and it seems to be true.  The 'managed' wild blackberries have larger, sweeter fruits than the unmanaged plants nearby.


Rather than cutting to the ground I left 1-2' of the hollow
Monarda stems as potential bee nesting habitat.

Another plant growing along the fence line is wild bergamot, Monarda fistulosa.  These grow up about 4' and are very attractive to bees in early to mid-summer.  The hollow stems can provide nesting sites for small bees, like mason and leaf-cutter bees.  Since these bees build their nests in summer and develop there through the fall and winter, these stems need to be left intact for over a year.  When I did the garden clean-up I cut most of these stems to leave 1-2' intact.  These old stems will disappear into the new growth by the end of spring.  I just need to remember to leave them alone for the next year. 

As a result of a lot of tree work done here this spring, I have a large supply of wood chips.  This year was therefore the year to replenish the garden paths with fresh chips.  Many folks don't like to use fresh chips in the garden because they take up nitrogen from the soil as they decompose.  Since I want to suppress growth on the paths and garden perimeter, these fresh chips are just the thing to use.  (This loss of nitrogen from the soil only occurs where the mulch touches the soil and does not significantly affect the root zone unless the wood mulch is dug into the soil.)

The gardens all ready for plants:  freshly weeded, fertilized and mulched. 
I ran out of mulch for the last two beds...we'll call this an experiment. 
The remaining greenery are mostly native perennials like
beebalm and coneflowers to attract pollinators.
One new thing I am trying this year is to put down a wheat straw mulch over the bare soil.  This should help with moisture retention and reduce the number of weeds, or at least those from new seeds being blown into the garden.  I am expecting that wheat straw is much lower in weed seeds than is regular hay.

Now it's (past) time to plant those peas!!!


Thursday, April 9, 2015

Securing the Garden Perimeter

Now that all sorts of plants are springing back to life any number of outdoor chores are available, some fun and interesting, others, not so much.  One of the major challenges in last year's vegetable garden was near daily incursions by a plump groundhog.  While we can hope that our resident fox does his/her job, I decided to take steps to modify the perimeter fence to make it more difficult to dig under.

Of course I had read that a good garden fence needs to go below the surface to keep out rabbits and groundhogs, I took the easy way out and only buried  few inches of the chicken wire fence under the mulch.  This was actually partially effective the first year, but last year there were several shallow entrances all around.  One article I read, says to dig a trench 2 feet deep and a foot wide and line the bottom and side closest the fence line with chicken wire.That sounds pretty impressive.  I got started, but hand digging a trench that size was beyond my limits of fun.  I backed off a little and when with 12-16" deep and 6" wide.

Here's some photos of my project:

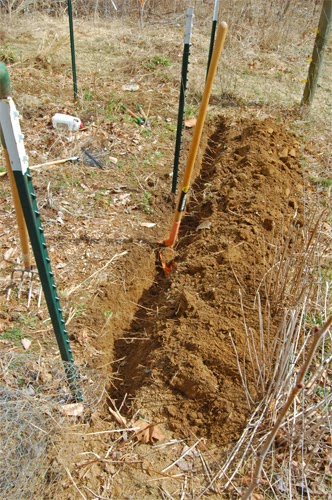
First, dig a trench.  I used a narrow trenching shovel
to make a narrow hole with pretty straight walls.
This trench was only 14" deep and about 6" wide.
Push in the chicken wire and bend it outwards at the bottom
 so that about 6" covers the bottom of the trench.  This way
if the critter tries to go deeper, it will be frustrated.


Fill in the trench and compact the soil.  Connect the buried chicken wire
with the above ground fencing.  I bent about 6" of the above ground portion
outward to create another digging barrier.
Cover the base of the above ground wire with soil and then
 mulch the area between the inner and outer fence.
So with the inner fence secured against the small mammals I'll need to tighten up the outer wire fence to deflect the deer.  

One of the features of my garden is a pollinator border consisting mostly of native plant species. Since many of these plants are vigorous seeders, I have an abundance of seedlings to move from the garden out to the border.  Before I got started with trench digging I took a close look at the plants I would be digging up to determine with they were keepers or 'weeds'.  Here are some photos of the ones I encountered:

This is an over-wintered rosette of Black-eyed Susan.
It can be recognized, in part, by the soft fuzzy leaves
Black-eyed Susans produce a lot of seed and each plant lives only 2-3 years.  To keep a good supply of these in the border I have been transplanting them out from the inner garden.
At first glance the rosette of the weedy English plantain is similar to the Black-eyed Susan.  

This English plantain has lance-shaped, deeply veined leaves


This clump of common yarrow was dug out of the path of the new trench.
Common yarrow, Achellia millefolium, is a cosmopolitan plant, meaning is occurs in similar habitats on a global basis, not just a single region.  Though not always considered a native species it is very good at attracting pollinators and beneficial insects.


These leaves did not break ground until the last week of March.
Wild columbine, Aquilegia canadensis, is another short lived native perennial and is dependent on reseeding for its long term presence in the garden.  The new leaves are a dark, purplish green and can be difficult to spot until they open up some.  Before the leaves develop they could be mistaken for red clover.


There are a  number of native Cardamine sp.
around but they do not resemble this one
Hairy winter cress, Cardamine hirsuta, is a introduced winter annual.  It develops its foliage in late winter or early spring and is in full bloom by April here.


There are many wild garlics, both native and introduced out in the garden.  Since these have a tendency to deter small mammals, I have not been targeting them for removal.  I planted nodding onion, Allium cernuum, in the garden border a year and a half ago.  I have seen several resprouting, some are already about 6 inches tall.

The foliage of nodding onion is a flattened blade.  The
 weedy field garlic, Allium vineale, found in many lawns
 has darker green tubular leaves
Sheep sorrel spreads rapidly by shallow runners.


The last weed I was tossing out was sheep sorrel, Rumex acetosella.  The leaves of this plant can be used as a tart, lemony flavoring in soups and salads.  The plant concentrates oxalic acid giving them a tart flavor; however, it can be toxic in high concentrations.  I should probably consider trying it in a salad, in moderation.


Thursday, May 16, 2013

The Garden is 'IN'

Mother's Day has past so now it time to be planting the vegetable garden.  At least that is the tradition for many.  This year we had to days with frost warnings immediately after Mom's Day.  But now the weather is on an apparent warming trend.

In early March I laid out the beds for my new garden using techniques described in Weedless Gardening by Lee Reich.  The goal was to avoid having to till the new garden and remove all the grass and weeds.  The result has not been entirely weedless, but the amount of buried vegetation coming through has been manageable.  I think if I had waited until the grass had begun to grow and use up some of the energy stored in the roots there may have been few 'weeds' poking through.  More of the buried vegetation is working it way up along the seams between the cardboard and paper layers.  So for now I am just pulling off the tops of the grass and weeds to keep them from generating any new energy.

The fences are up and the garden is ready for planting.
Pollinator plants will go in along the outer fenceline.

The second phase of establishing the garden was to put up the fencing to keep the wildlife out.  My biggest concern is the deer, but there are plenty of other varmints (rabbits and ground hogs) to deal with as well.  I got a copy of Deerproofing Your Yard and Garden by Rhonda Hart.  I found this a very useful book that explains how deer operate and how manage them.

Separation between the fences is 3 ft, however 4 feet is commonly recommended.
Note the new compost enclosure in the back left, made from old wooden pallets
(Idea thanks to Washington County Master Gardeners).
The method I am trying out is a hybrid of the double-row fence and the invisible monofilament fence. The idea behind the double row fence is that while deer can jump high or long, they can't do both.  So a 4 foot fence that is also 4 feet deep is an effective deterrence. The invisible monofilament fence works by surprising deer with a barrier that they can not see.  In my case I had the remains of an electric fence to use to make my outer monofilament fence (I used the leftover electric fence wire).  I have 4 wires spaced out between 1 and 5 feet off of the ground.  For the inner barrier I have a very visible chicken wire fence.  The main purpose of the inner fence is to keep out the smaller mammals.  The chicken wire is partially buried under the mulch (flaring outward) to discourage tunneling into the garden (we'll see if that is enough).

The fencing was immediately effective.  The Sunchokes, Helianthus tuberosa, I planted a month ago had been repeatedly browsed upon, but after the fence was up they started getting taller.  About a week after putting up the fences a deer did breech the fence and it appeared to be a messy result for the deer, judging by the amount of fur left behind on the chicken wire.  I'm hoping that that was a learning experience and that it was sufficiently unpleasant.

Seeds for Peas, Collards, Chard and Lettuce sprouted within a week
and the Tomato and Pepper plants went in yesterday (5/15).

In the Deerproofing book the point is made to put up your deer deterrents before there is something to attract the deer.  So now that I've had the fence up for a couple of weeks I've started putting out the vegetables.

This year I am planning the garden based on companion planting ideas.  The plants in each of the 4 rows should all get along.  Here's whats going in:
Row 1:  Winter Squash, Snap Peas, Chard and Collards with Winter Savory
Row 2:  Pole Beans, Lettuce, Zucchini, Corn Salad and Arugula* with Nasturtums
Row 3:  Sunchokes, Tomatoes, Basil and Lettuce with Marigolds
Row 4:  Tomatoes, Peppers, Shallots and Garlic with more Nasturtums

*Arugula is in the cabbage family and may not be a good companion for the pole beans.  I should be harvesting these while young, so they may not interfere with the beans as they mature.

I'll plant the bean and squash seeds in a week or two (when the soil gets a little warmer and I should have the pollinator border plants by the end of May.