Friday, August 23, 2013

Mid-summer's Little Blooms

In the middle of summer there are many big blooming native plants like Cone Flowers and Black-eyed Susans.  A next post I will take a look at some of the 'prettier' natives that are in bloom now.  But this post I will show you some of the natives blooming with small pale or white flowers.  Many of these could be considered weeds, but I had not ID'ed many of them before, and, of course as native species they are part of the 'original' ecology of the area.

This Virginia Stickseed is about 2 feet tall.  The horizontal
sprays of seed pods give it a unique texture.
The first plant that literally caught my attention was Virginia Stickseed, Hackelia virginiana.  As I was clearing stilt grass from a planted area several branches from this plant caught hold of my sleeve.  When I pulled back These branches broke off, transferring the sticky burr-like seeds onto my shirt.  Originally about 4 feet tall, parts of this plant fell over due to the weight of seeds.  Rather than noticing the small white flowers, what I see now is a a textural affect from the horizontal branches laden with burrs.
Here you can see the progression from flower to burr.  This bee fly is a pollinator
 for many small flowers.  Its larvae are parasites that feed on other insects.


This plant has a highly branched forms, others
in less disturbed areas grow as a single upright stem.

Nearby was one of my favorite little natives, Indian Tobacco, Lobelia inflata.  It is not really showy.  The blue flowers are not very big and the small flowers are spaced widely on the stalk.  What I think is so cool are the swollen ovaries (hypanthium) that form after the flower fades.  This feature is the reason for the species name, inflata.  This plant is used as an herbal remedy for many ailments, particularly as an emetic, but it is also quite toxic.  I've tried growing these from seed indoors under lights with limited success.  It seems to grow better as a 'weed', than as a cultivated plant.

Here you can see both the pale blue flowers
and the inflated hypanthium.

The coarsely toothed, oppositely arranged leaves
on long petioles are similar to those of nettles.


White VervainVerbena urticifolia, has spikes of tiny white flowers.  The plant has a rough appearance with its large, coarsely toothed leaves.  The species name uricifolia refers to it having nettle-like leaves.  This is not a particularly attractive plant, but its flowers are visited by a variety of bees and its seeds are consumed by birds.

Here's a closer view of the flowers of White Vervain.  It seems like the tips of the flower stalks are the place for small insects to hang out.

The current botanical name for this
Horseweed is Conyza canadensis.


When I looked past the white Vervain I saw what thought was more of the same, but on second glance I realized that I had yet another plants with little white flowers.  I keyed this one out as Horseweed, Erigeron canadensis, which has been updated as Conyza canadensis. On examination its form is very different from the verbena, with narrow leaves occurring alternately along the stem.  The main similarity was that the flower stalks originated from the leaf axils.  Similar to members of the genus Erigeron, its flower is composite type with many small rays.  This annual is commonly seen in waste areas and fence rows.

A green sweat bee visiting a Horseweed flower.

My last plant for this post was discovered with its flower stalk sticking out of some berry vines in a woodland edge habitat.  Normally I leave a plant in place until I know what it is, but this one had me worried.  It had characteristics of Polygonum (Knotweed) and with its white flowers I immediately thought of Japanese Knotweed.  When I brought the cutting in for examination I learned that it was actually a native knotweed, Polygonum virginianum, aka Jumpseed or Virginia Knotweed.  It is also known and sold as Persicaria virginiana and Tovara virginiana.  This particular specimen had dark green leaves; however many plants have a red chevron on otherwise green leaves.  

This stem got beat up a bit after I pulled it out from a mass of wineberries.
I would have left it alone had I known what it was.
Of these five natives, I think Jumpseed is the most easily adapted to a landscaped garden.  In addition to the red striped leaves and more compact habit, the long flower stalks (up to 3 ft) turn from pale yellow to red as they age.   A cultivar with particularly strong red markings is called 'Lance Corporal'.  Another cultivar called 'Painters Palette' has multicolored leaves.  The biggest negative is that it can reseed vigorously.  Jumpseed does well in dry shade.  I had a client in the Boston area with a large patch of these growing on the north side of the garage in full shade.   I will keep an eye out for more of these so that I can see how the red color develops on the flower stalk.


Thursday, August 8, 2013

Lessons from my Collards

An isolated collard plant looks
relatively healthy.
I've been trying to manage my vegetable garden with as few chemicals as possible.  I have been relying on companion plantings and predatory insects to help with the number of pests feeding on the vegetable plants.  I have also left some nearby areas unmown as habitat for predators.  In addition I have a jug of soapy water to collect some of the beetles, stink bugs (BMSB) and Harlequin Bugs.  The Harlequin bugs feed on members of the mustard family, this means the collards and arugula in my garden.  The arugula show little damage, but the collars have taken a beating.  This bug sucks the sap from the plants, leaving disfigured foliage behind.  The cabbage moth caterpillars have also had a field day, eating away at the damaged leaves.

The other day I noticed that some of the collars looked much better than the others.  These were the ones located at the end of the row and one that had been accidentally planted away from the rest.  It appears that by planting these leafy greens closely together the feeding insects can go easily from one plant to the next with little exposure to predators.  Access to the plants on the edges requires more work and more risk.  This is a general problem when planting monocultures.  While they are easier to maintain and harvest, they are susceptible to mass attacks by pathogens or predators (herbaceous) that can easily jump from plant to plant.


The Collards in the row have taken a lot of damage.  The Chard (red stems) is in pretty good shape.
   
Next year I will space my collards out into short rows of 3-4 plants surrounded by plants from a different family, which should have a different set of pests.  This year I have a long row of Swiss Chard flanking the collards.  I have been very impressed by the performance of the Swiss Chard 'Bright Lights'.  They seem to have fewer pests and the plants have been providing a long season of harvest.  By just picking the outer stems, a fresh crop will be generated from the center.   


This Wheel Bug is just hanging out on the top of an Evening Primrose, Oenothera sp.
Maybe it will grab a nearby Japanese Beetle.
Since I am depending on natural predators for pest control, I have been trying to learn which ones are out there.  One of the more frightening looking species is the Wheel Bug.  I've shown photos of the nymphs before.  Now the adults are showing up.  These beneficial insects can deliver a painful bite if annoyed, so I have been admiring them with my eyes only.

The pupae of a parasitic wasp have been feeding on this Horn
Worm for a while.  It is starting to shrivel up.


A few weeks ago I started seeing the Tomato Hornworm on the tomatoes.  The first few I plucked off and squished.  About the 3rd week of July, I noticed that they were carrying cocoons of a parasitic wasp.  Now I leave these in place so that the wasps could come to maturity.  Since that time I have only seen a couple of worms that were not infected by these wasps.


Looking out the second floor window I noticed this ground beetle.  I have determined what species this is, but these large (>1 inch) beetles eat other insects and their eggs.  These are found primarily undercover in the leaf litter.  
Don't know why this beetle is patrolling the pool cover.
The Chinese Chestnut leaf is for a sense of scale


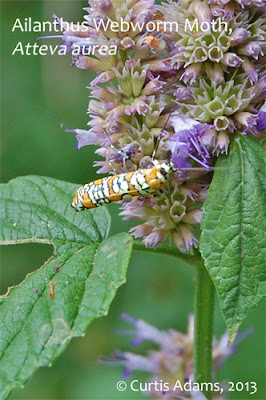
This moth shown on an an Agastache
measures about 1 inch long.


This last insect is not a predator in the normal sense.  The Ailanthus Webworm Moth, native to tropical parts of the Americas, is a useful pollinator. What I like about it is that it's larva feed heavily on the invasive Ailanthus altissima (Tree of Heaven).  The natural food source for this insect are trees of the Simarouba genus.  It turns out that Ailanthus is a member of the same botanical family and this is close enough for these webworms.  This insect does not overwinter too far north of Florida.  I never thought I would say, YEA! for a webworm.

Saturday, July 27, 2013

Water for the Potted Plants

We have a much larger and sunnier deck than in our old place so we have nearly doubled the number of pots to make an impact in that space.  In general I chose plants that like it on the dry side and will recover quickly if they get dried out.  Also these plants do not need to be deadheaded to continue blooming; however the Pelargoniums do look neater when they are cleaned up.

Here are a couple of photos of my compositions for full sun.  Aside from the Pelargonium cultivars these plants are all derived from North American species.  These Medallion Flower are doing quite well.  I've had mixed results with these.  I think they like warm moist sites.  This is the first year I've had the 'Evolution' Salvia, I usually get 'Victoria'.  They are doing well and I would not hesitate using them in the future.  This is the second year for 'Profusion' Zinnias.  These are great for pots low growing and dense, a great 'filler' plant.

Starting from the bottom are: Lantana camara 'Luscious Berry Blend',  
Melampodium padulosum/divaricatum (Medallion Flower), Zinnia 'Profusion',
  Pelargonium 'Balcon Princess', and Salvia farinacea ‘Evolution’


Here are more Zinnia 'Profusion' with Salvia splendens cultivars
and Salvia farinacea ‘Evolution’ backed up by Pelargonium 'Merlot'

Being in full sun these plants are in need of regular watering.  While there is a spigot nearby, we really did not want to deal with a heavy garden hose.  When we saw one of those light-weight expanding hoses in the store (as seen on TV) we thought it would be perfect.  At 50 feet it could reach from one end of the deck to the other with room to spare and its light weight would make it easier to maneuver and store.

The first few times we used it were OK, just a little leaky, but what the hey.  However, by the fifth time out the hose was hemorrhaging water at the nozzle end fitting.  I just waved the leaking nozzle end over the plants to water them.

Water is no longer coming out of the end of the hose.
The inner rubber hose broke free of the nozzle.

The inner hose expands like a water balloon


At this point I should have found the receipt and took it back to the store, but I really wanted to find out if I could fix it.  My opportunity came when the inner hose totally separated from the nozzle.  Now something had to be done!  I cut off the end or the hose to reveal a super stretchy rubber tubing about 1/2" in diameter.  This expands like a balloon under pressure and is kept in check by the nylon mesh outer hose.  The problem was that the original attachment to the male fitting was not done well.  Since I had some repair fittings for a 1/2" hose I thought I would give that a go.


My first attempt with the repair kit worked, so I got a male coupling from the store, 'slipped' it on and thought I was all set.  On closer examination of the on/off fitting supplied with the expandable hose, I found that it was leaking in two locations.  Not just at the valve, but also at what appeared to be a stress crack in the body of the fitting.  This was troubling but not entirely unmanageable.


The rubber hose was stretched over the 1/2 inch coupling, then the nylon outer hose was pulled into place.
The two-piece clamp was screwed tight and this seemed to hold well even under pressure.
I then replaced the coupler with a male fitting.
Note the two spots where the
on/off valve is leaking.


What turned out to be the killer was the catastrophic failure of the hose that occurred while I was taking the the photo of this fitting.  The nylon outer hose gave way allowing the inner balloon hose to burst.


The first image is of the hose conveniently rolled up into an extra flower pot.
Next is after the water was turned on and the hose was pulled out and tested in the photos above.
The last image is 2-3 minutes later when the outer hose failed, allowing the inner hose to burst.

 Since I had the coupling kit on hand,  rather than tossing out the hose, I chose to repair it one last time.  Now I am just using it to water the pots without putting any pressure on the hose (i.e. no nozzles or on/off valves).  I may have been partly to blame for this last failure, since the hose was not allowed to expand freely under pressure.  While I love the concept of this hose, mine was not particularly well made.  I will continue to use this one without putting pressure on it.

If you have one of these that has failed, it may be repairable.  If you don't have one, proceed with caution, there is more than one brand of this type of hose available.

Thursday, July 11, 2013

White Avens

I have curtailed my trips through the woods since the chiggers have become more active.  This has limited my search for wild flowers to the relatively open places.  There are still plenty of plants that are new to me to identify.  One of these native wildflowers that, while fairly common, is new to me is White Avens, Geum canadense.


This plant is about 2 feet tall and has been
in bloom for at least 2 weeks.


I first noticed this plant along the partly sunny edges of the woods at the end of June.  The 5-petaled white flowers looked like something from the Rose family, but I was pretty sure that it wasn't a cinquefoil (most are yellow) or blackberry (no thorns).  I was able to ID using Newcomb's Wildflower Guide; It has 5 regular flower parts, alternate arrangement of leaves and the leaves are divided into 3 or more leaflets.  I was a little slow in settling on Avens because most of the species in this genus have irregular leaflets that get larger toward the end of the leaf.  White Avens tends to have 3 similarly sized leaflets per leaf.  After the petals fall off a bristly receptacle is left behind.  While interesting close up they make the plant look wild and messy, not the best choice for a formal garden.

After blooming, the ripening seed heads will turn brown
 and give the the plant a wild, ungroomed appearance.


Most of my plants are 1-2 feet tall.  The white flowers bring some contrast to to a shady woodland edge.  They have an loose open habit, so they probably wouldn't well as a focal point.  I think they would work well as background plants.


I have an area under some trees that I nuked with round-up (formerly stilt grass, multiflora rose, euonymus, bittersweet poison ivy and horse nettle).  This may be a good spot to scatter some of these Avens seeds and see if they will fill in as a flowering ground cover.  I have not seen signs of deer browsing on the Avens, but I will need to keep a closer eye on that.


The flowers of White Avens is attractive to a variety of insects.  This image caught a small caterpillar and a fly.  Since it had been raining I think the caterpillar had just fallen out of a nearby tree.  I saw no evidence of the caterpillar feeding.  I annoyed it sufficiently that it left the flower and started crawling down the stem.

White Avens is attractive to bees, wasps and flies.
Not necessarily to caterpillars.


When this caterpillar 'stood up' it gave me a clue that it may be an inchworm or looper.  A perusal images on Bug Guide lead me to believe that this was a Common Pug, Eupitheca miserulata; although I'm sure it is as difficult to assign the species of a bug with a picture as it is to do so with a plant.


The caterpillar 'stood up' when I nudged it,
then inched its way down the stem.

Thursday, June 27, 2013

Co-existing with Nature

There is a conflict between nature and designed human space.  We like to have our nature neatened up and easily readable with beautiful plants arranged just so.  Nature is just do what it needs to survive, with each of its members seeking out their basic needs: food, shelter and reproduction.  Conflict arises when our focal plantings become a meal or natures breeding habitat becomes a lawn.

In putting in our new garden and new plantings I have been trying to work with nature to achieve my design goals and keep our vegetables ‘safe’ without destroying too much habitat or employing chemical weaponry. 

The double fence has been keeping the deer at bay.  The outer border has been planted with seedlings of
pollinator-friendly perennials.  I may not get too many flowers this year as these plants get established.

To help control garden insects I have left some meadow areas intact that provide habitat for predatory insects.  I have also planted a border around the garden with pollinator friendly plants.  In selecting these plants I chose ones that are listed as deer-resistant.  To combat the beetle population I have a jug of soapy water.  This works well on some of the bugs whose escape strategy is to drop to the ground.  I just hold the jug under them and they drop in when nudged.

Here are some photos of predatory insects that are in the yard.  In addition to these I have seen the 6-spotted Tiger Beetle, very cool!
This nymph of a Wheel Bug looks like something from
the movie, Starship Troopers.
This 2-inch mantid was hopping from stem to stem in a patch of
moss phlox as I was looking for a Tiger Beetle.

Compared to the green sweat flies, Long-legged flies are aptly named.  
This 1/2 inch fly is a general insect predator.


Most of the landscape plantings I have selected are not deer favorites.  For those plants that are on the deer’s menu I have been using repellents that are either scent-based (putrescent eggs) or taste-based (capsaicin/hot pepper).  The hot pepper spray seems to be effective at getting the deer or rabbits to stop feeding on a plant even after they have gotten a first taste. 

You can tell deer damage by the ragged edges they leave where they tear off leaves and stems (deer don't have upper incisors).  Rabbits have sharp teeth and will leave a clean cut, or they will consume a plant right to the ground.  

The following are lists of plants that have I have put in that are 1, deer candy; 2, occasionally browsed; 3, not bothered by deer.  It is still early in the season and these comments are based on how they treat the foliage.  Flowers will be another subject (see some comments).  While it is risky to proclaim a plant to be deer proof, I have not seen any damage to the plants on this list (yet).

The buds on this Magnolia were being eaten off
until I put on the chicken wire cage 
1.  Heavily Browsed
Apios americana 
Helianthus tuberosus 
Magnolia virginiana 
Rudbekia triloba 
Campanulastrum americanum* 
Zizia aurea

*These were very small and eaten to the ground so rabbits or some other critters were responsible for this damage. 

The pinnate leaves of the ground nut have been
chewed off in more exposed locations


This Jerusalem Artichoke was being browsed to the ground until the fences went up.
Now (June 27) these are 6-7 feet tall.


This Filipendula was nearly ready to bloom when the deer
ate off most of the upper growth.  Note the rough edge
where the deer ripped off the tip of the plant.

2.  Occasionally Browsed
Achillea millefolium (flowers were removed, the foliage was left behind)
Aronia melanocarpa 
Hibiscus moscheutos (just once)
Filipendula rubra (just once leaves and flower buds, not after hot pepper spray) 
Lobelia siphilitica 
Physostegia virginiana 
This Hibiscus had the tips chewed off, but no more
damage since I applied some hot pepper spray.
Rudbeckia hirta 

(The Lobelia had been untouched until yesterday.)


3.  Resistant, so far
Aquilegia canadensis 
Asclepias tuberosa 
Asclepias incarnata 
Ceoanthus americanus 
Chamaecrista fasciculata  
Chelone glabra 
Dicentra eximia 
Hedeoma pulegiodes 
Iris versicolor 
Monarda didyma 
Monarda fistulosa 
Monarda punctata 
Spiraea alba 


As far as keeping the critters out of the garden, the double fence method is still working.  I’ve been able to harvest snap peas, lettuce, chard and collards, so far.

I did notice some evidence of moles digging around the property.  For these I put down a perimeter treatment of MoleMax, a castor oil based product that moles and other burrowing species do not like. 


Thursday, June 6, 2013

Discovering My Invasives

As we are coming into late spring and I have been marveling about all the native plants I have found a crop of invasive plants has manifested themselves.  I know some of these were lurking out there, others were plants that I had misidentified, but have now reveled themselves now that they are in bloom.  Here a run down on what I've got, but wish I hadn't, and I plan to do about it.

Multiflora Rose, Rosa multiflora, is scattered around the property, mostly in the woodland edges.  These roses can be identified by their frilly stipules (leafy appendages at the base of the petioles), but now are very obvious by the clusters of fragrant, small white flowers.  I had hoped that I had some native roses out in the field, but so far it looks like they are all Multifloras.

Left to its own Multiflora Rose will send stems high into a tree.  
For the plants out in the open I am continuing to mow over them.  For the more established plants I will cut and treat the stumps with concentrated Round-Up in August.  I will do an earlier cut on some plants to prevent this crop of seeds from maturing, but I want to leave enough for easy application of the herbicide later in the season.


It turns out that a couple of small trees that I thought were Pin Cherries are actually Autumn Olives, Elaeagnus umbellata.  My mistake was made clear at the beginning of May when these plants were coming into full bloom.  I was drawn to the wonderful sweet scent.  When I saw the flowers I realized that what I had was definitely not a cherry of any kind.

These two Autumn Olives are nicely situated on either side of a path.
I'll cut them down soon and replace with something native,
maybe Winterberry Holly and Tupelo

These fragrant tubular flowers
were very popular with the bees.


I decided to let these finish flowering before cutting them back to a stump and then treating the fresh cuts with Round-Up concentrate.  This seems to be a pretty general method for killing undesired shrubby vegetation.  I did this to a very large Euonymus alatus in mid-March and I have seen very little if any regrowth so far this season.


When we first moved in last fall I noticed a lot of honeysuckle vines growing everywhere.  I had hoped that they were the native Coral Honeysuckle, Lonicera sempervirens.  There were no berries present (Japanese Honeysuckle has black berries, L. sempervirens has red berries) so I couldn't tell by that.  Also a cross section of the stem appeared to solid, not hollow, so I assumed it wasn't Japanese Honeysuckle.  Now that they are coming into bloom with their sweet-smelling white flowers, I see that I have a lot of the invasive honeysuckle.  A check of the stem shows that these are in fact hollow, so looking at the cross-section of the stem may not be a great late season indicator for this species.

Japanese Honeysuckle flowers start off white, then turn yellow after a couple of days.

I'm not sure what approach to take on all the trailing stems on the ground.  Pulling and late season herbicide applications can be effective (as long as the leaves are still photosynthesizing).  In the interim I have been cutting the stems of the vines up in the trees to minimize seed production.

Garlic Mustard, Alliaria petiolata, is well establish in the wooded areas on and around our property.  I am trying to remove all of it from an area before moving on to a new area.  This is a more effective strategy for elimination than just pulling a few plants here and there from a much wider space.  The seed heads are just about to mature so it's time to take a break from pulling.  If you are pulling plants that are shedding seeds, it's kind of like planting more of them.


Year old rosettes of Garlic Mustard remain green here over the winter.  This gives me the option of either pulling or spraying when most of native plants are dormant.  Because of the diversity of native plants in the woods, I will continue pulling up any Garlic Mustard I see each spring and fall.  this will be a multi-year effort.
Same area after clearing.  The ground plane is now opened up.

Note the white center vein on the leaf.
Japanese Stilt Grass is wide spread in this area.  It fills in shady borders with a dense mass that can smoother out other plants.

As an annual it can be controlled if you can keep it from going to seed.  Cutting it back when it begins to flower in late summer can keep it from successfully setting seed.  Cutting it back earlier may stimulate earlier flowering.  For plants in the woods I will go after them with the weed wackier in August. This grass has a weak root system and is easily pulled up, but there is just so much!

This is a very leafy grass and is soft to the touch.  The shiny mid-rib is a feature that sets it apart from other grasses


This is a recently opened-up area where the stilt grass is going to town.
It is joined by some garlic mustard and  bittersweet.
The near-by poison ivy is slowing my progress here.


Note the triangular leaves of Mile-a-minute vine.
There are nasty thorns forming on all  parts of this vine.


Mile-a-Minute Vine is a very fast growing invasive.  Once I noticed it I took some time out from writing this post to pull it out right away.  It is really important to do this before its many thorns begin to harden.  In my enthusiasm I accidentally pulled up a new Redbud tree, because its heart-shaped leaves looked similar to the triangular leaves of Mile-a-minute.

To combat this invasive, a weevil has been introduced and has been found to be very effective, and selective, at consuming this plant.  I examined the plants I pulled but saw no signs of this insect.  

To keep from going crazy I've realized that these invasives did not appear overnight and that any reasonable action is a step in the right direction.


Thursday, May 16, 2013

The Garden is 'IN'

Mother's Day has past so now it time to be planting the vegetable garden.  At least that is the tradition for many.  This year we had to days with frost warnings immediately after Mom's Day.  But now the weather is on an apparent warming trend.

In early March I laid out the beds for my new garden using techniques described in Weedless Gardening by Lee Reich.  The goal was to avoid having to till the new garden and remove all the grass and weeds.  The result has not been entirely weedless, but the amount of buried vegetation coming through has been manageable.  I think if I had waited until the grass had begun to grow and use up some of the energy stored in the roots there may have been few 'weeds' poking through.  More of the buried vegetation is working it way up along the seams between the cardboard and paper layers.  So for now I am just pulling off the tops of the grass and weeds to keep them from generating any new energy.

The fences are up and the garden is ready for planting.
Pollinator plants will go in along the outer fenceline.

The second phase of establishing the garden was to put up the fencing to keep the wildlife out.  My biggest concern is the deer, but there are plenty of other varmints (rabbits and ground hogs) to deal with as well.  I got a copy of Deerproofing Your Yard and Garden by Rhonda Hart.  I found this a very useful book that explains how deer operate and how manage them.

Separation between the fences is 3 ft, however 4 feet is commonly recommended.
Note the new compost enclosure in the back left, made from old wooden pallets
(Idea thanks to Washington County Master Gardeners).
The method I am trying out is a hybrid of the double-row fence and the invisible monofilament fence. The idea behind the double row fence is that while deer can jump high or long, they can't do both.  So a 4 foot fence that is also 4 feet deep is an effective deterrence. The invisible monofilament fence works by surprising deer with a barrier that they can not see.  In my case I had the remains of an electric fence to use to make my outer monofilament fence (I used the leftover electric fence wire).  I have 4 wires spaced out between 1 and 5 feet off of the ground.  For the inner barrier I have a very visible chicken wire fence.  The main purpose of the inner fence is to keep out the smaller mammals.  The chicken wire is partially buried under the mulch (flaring outward) to discourage tunneling into the garden (we'll see if that is enough).

The fencing was immediately effective.  The Sunchokes, Helianthus tuberosa, I planted a month ago had been repeatedly browsed upon, but after the fence was up they started getting taller.  About a week after putting up the fences a deer did breech the fence and it appeared to be a messy result for the deer, judging by the amount of fur left behind on the chicken wire.  I'm hoping that that was a learning experience and that it was sufficiently unpleasant.

Seeds for Peas, Collards, Chard and Lettuce sprouted within a week
and the Tomato and Pepper plants went in yesterday (5/15).

In the Deerproofing book the point is made to put up your deer deterrents before there is something to attract the deer.  So now that I've had the fence up for a couple of weeks I've started putting out the vegetables.

This year I am planning the garden based on companion planting ideas.  The plants in each of the 4 rows should all get along.  Here's whats going in:
Row 1:  Winter Squash, Snap Peas, Chard and Collards with Winter Savory
Row 2:  Pole Beans, Lettuce, Zucchini, Corn Salad and Arugula* with Nasturtums
Row 3:  Sunchokes, Tomatoes, Basil and Lettuce with Marigolds
Row 4:  Tomatoes, Peppers, Shallots and Garlic with more Nasturtums

*Arugula is in the cabbage family and may not be a good companion for the pole beans.  I should be harvesting these while young, so they may not interfere with the beans as they mature.

I'll plant the bean and squash seeds in a week or two (when the soil gets a little warmer and I should have the pollinator border plants by the end of May.