Tuesday, May 14, 2019

New Plants for 2019

Top and left are the female 'Blue Rug' junipers, lower right is the
supposedly male 'Andorra Compacta'.  Normal bloom time
for these is late May to early June.  So I will keep an eye out..
I had an established planting of creeping juniper, Juniperus horizontalis, die back last year.  This may have been due to a number of factors, but I think mostly the very wet weather causing the soil to stay very moist for most of the year.  While many folks poo poo junipers as too common, they have their place.  They are a durable, low-maintenance ground cover for sunny, dryish locations.  This species is native to the northern third of the US and most of Canada.  Their usefulness and adaptability has, however, made them a staple in the landscape trade.  One thing you don't see too often is berries on these plants.  Like other junipers, creeping junipers have separate male and female plants.  Ever since seeing cedar waxwings last year I have been looking to have more bird berries on our property.  To the extent that I could find gender information, it seems that most creeping juniper cultivars are female, such as the very popular 'Blue Rug' cultivar (aka 'Wiltonii').  Digging through the literature I found mention that the cultivars 'Bar Harbor', 'Blue Horizon', 'Plumosa' and 'Andorra Compacta' are male (or at least may be male).  In addition to a bunch of 'Blue Rug' junipers I was able to get an 'Andorra Compacta' to serve as a breeding partner. Now by having both male and female cultivars there is a better probability that berries will be produce to help support the winter bird population. 


These large-flowered bellworts came into bloom
just after our mid-season daffodils.
In an area just outside our kitchen window we have a large, somewhat wild perennial garden backed up by pine trees.  The shadier areas are dominated by several species of lamium and ground ivy.  I have had some success with shade-tolerant goldenrods here, particularly blue-stemmed and zigzag goldenrods.  To introduce some more natives to this area of potentially dry shade (assuming it will stop raining at some point), I ordered a few large-flowered bellwort, Uvularia grandiflora, as bare root plants.  We'll see how well these compete.  They have done well so far, all of them sprouted and bloomed this first year.


They say, planting trees is planning for the future, even one that I am not likely to see.  I have been dismayed that some of the big old trees here are dying.  Don't know if it's just their time or if there is something going on.  Besides the loss of their biological function, many of these trees are on a slope where they are helping to hold the soil.  Emerald Ash Borer is definitely one of the problems, causing a early death of many established ash trees.  But we have lost some big oaks and black cherries as well.  Besides these trees going away I am also actively targeting the invasive Alianthus trees and this is opening up the canopy even more.  While natural succession is kicking in, this is slowed by the number of deer that eat the tree seedlings.  I am more than a little concerned how many of these seedlings will reach maturity.  So I am looking for some shade tolerant trees that I can put in and protect to help nature along. 

I got these bare root American beech in the
ground the day they arrived. 
In the woods right now there are a lot of new beech trees, Fagus grandifolia.  These are quite shade tolerant, and seem to be well adapted to our location.  I found a source of bare root beech trees in southern Virginia, Mid-Atlantic Natives, so I ordered a few to see how that works out.  They were planted in early March and are just leafing out now, a bit behind the established beeches.  Beech are fairly slow growing trees, but will mature to be dominant elements in the canopy. 


These are the maple seedlings I gathered from around the property.  These may include
Red, Sugar, Silver and the hybrid Freeman maples. (Also one tulip tree in the mix.)
Red maples, Acer rubrum, are also quite shade tolerant but are much faster growing.  I am looking to add a few of these to fill in the gaps.  Sugar maples are another possibility.  These are slower growing, but better adapted to the near neutral soil pH we have here. (Based on the natural distribution of trees here (Box elder, Hickories, American hornbeam and Tulip tree) soil pH is probably running 6-7.5.)  My regular source of native trees, Stadler Nursery, is cutting back on its supply of reforestation plants (I don't know why), so I decided to harvest some of my own seedlings and nurse them along a little before planting them out.  I've got several species of maples growing here, so at this point I can't say for sure what each of these seedlings are.  Tulip trees also do well here and I've got lots of these seedlings too, so I could move those to some of the more open areas in the woods.

This Henry's Garnet Virginia sweetspire has flopped a little due to the weight of the rain. 
It is nearly full height, at 4' and should spread to about 6'. 
The racemes of white flowers are about to pop.

Another area that I have been trying to bulk up with native species is a  slope that has been built up with sandy clay and is dominated with Japanese stiltgrass, Japanese honeysuckle and garlic mustard.  I've been putting divisions of wild bergamot, Monarda fistulosa, and they are taking hold. I am focusing on shrubs that are colonizers.  These spread out by underground shoots and should help stabilize the soil to erosion.  This year I'm adding a Henry's Garnet sweetspire, Itea virginica 'Henry's Garnet', gray dogwood, Cornus racemosa, and some bare root smooth sumac, Rhus glabra.  Unfortunately my deer do like to munch on these so I need to stay on top of these with either fencing or repellent sprays until they get established.

Since deer like to browse on my gray dogwood I
put some fencing around this one right away.
You can see that the leaf buds on this smooth sumac
are about to pop.  I should get some fencing around this
one soon (in addition to the repellent spray).

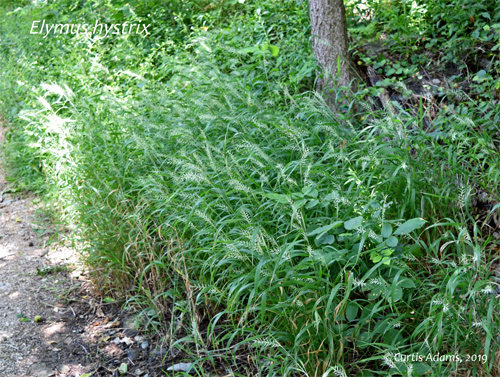
In my battle with Japanese stiltgrass, I am planting native species to help displace that invasive grass.  One grass that does well in shadier locations is bottlebrush grass, Elymus hystrix.  I started some from seed this winter and planted them out in early spring.  These make take a year to get established, but should help fill in areas where the stiltgrass has been (is being) removed. 

I started this bottlebrush grass from seed in February and planted it out in April.
It may not get too big this year, but should form a dense clump next spring.

Last year I put in a Red Sprite winterberry holly along a sloping path.  I already had a mate, the early blooming Jim Dandy cultivar, Ilex verticillata 'Jim Dandy'.  To improve berry availability for winter time birds I added another early blooming female cultivar called Afterglow, Ilex verticillata 'Afterglow'.  This cultivar is also compact, like 'Red Sprite' and is supposed to be very dense with flowers and berries.


Also on the holly front, I put in some inkberries, Ilex glabra, in a shady location, near an English walnut tree, last year.  Of the three cultivars I put in, Shamrock and Nigra did well, but the Densa cultivar died.  I don't know if it was just the amount of shade or sensitivity to the juglone from the walnut.  I replaced it with another Nigra cultivar this spring, so we'll see if that one does better.  


Saturday, April 6, 2019

Stiltgrass actions for Spring 2019

I have been battling Japanese stiltgrass, Microstegium vimineum, for the past 5 years or so.   Pulling stiltgrass out, particularly in late summer, in the shaded woodlands has been effective in reducing the amount of stiltgrass over several years.  Getting it out of the lawn is another matter.  I've tried raking it out in late summer, and over planting with more desirable grasses (particularly fine and tall fescues).  This has helped, but stiltgrass as a warm season annual, is very adept at filling any gaps in the lawn starting in mid-spring.  While I really like the look of the fine fescues,  particularly the no or low-mow fescue blends, these are slow to establish.  The tall fescues are more aggressive than the fine fescues.  When over-seeded in late summer, these do a better job of getting established and filling in the gaps. 

The area outlined in black has been burned with a garden torch in late summer for the past two years. 
The control patch in the middle was not burned; it has slightly less coverage with perennial grasses.

More recently I've used a garden torch in late summer to eliminate it before it can set seed.  This has been somewhat effective but that is not so practical for a large area.  

Last year I used a pre-emergent herbicide, like those you would use for crabgrass, for the first time.  It was very effective at suppressing the stiltgrass for an entire season.  (I should say that the chemical's effect is probably gone after 2-3 months, but by that time the stiltgrass germination rate has dropped.)  Other perennial grasses were able to start filling in.  I will expand the area of application this year and also test it in some of the meadow areas, as well.

The treated areas have a little more coverage with perennial, mostly cool season, grasses than the untreated areas. 
The brownish spots are mostly zoysia or nimblewill, both warm season species.

While Japanese stiltgrass has a very high rate of germination, I expect that there may be some that waits a season of two to germinate, so these pre-emergent herbicide treatments may need to be repeated for several years.  I will try to leave a small area that I treated last year  untreated this year to see how strongly the stiltgrass comes back. 

In a blog post last year I mentioned several pre-emergents that were effective.  This year I will be using the same as last year, dithiopyr, sold as Dimension.  It has the advantage that I could find it alone, without added fertilizers.  Also, it was less expensive than Preen garden weed preventer (trifluralin).  Timing-wise, the general recommendation is to put the pre-emergent herbicide down when the forsythia are in bloom.  Last year I did this on the early side, just before peak bloom.  This year I will wait just a little later.  My thought is that this will give the existing grasses a little more time to spread before I put down the herbicide, which works by inhibiting new root growth near the soil surface.  I recently found a website that give guidance on when to apply pre-emergent herbicides and other turf related IPM activities called GDDTracker.  A nice feature is that it compares the current and previous year's temperature histories.

I will also try the pre-emergent herbicide in an area that I mow only once a year then leave to grow as a meadow.  In one section I burned off the surface debris.  Half of this I will treat with the pre-emergent, the other half will be untreated (Burn Only).  I will also treat an unburned area with the herbicide to see if burning makes a difference.  The rest of the meadow will serve as the 'control' group.  I am a little concerned about using the pre-emergent herbicide in' wilder' areas.  It could have a negative effect on some of the native annuals there like sweet everlasting, Pseudognaphalium obtussifolium, and yellow fumewort, Corydalis flavula.  But, then again, the stiltgrass has a definite negative effect.

Here is a section of my 'Mown Meadow' where I will do a Stiltgrass/Pre-emergent experiment.  This will give me an idea of how much prep work is needing in this wilder area.

Another action that I will be doing is to plant some bottlebrush grass seedlings, Elymus hystrix, into areas that are infected with Japanese stiltgrass (some herbicide treated, others not).  Bottlebrush grass does particularly well in open shade, conditions that Japanese stiltgrass excels in.  Just removing the stiltgrass alone is not enough, I need to establish some desirable native species to keep the stiltgrass out.

Thursday, March 7, 2019

Eastern Bottlebrush Grass

Bottlebrush grass, Elymus hystrix, is a pretty common native species found in open shade and woodland edges in Maryland.  Its native range is from Maine to Georgia and westward to the Great Plains.   It is a cool season grass, meaning that it begins grows actively when soil temperatures are between 50 and 65 F.  Attractive seed heads are produced in June and these often persist into the fall.  Like most cool season grasses it shuts down in the heat of summer, but comes back to life in the fall, sometimes staying green all winter.  I am looking at using this grass to help fill in the woodland edges after removing the invasive Japanese stilt grass, Microstegium vimineum.  Ideally once it gets established it will grow up and shade the ground before the stiltgrass germinates later in the spring.

Eastern Bottlebrush Grass at the end of June growing along a trail near Harper's Ferry, WV

Rather than buying new seed, I harvested some from my existing plants last October and stored them dry in a refrigerator at about 42-45 F.  They were left there until I planted them in mid-February under lights.  Bottlebrush grass seeds do not require moist stratification to get them to germinate, just cold storage for a few months.


Since I have had less than stellar success with starting seeds I thought I would compare different ways of planting the seeds and see how well each germinated.  This was a limited study with only 8 seeds under each of 8 conditions.  All were planted in a soil-less seed starting mix and put on a warming pad to give a soil temperature between 65 and 70 F.  The long awns on the seeds, which give the brush effect, are not easily removed.  I pulled the awns off of each individual seed.  For these I planted one set vertically, and the next horizontally, each about a quarter inch deep.  The third set I planted vertically about a half inch down.  I repeated these conditions using seeds with the awn still attached.   


Here's the first leaf of Eastern Bottlebrush Grass.  The inital shoot has a reddish
 tinge that makes it harder to spot on the dark background. 
The last set of seeds were moved to a colder refrigerator for about a month.  I thought this might simulate winter conditions better.  One set of these I cleaned and planted horizontally, and the other was with the awn attached and planted vertically. 

Seeds began germinating after 9 days.  Rather than going into too many details the results indicated that seeds that were cleaned germinated more quickly, but after a month there was little difference between cleaned and uncleaned seeds.  Where I did see a difference was with colder storage.  Seeds stored in the back of the refrigerator germinated at half the rate of the others stored at about 44 F.  I suspect at the back of the frig, where the coldest air comes in, temperatures would sometimes drop below 32 F.


Now I have about 30 plugs of a native grass that I can grow on to use in my battle against stiltgrass.

Saturday, February 2, 2019

Garden Trellis

My vegetable gardening style is on the wild side.  I give maybe too much weight to reseeded native flowers over food producing plants.  I start out with grand expectations of neat rows, but inevitably weeding the garden becomes less important as other tasks loom.  In fact this year I got things nicely cleaned up with weeded and fertilized beds and mulched paths.  Unfortunately reality struck with a cool wet spring that offered few pleasant days to keep the garden neat and clean.

I got the garden all cleaned up in April of 2018 with great intensions
 for keeping it neat, but ...
One way to bring order to the garden is to add visual structural elements.  These add focal points or visual anchors that rise above the clutter.  In past years I've used fallen limbs to create tripods to support beans, cucumbers and tomatoes.  Since these were not well anchored, they end up falling over as the season wears on.  This year I decided to build some semi-permanent tripods that could be left standing for a couple of seasons and could be easily repaired if and when the time comes.

Schematic for my garden trellis.  Parts include 2x2 wooden legs, 3" diameter PVC pipe,
 6" wood square, some 2.5" deck screws and a bag of coarse sand.

I liked the idea of using tripods.  They are easy to build and structurally sound.  Here is a schematic plan that I came up with for my tripod trellises.  I wanted to build it out of 2 by 2 cedar, but it was not readily available in long lengths.  Being somewhat impatient I got 2 by 8 pressure treated boards that I ripped into 3 1.75" wide pieces about 7.5' long.  Before ripping into thirds, I cut off a 6" piece (actually 6" x 7.5") to make the top support.  I trimmed this rectangular piece into a hexagon on the band saw and angled 3 of the faces at 12° to match the angle of the tripod (see the diagram).


Completed intallation of tripod legs.  Having the PVC sleeve
 above the soil level helps keep the sand clean.
 Rather than driving the trellis directly into the ground, where constant contact with wet soil would accelerate rotting of the wood, I put in a length of 3" PVC drain pipe that I would later fill with sand to make well draining fill that would also hold the trellis firmly in place.  (Note that the thinner schedule 40 PVC drain pipe can be used rather than schedule 80, since you are just forming a soil barrier.)  To further improve the weatherability I also painted the lower 2 feet of the wood with a water seal coating. 

My biggest mistake last year was getting started too late in the season, after the garden had started growing. To put in the PVC liners in the established garden I used a trenching shovel (about 3" wide) to dig a fairly narrow hole in at a roughly 12° angle and 16-18" deep.  I then used the PVC tube itself to remove the last bits of the soil and get a firm fit.  The other two liners were put in 31" away from the first to form an equilateral triangle (see the diagram). 

The top support is attached to the legs
with 2.5" deck screws.  These are easily removed
 if I needed to replace one of the legs.
After the liners were in, it was time to position the legs of the tripod.  With the 3" lined holes there was sufficient wiggle room to get the legs to align.  The top hexagonal support was attached to the legs with 2.5" deck screws. The screws were prepositioned about 9" from the ends of the legs so that I only had to drill them into hexagonal support (into the angled faces).

The completed trellis, with a spiral of twine,
is ready to support these cucumbers.
With the top support attached and the legs in their PVC sleeves I filled in the space between the sleeves and legs with coarse sand.  First I put in about an inch of sand as a base under the legs then finished by back filling with sand to the top of the sleeve with occasional tapping to make sure the sand was evenly and firmly distributed. It took a little over a half cubic foot of sand to to do 4 tripods (12 holes).

Even with this late start I was able to train the tomatoes and cucumbers onto the trellises that I had built around them.

I tied some rubber balls to the blunt top ot the tripod using fishing line. 
The lightweight balls won't damage the plants if they fall off.

Now I am again getting ready for a clean start in the garden.
It's February and the trellis are ready to go.  Well, maybe in a couple of months.


Tuesday, January 8, 2019

What to do with old potting soil?


Here's about half of my potted plants that I do each spring.

I hate to throw out used potting soil.  I have about 30-40 pots in various sizes.  If I were to change out the soil every year I'm looking at buying 150-200 quarts of new soil each time.  Then I would also need to get rid of the used stuff.  In many cases potting soil can be reused for two or three seasons with a little refresher.   Here are three things you can do with used potting soil.

Here's whats left as the growing season ends.  These will all be brought in
under cover to avoid damaging the pots in freezing weather.

Rejuvenate it:  I've reused potting soil for several years.  It does degrade over time and will benefit from being rejuvenated.  The biggest problem is when it gets too dense and no longer drains well.  Can also make it more difficult for roots to grow and it gets soggy.  Old potting soil has also lost whatever fertilizers were there at the beginning, so nutrients will need to be added.  Espoma Flower- or Plant-tone are good organic choices.  Osmacote slow release fertilizer is another good choice, though not organic.  Compost is also a good form of fertilizer, but too much, any more than one third by volume, in the potting mix can decrease drainage and soil aeration.  Last year I tried using alfalfa pellets stirred into the container mix where I was growing tomatoes in pots.  It gave moderate results, but I think I needed to use a lot more or more frequent additions to get sustained results.  (The NPK value for alfalfa pellets is about 3-1-2.)  

To lighten up older potting soil you can mix in fresh peat moss or coir and/or pearlite.  To improve drainage some sand could also be added, but that ingredient does not get depleted from one year to the next.  I am torn about leaving old root balls in the container mix.  They slowly decompose to build organic matter, but they also are places where the soil is denser and they may harbor some plant pathogens.  I am tending to pull most of them out now and throw them into the compost pile.  Also pick out any bugs and weeds that you see.  I've seen warnings about not growing tomatoes in the same soil two years in a row.  This is due to root pathogens carring over from one year to the next.  That being said, I have replanted tomatoes in the same soil and they have survived, but I would recommend following the recommendation if your tomatoes have suffered any fungal disease.  If you believe your soil is infected with pathogens, or if it is loaded with weed seeds it can be pasteurized by warming it to 120 F for 30 min.  This can be done by putting to soil in black plastic bags and placing them in full sun.  Note that the more soil there is in the bag the longer it will take to get up to the right temperature.  

For more tips on reusing potting soil see:  https://www.springpot.com/blog/reusing-potting-soil/

Use it in the garden to lighten heavy soil.  Mixing old potting soil into heavy garden soil is a pretty effective means of adding long lasting organic matter to the soil.  I've done this and even after two seasons the soil is noticeably lighter and easier to work with.  The down side is that any viable seeds from your potted plants are now in your vegetable garden.  As a result I now have scarlet sage and torenia scattered through the vegetable garden.  Had I pasturized the soil this problem could have been avoided.

While my vegetables are planted in neat rows, volunteer seedlings are filling in all the gaps. 
This photo was taken in mid-July so the salvia has not yet reached full size - it gets 'worse.'


Throw it in the composter.  This should be a no brainer, but I had not considered it until I read about doing this recently.  Potting soil adds 'brown' material to the composter.  Since we use our composter mostly for kitchen waste (mostly 'green' or high nitrogen materials), it is in need of 'brown' or high carbon materials to balance it out.  After adding a load of old potting soil I noticed an almost immediate increase in composter temperature.  This practice also carries a risk of spreading seed from the potted plants, but if the compost gets up to temperature (120-140F) for several days most of those seeds will be killed (as will most plant pathogens).

Do you have any other tips for using old potting soil?  I would love to hear them.


Tuesday, December 11, 2018

Inkberry berries


This past spring I replaced some non-native Leatherleaf Mahonia, Mahonia bealei, with inkberries, Ilex glabra.  While moderately invasive, the mahonia did produce a decent crop of berries over the winter which was available to the resident bird population.  I wanted to make sure that these inkberries would also produce berries that the bird could use through the winter. Inkberries, like most other hollies, tend to be dioecious, that is have male and female flowers on separate plants.  Most inkberries commercially available are listed as being female.  The only male cultivar I could find listed is 'Nordic', which was selected for is cold hardiness.  Here in the relatively warm Mid-Atlantic, I couldn't find any for sale.  I did find a mention that you could use another species of male holly as long as it blooms at the same time as the inkberry.  Jim Dandy winterberry holly, Ilex verticillata 'Jim Dandy' (blooming in late May-early June), seemed to be a good fit for inkberries which bloom from about mid-May to mid-June.

The selection of native hollies that I put in to replace the leatherleaf mahonia.  Left to right:
Jim Dnady winterberry (male), Nigra inkberry and Shamrock inkberry (both female)

The selection of inkberries I settled on were two Shamrocks and one each of Densa and Nigra.  The Shamrock cultivars a supposed to top out at around 4' while the other two should grow larger to about 6'.  By having a mix of cultivars I hope to add a little extra texture and variation in height to this planting.  Right next to these I put in the Jim Dandy winterberry, to help with fertilization.

Here's the Shamrock inkberry at the end of May.  Looking closely
you can see some of the flowers have anthers with pale yellow pollen. 
Other flowers are lacking stamen, but have a large central ovary.

This Nigra inkberry has only female flowers.  The flowers are
not in dense clusters like many of the male flowers on the Shamrock cultivar.

At the end of May the flowers on this male winterberry are just opening up. 
This timing overlaps with the flowers on the inkberries.

As the inkberries were blooming I paid attention to when the flowers were opening up on each plant.  To my surprise I noted that the Shamrock inkberry seemed to have both male and female flowers on it.  The Nigra and Densa cultivars appeared to have only female flowers.  I would have thought that if the Shamrock cultivar is typically monoecious (have both flower genders on one plant) then that should be called out in the description of the plant as this would be a great benefit to wildlife gardeners. 

Fast forward to mid-fall and there are reasonable numbers of black berries on both the Shamrock and Nigra cultivars.  I can not say unequivocally that the Shamrock did all the pollination work since the male winterberry was right there in the mix, but at least I have been successful in replacing the leatherleaf Mahonia with a native evergreen shrub that provide berries for the resident bird population in the winter.

Got a few berries on this Shamrock inkberry.  It's missing
 quite a few leaves, my guess would be deer browse.
 Unfortunately the Densa cultivar died back by the end of summer.  Two possibilities are that it was in the shadiest spot of all the newly planted hollies, and/or that it is planted at the edge of the drip line of an English walnut, Juglans regia.  While not as potent as the native black walnut, Juglans nigra, the English walnut does produce juglone, a compound the inhibits the growth of a number of plants, including inkberries.  We'll see how the other inkberries overwinter before I find something to replace the Densa cultivar.


This Nigra inkberry also has a few berries, as expected.  It too
has taken some deer damage.  I've since sprayed them with some deer repellent.  


Wednesday, November 28, 2018

Monarch Successes in 2018

I've been planting native milkweed plants for 5 years here and that while I've seen a few monarch butterflies over the this time, 2018 is the first year that I've actually seen any caterpillars.  While this may have been destined, one thing that was different this year is that I included a couple of pots of tropical milkweed, Asclepias curassavica, into our mix of potted plants.  Since these new plants were on the deck where we could see them easily, it may just have been that the caterpillars were just easier to spot this year.  Or tropical milkweed is a preferred host, so that encouraged the females to lay eggs closer to where we could see them.  These caterpillars showed up around the beginning of August.  This corresponds to the third generation in the monarch migration.  

Monarch butterfly on a tropical milkweed, Asclepias curassavica.
Tropical milkweed is native to South America and has naturalized into tropical areas worldwide, including southern California, southern Texas and Florida.  It is winter hardy in USDA zone 9-11 and can be grown as an annual in colder parts of the U.S.  It has striking red and orange flowers that make it an attractive garden plant and its tender foliage seem to make it a preferred host for monarch caterpillars.  That being said there are a number of reasons to plant more of the native milkweed species rather than planting a lot of this 
tropical species.


Some people have cited concern that this tropical species may interfere with migration patterns, especially in the southern parts of the US.  There, the presence of large tropical milkweed population may fool the butterflies into stopping their migration before reaching their destinations in Mexico.  This has not yet been established by scientific studies.  One negative factor that has been proven is that tropical milkweed can host a parasite that can harm monarch butterfly populations in overwintering butterflies.  I would refer you to this link on parasites on tropical milkweed for a more detailed discussion of this issue.

The authors do not insist that all tropical milkweed be removed, but recommend that all green foliage be removed from over-wintering plants between October and February to prevent any parasites from surviving and infecting any of the northward migrating butterflies along the way the following season.  What would be best is to grow only native species which die back to the ground naturally each year, thus ensuring that there will be no parasites.

The remains of the tropical milkweed after 6
 caterpillars fed on it.

While we were thrilled with seeing the monarch caterpillars, we soon saw that there was a potential crisis developing.  Within a couple of days the caterpillars had totally stripped the potted milkweed plants of all of their foliage.  The caterpillers were approaching maturity (4th or 5th instar) but we still didn't want to risk starvation so close to maturity. 


Fortunately there were the native milkweeds elsewhere on the property.  Since the tropical milkweed was growing in pots, I was able to more the pots to where the native milkweeds were growing and encourage the caterpillars to migrate onto the other plants.  Before moving the caterpillars I tried to do some research into what are the preferred host plants in the Mid-Atlantic region.  Much of the info on the internet is anecdotal but I did find one scientific study that looked at nine North American milkweed species and reported the survival rates for caterpillars reared on each.  Of these nine I knew where I had three of them growing on my property: Common milkweek (A. syriaca), butterfly weed (A. tuberosa), and honeyvine (Cynanchum laeve).  

By August the caterpillars did not seem so interested
 in eating butterfly weed. 
While butterfly weed was among the better hosts based on that study, late in the growing season its leaves are relatively tough compared to my other two species (and much tougher than the tropical milkweed).  By placing the tropical milkweed pots among both common milkweed and honeyvine I was able to coax the caterpillars onto those plants.  

I was able to get the caterpillars to move onto the common milkweed plants.

The honeyvine, with its thin, tender leaves seemed to be a big hit.  This was a bonus for me since the honeyvine, which appeared last year as a weed, is an aggressive grower.  The caterpillars, which are aggressive eaters were a good match for the honeyvine and after a couple of days the vine had been eaten back to an acceptable level. 

Honeyvine is an aggressive vine, similar in habit to bindweed,
except with opposite leaves.  It's native to the
Mid-Atlantic and Mid-Western states.  The small white flowers
have an intense honey-like scent in late summer.


So, based on this year's experience I will try to keep the potted tropical milkweed in the sunroom over the winter so that I will have a head start on growth next spring.  To control potential parasites I will cut the plants down to within 6" of the soil and  remove all leafy sprouts between in late winter.