Showing posts with label Asclepias tuberosa. Show all posts

Wednesday, November 28, 2018

Monarch Successes in 2018

I've been planting native milkweed plants for 5 years here and that while I've seen a few monarch butterflies over the this time, 2018 is the first year that I've actually seen any caterpillars.  While this may have been destined, one thing that was different this year is that I included a couple of pots of tropical milkweed, Asclepias curassavica, into our mix of potted plants.  Since these new plants were on the deck where we could see them easily, it may just have been that the caterpillars were just easier to spot this year.  Or tropical milkweed is a preferred host, so that encouraged the females to lay eggs closer to where we could see them.  These caterpillars showed up around the beginning of August.  This corresponds to the third generation in the monarch migration.  

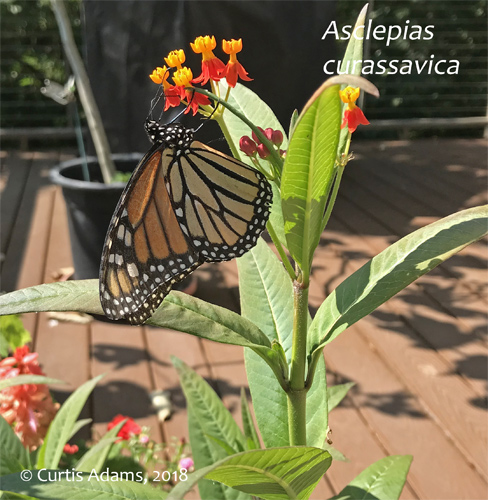
Monarch butterfly on a tropical milkweed, Asclepias curassavica.
Tropical milkweed is native to South America and has naturalized into tropical areas worldwide, including southern California, southern Texas and Florida.  It is winter hardy in USDA zone 9-11 and can be grown as an annual in colder parts of the U.S.  It has striking red and orange flowers that make it an attractive garden plant and its tender foliage seem to make it a preferred host for monarch caterpillars.  That being said there are a number of reasons to plant more of the native milkweed species rather than planting a lot of this 
tropical species.


Some people have cited concern that this tropical species may interfere with migration patterns, especially in the southern parts of the US.  There, the presence of large tropical milkweed population may fool the butterflies into stopping their migration before reaching their destinations in Mexico.  This has not yet been established by scientific studies.  One negative factor that has been proven is that tropical milkweed can host a parasite that can harm monarch butterfly populations in overwintering butterflies.  I would refer you to this link on parasites on tropical milkweed for a more detailed discussion of this issue.

The authors do not insist that all tropical milkweed be removed, but recommend that all green foliage be removed from over-wintering plants between October and February to prevent any parasites from surviving and infecting any of the northward migrating butterflies along the way the following season.  What would be best is to grow only native species which die back to the ground naturally each year, thus ensuring that there will be no parasites.

The remains of the tropical milkweed after 6
 caterpillars fed on it.

While we were thrilled with seeing the monarch caterpillars, we soon saw that there was a potential crisis developing.  Within a couple of days the caterpillars had totally stripped the potted milkweed plants of all of their foliage.  The caterpillers were approaching maturity (4th or 5th instar) but we still didn't want to risk starvation so close to maturity. 


Fortunately there were the native milkweeds elsewhere on the property.  Since the tropical milkweed was growing in pots, I was able to more the pots to where the native milkweeds were growing and encourage the caterpillars to migrate onto the other plants.  Before moving the caterpillars I tried to do some research into what are the preferred host plants in the Mid-Atlantic region.  Much of the info on the internet is anecdotal but I did find one scientific study that looked at nine North American milkweed species and reported the survival rates for caterpillars reared on each.  Of these nine I knew where I had three of them growing on my property: Common milkweek (A. syriaca), butterfly weed (A. tuberosa), and honeyvine (Cynanchum laeve).  

By August the caterpillars did not seem so interested
 in eating butterfly weed. 
While butterfly weed was among the better hosts based on that study, late in the growing season its leaves are relatively tough compared to my other two species (and much tougher than the tropical milkweed).  By placing the tropical milkweed pots among both common milkweed and honeyvine I was able to coax the caterpillars onto those plants.  

I was able to get the caterpillars to move onto the common milkweed plants.

The honeyvine, with its thin, tender leaves seemed to be a big hit.  This was a bonus for me since the honeyvine, which appeared last year as a weed, is an aggressive grower.  The caterpillars, which are aggressive eaters were a good match for the honeyvine and after a couple of days the vine had been eaten back to an acceptable level. 

Honeyvine is an aggressive vine, similar in habit to bindweed,
except with opposite leaves.  It's native to the
Mid-Atlantic and Mid-Western states.  The small white flowers
have an intense honey-like scent in late summer.


So, based on this year's experience I will try to keep the potted tropical milkweed in the sunroom over the winter so that I will have a head start on growth next spring.  To control potential parasites I will cut the plants down to within 6" of the soil and  remove all leafy sprouts between in late winter. 

Saturday, July 4, 2015

Green Milkweed

I've been planting more milkweeds (Asclepias sp,) around our property with mixed success.  Butterfly milkweed, A. tuberosa, has done well and looks great with its showy orange flowers.  Swamp or rose milkweed, A. incarnata, has had trouble.  My deer, for some reason, seen to like to eat up the young plants I put in.  I've resorted to putting wire cages around them so the have a change to get established.  On the wild side we have a small patch of common milkweed, A. syriaca, which are ignored by the deer and doing quite well.

The other day while mowing I was surprised to find a different species of milkweed.  Not as tall as common milkweed and with drooping green flower clusters, I was sure this was something new (to me).

Green milkweed is noted for it's thick oval leaves and
green nodding flower clusters that hang from the leaf axils.

I checked a couple of guide books and am pretty sure what I found is Green Milkweed, A. viridiflora.  This is a fairly common species, usually found in dry lightly shaded locations, including roadsides, prairies and clearings.  My plant is near the edge of a wooded are, mostly in the open with average moisture soil.

While not showy for us, it does attract pollinators, particularly bees to its sweetly scented flowers and it does provide food for the monarch butterfly caterpillars.  So far I've only seen this one, but I'm watching for more.

Sunday, March 17, 2013

Putting in the Garden

Turf in garden area 'weed whacked' to less than 1/2 inch tall.

As I mentioned a few posts back, I am putting in a new vegetable garden over an area that was previously 'lawn'.  I am using a technique described in Lee Reich's 'Weedless Gardening', where soil disturbance is minimized, by working from the top down.  This method uses a layer of grass smothering material to kill the existing vegetation and then a layer of soil or mulch on top of that layer to do the planting in.  By not turning over the soil, no new weed seeds are brought to the surface and the original soil structure is preserved.  (This method may not work so well on compacted soil or where there are some major soil chemistry problems.)


The first step in this process was to do a soil test to learn if there were any serious deficiencies or pH problems.  Turns out that the pH was good (6.9) and the nutrient levels were about right, save for a low phosphorous level.  Step two was to cut the existing vegetation down as low as possible.  I did this with the weed whacker.  Where there were vigorous clumps of grass I really scalped them down to the ground.

After flattening the cut vegetation, apply a fertilizer at a rate of 6 cups of a 5% nitrogen fertilizer for every 100 sq feet.  I had some Espoma Organic Lawn fertilizer with 17% Nitrogen (17-0-3), so doing the math, I only needed 2 cups of this per 100 sq. feet.  The soil test results indicated that I needed 1/4 phosphorous per 100 sq feet, so I was able to formulate that in with some triple phosphate that I had on hand.  Since over use of phosphorous in fertilizers is a major contributor to water pollution, having a soil test done and using only the required amount of phosphorous was the responsible way to go.

Now comes the new trick.  Rather than tilling the new garden, you just cover the garden space with cardboard or four layers of newspaper.  This will starve the existing vegetation of light and prevent germination of new weeds.  Since we had plenty of boxes and packing paper from our recent move, we were in great shape for this.  I chose to use paper to cover over the areas that would be the new planting beds, and cardboard for the paths since it would take longer to break down.

Cardboard was laid out for the paths.  Landscape staples held it in place.
My new Weed Wrench was handy for holding down the stack of packing paper.

After getting the paper and cardboard down on the ground with the help of some landscape staples, the paper was wetted to get it to conform to the ground.  The beds were covered with a layer of soil, and the paths were covered with a couple of inches of mulch.  This installation would have been easier on a calm day, however it was kind of blustery the day I was working.  The stables really came in handy to hold things down until I could lay down the initial layers of soil.

The planting beds in this garden are 3 feet wide and 12 feet long.  The width was chosen so the entire row could be easily accessed from the path.  By not stepping on the planting beds soil compaction is minimized and good soil structure is preserved (and no digging!).

I had 3 yards of screened top soil/leaf compost blend delivered...
and carted it down to the garden to build up the planting beds.


Now I just needed to make a 'few' trips to move the soil onto the new beds.  It would have been much easier if I could have had the soil delivered closer to the new garden, but alas that did not work out.  So about 16 trips with the wheelbarrow later, I brought down enough soil to cover the beds 3-4 inches deep.


In addition to the vegetable beds I am also preparing perimeter beds where I will put in some pollinator friendly natives.  These include Aquilegia canadensis, Asclepias tuberosa, Monarda fistulosa and Rudbeckia hirta and R. triloba.  These plants are also listed as deer resistant.  As such they are serving as part of my multi-layer deer defense scheme.  In addition to these deer resistant plants, I will plant some of the annual False Pennyroyal, Hedeoma pulegioides.  This is not listed as a deer deterrent, but it packs a pretty sharp minty odor when touched.  I'll watch to see how the deer treat this plant.

Again, I used paper under the perimeter beds, so that root penetration will be easier.

You may have noticed the double set of fence posts.  The outer set are from an electric fence that the previous owners had used for some sort of corral.  The inner set will be for a plastic mesh netting fence that will be partially buried.  That should keep out the rabbits and ground hogs.  The double fence method is supposed to deter the deer because they are not able to judge the width of the double fence and will be uncertain about making a safe landing on the other side.  I'm not planning on turning on the juice to the electric fence unless I have to.

The main beds and paths are all done.
Just need to prep the back edge for planting the Pennyroyal.

The final step was to cover the cardboard paths with a layer of mulch.  We had this on hand from some trees that we had taken down last fall.  The mulch will hold down the cardboard and suppress weed growth from both above and below.

It's really strange to be working in the garden in early March.  Back in Boston I wouldn't come out to the garden until late April.  I wanted to get an early start putting this garden in so that the layers of paper had a chance to suppress the old vegetation and then begin breaking down to let the roots of the new plants through.  Once the fencing goes up in a couple of weeks I will do an update.


Wednesday, January 23, 2013

Starting a New Vegetable Garden

When we moved into our home in Watertown, MA starting a garden was easy.  The previous owner had established raised beds in a sunny opening in the back and along the south-side of the house.  The beds were small, but the soil was great.  Over the next 17 years the sunny spot in the back became only partly sunny (maybe 4-6 hours of full sun) due to the trees growing up and out.  Now with our new property in Maryland we are starting with a clean slate.  There are no established kitchen garden beds, so we need to determine which space works the best for us.

In selecting the site for the garden we considered accessibility to the garden, water, exposure, soil quality and protection from wildlife.  I consider solar exposure and soil quality as the most important factors; those are the most difficult to change.  All the convenient locations near the kitchen have less than optimal solar exposure.  A location off the garage offers better protection from wildlife, but it impinges on the septic field and is surrounded by trees (too much shade).

Garden site looking to the NNW.  Parts of the electric fence can be seen
The site I am considering with now is fairly open, with evergreens to the north and only a couple of trees nearby.  It has an open south-east aspect (the topography tilts to the SE), so it should warm-up quickly in the mornings and have good light throughout the day.  There is a water faucet nearby and the previous owners had installed an electric fence around the area, so we have the beginnings of an enclosure to keep the deer out.  I just need to take some soil samples for analysis to learn about any problems with the soil chemistry (crazy pH or nutrient deficiencies).

In addition to a deer fence I will surround the immediate area of the garden with a low mesh fence dug 6" into the ground to discourage the rabbits and ground hogs.  I have ordered a quantity of False Pennyroyal seeds (Hedeoma pulegioides) to plant on the perimeter.  The strongly aromatic scent is reported to repel many animals; we'll see just how effective it is.  Some other deer resistant plants planned for the perimeter are: Aquilegia canadensis, Asclepias tuberosa, Monarda fistulosa and Rudbeckia hirta.  These plants should also help in attracting pollinators.

Since I am planting a garden from scratch, I spent a little time reading about companion planting in order to make some better decisions about which plants will benefit from interplanting in the same part of the bed.  Two books that I found useful for this are "Companion Planting," by Bob Flowerdew and "Little House in the Suburbs," by Deanna Caswell and Daisy Siskin.  I can not speak about the benefits of companion planting yet, but these books did offer some explanation for some of my past vegetable garden failures such as Kohlrabi with Pole Beans and Snap Peas with Tomatoes.

Since I am interested in growing Native Edibles as well as 'regular' vegetables, I have ordered some tubers of Jerusalem Artichoke, Helianthus tuberosa, known as a Sunchoke in culinary circles.  These can get out of control on their own, so we will need to harvest the tubers annually to keep them in check.

I have also ordered some tubers of Groundnut, Apios americana.  They can be used like potatoes, but have a nutty flavor.  These sprawling vines may find their home along the shady woodland edge, rather than the center of the garden, for both cultural as well as aesthetic reasons.

To prepare the planting beds I will be using techniques described in Lee Reich's book "Weedless Gardening."  This is a top down method where the existing plants are cut to the ground then covered with multiple layers of paper.  NO DIGGING!  After wetting the paper it is covered with several inches of weed-free material.  In my case this will be soil that I will plant seed directly into.  For the garden paths I will use cardboard cover with wood mulch as a more resistant barrier layer.  The existing plants are smothered and since the soil was not turned over no new weeds from the seed bank are brought to the surface.  I will refer you to this easy reading book to get the details.

I've seen this technique work successfully for converting lawns to ground cover beds.  This will be the first time I've tried it over a more robust planting.  Since we still have loads of paper and cardboard left over from our move this is a perfect way to use existing resources.  The only materials I will need to bring on site are a couple of yards of planting soil and some organic fertilizer.  The best part of this method is that I will not need to turn over a large mass of the soil, only to be followed by a long season of weeding.

I will update this information as the garden installation moves along.

Thursday, December 22, 2011

Getting a Jump on Seeds for 2012

As I was flipping through the Feb 2012 issue of Garden Gate magazine, I came across an article about winter sowing perennial seeds.  While I’ve seen this type of thing before, this time it sent me into action.  I’ve been moaning about why some seeds I’ve tried just won’t germinate well, if at all.  The method described in this article by Michelle Mero Riedel, can also be found at theMy Northern GardenBlog', and at the Winter Sown Seeds website. So today I grabbed the two containers I had on hand to give it a try.

1. Cut container, leaving a hinge
2. Make plenty of drain holes
3. Add seed starting mix


In short, it involves cutting 90% of the way across the top of a 1 gal plastic milk carton (or similar) cut, to create a hinged lid.  After making some drain holes in the bottom it is loaded with pre-moistened seed starting mix.  The seeds are sown at their recommended depth and the top is taped back in place.  


4.  Sink the containers in soil 
outside in a sunny location
Next the carton is put outside in a sunny exposed location and sunken into the soil to simulate the actual soil conditions.  In this way the seeds will experience actual winter conditions, but be protected from animals.  The cover creates a mini-greenhouse for protection after germination and the contained soil-less mix will be easy to break-up for transplanting after the plants grow up a bit.  It is important not to put the cap back on the jugs, otherwise the seeds will cook.

The first seeds that I am trying are one’s that did not germinate for me last time: Butterfly Weed (Asclepias tuberosa) and Rosey Sedge (Carex rosea).  As I get more containers I will also try this with the difficult Fernleaf False Foxglove (Aureolaria pedicularia) as well as with seeds that gave a lower % germination last season: Woodland Sunflower (Helianthus divaricatus), Flowering Spurge (Euphorbia corolorata), and Crowned Beggarsticks (Bidens coronata).

One trick I did differently from the article was to use a drill fitted with a brad point bit to drill very neat holes in the plastic, rather than using an awl or screwdriver.    We’ll see next spring how this method compares my usual method of cold stratification in the refrigerator.  So far this ‘winter sowing’ method has been pretty easy, plus it doesn’t take up space in the frig and I won’t need to use the grow lights for two months this spring.  Also by winter sowing early, I won’t be digging into frozen soil to sink in the containers.

Friday, July 29, 2011

A Rainbow of Colors


As I was trying to think of some deep topics to discuss on my blog in late July, I was working in the garden and realized that just about everything was in bloom. In fact there are North American natives blooming in all the colors of the rainbow right now. So I thought I would share examples of each color from my garden.


Mixed border with Cosmos, Agastache and Spotted Beebalm


I’ll start with some of the warmer shades. I reintroduced the annual Sulfur Cosmos, Cosmos sulphureus, this year (it had been pushed out by the overly vigorous Bearded Beggarticks). These along with Orange Hummingbird Mint, Agastache aurantiaca ‘Navaho Sunset’, and the Spotted Beebalm, Monarda punctata, form a rather dense border on the south side of the house. 
 

A self-seeded Blood Sage


 Mixed in with these are a few Blood Sage, Salvia coccinea, a Texas native that reseeded from last year. Overall the red shades are underrepresented, the only other red is some Drummond Phlox, Phlox drummondii, also from Texas.


A native bee is sampling from a Wine Cup


For a really hot magenta I have Wine Cups, Callirhoe involucrata, native to the central U.S. This viney perennial has been doing well on it’s own for 5-6 years on the east side of the house. 


Cooling down to the pinks, I have been really surprised with the Pink Tickseed, Coreopsis rosea; a Massachusetts native. It prefers moist soils and this one seems very happy growing in a crack in the driveway. There must be runoff collecting under the pavement. Another pink flowering native I have is Butterfly Gaura, Gaura lindheimeri. While native to Texas and Louisiana, it can be found growing in many gardens in the Northeast.

This Pink Tickseed has been growing in the driveway for more than 5 years.


Butterfly Weed

A new addition for me is the orange Butterfly Weed, Asclepias tuberosa. As it is quite drought tolerant, I’m trying it out in the ‘Hell Strip’ along the road.  This area is exposed to a lot of sun and it is difficult to get water to soak in.  Hopefully this tap-rooted plant can get established here.


Yellow seems to be the most commonly seen color for native plants. You see Black-eyed Susans and Yellow Coneflowers everywhere. I have them too. A couple of less commonly used species are the Prairie Coneflower, Rabitida pinnata, with its paler, more lax petals, and Whorled Rosinweed, Silphium trifoliatum. The coneflower has been just getting by, popping out from a dense border of Purple Coneflowers and a variety of native asters. On the other hand the Rosinweed stands tall (actually it leans forward) in the dry shade under a Norway Maple.

Whorled Rosinweed, leaves in whorls of three.


Prairie Coneflower


Inland Sea Oats turn golden in fall.
There is lots of green in the garden from all the leaves, but there are also some other green features. The green flowers of my Strawberry Blite, Chenopodium capitatum, are forming now, to be followed by bright red berries. Also there are grasses, such as the Inland Sea Oats, Chasmantheum latifolium, shown here.


'Victoria'


Moving on to blue, may last post was about the American Bellflower that is all over my garden. Instead I’ll show you the Mealycup Sage, Salvia farinacea ‘Victoria’, that I have in my flower boxes. This tender perennial native to the south-central U.S. it a common garden annual available at many nurseries in the Northeast. While not native up here it does get a fair amount of traffic from both native and honey bees.


For lavender I’ll show you my Wild Petunias, Ruellia humilis. This plant is native to the Eastern U.S., but not New England. I started this one from seed in 2007 and it slowly spreading into some of the sunnier and drier spots around the house.

Wild Petunia, late to emerge,
but in full bloom in early July.


Of course there is the ever popular Purple Cone Flower, Echinacea purpurea. Mine are from seed and I am seeing a lot of variation in size and color. Instead I’ll show the less popular Swamp Verbena, Verbena hastata. This somewhat weedy plant is found all over North America. It reseeds vigorously and will grow under a wide variety of conditions. I have been cutting mine back by half in mid-June to control their size and get a few more blooms. I started seeds for both the species (violet) and a naturally occurring pink form, ‘Rosea’, in 2008. As you can see I am still seeing examples of each, though the violet is much more prevalent.
A pink form of Swamp Verbena along with the more common Violet form.

Philadelphia Fleabane is found throughout North America


I have no black native flowers, but I do have a lot of white ones. There’s the long-blooming shrub Meadowsweet, Spiraea latifolia, the Bigleaf Asters, now known as Eurybia macrophylla, and purple-leaved Heuchera villosa. All of which I grew from seed from the New England Wildflower Society. Here I have Philadelphia Fleabane, Erigeron philadelphicus, that just blew in on its own.


Blooming is not over, there are still more plants to come, but it nice to see everything that is going on despite the heat of summer.


Friday, March 25, 2011

Snowplows and Roadside Plantings, a Case for Native Annuals

Last week I did the spring clean-up of a roadside bed I designed. The plants used were all Eastern North American species.  As I was working I was reflecting on what did and did not work well. For the most part it has been doing quite well with little input from me. Up away from the main traffic flow Aronia (Aronia arbutifolia), Meadowsweet (Spiraea latifolia) and Shrubby Cinquefoil (Potentilla fruticosa) are growing well as are the perennials including Prairie Aster (Symphyotrichum turbinellum), Purple Coneflower (Echinacea purpurea), Appalachian Blazing Star (Liatris squarrulosa), Stiff Goldenrod (Solidago rigida), Red Columbine (Aquilega canadensis) and my favorite grass, Prairie Dropseed (Sporobolus heterolepis).


When I designed this roadside bed back in 2006, I selected plants that I thought would withstand drought conditions, salt spray, full sun and wind. The one aspect that I had not fully appreciated was tolerance to disturbance, particularly resistance to snow plows! Where the bed is protected by a curb there is not much of an issue, but down near the highway the surface of the bed is often scraped over, either directly by the plows or as a result of snow being pushed up and over the sidewalk.
    
When I first learned that blueberries were salt tolerant I happily incorporated them into the roadside position.  I thought people going by would be impressed at how versatile of a shrub blueberries were. I was shocked the following spring when I found the bushes pushed nearly a foot further into the bed, the result of plowing of the snow. Well, the plants are still there 4 years later, but just hanging by a thread. This is obviously the wrong place for what would otherwise be the right plant.


Problem area, after a fresh layer of leaf mulch. 
The blueberry twigs are still in there.

Down by the road Seaside Goldenrod, Solidago sempervirens, is performing well. In fact, this is an example of a native species that is expanding into the urban environment in disturbed areas where road salt makes it difficult for other species to establish. The Prairie Dropseed in this area (those that haven’t been plowed over) are not doing as well. However, Sand Love Grass, Eragrostis trichodes, a new addition to this area does seem to be doing better.

Considering the conditions at this end of the planting I really need a plant (or plants) that will have a continued presence despite a nearly annual scraping of the top layer of soil. Use of a native annual, or perennial, that vigorously self-seeds should fit the bill. Since the plant starts each year anew, disruption of the crown and roots would not be an issue.

This year I have seeded in some American Pennyroyal, Hedeoma pulegioides, a true annual that grows in dry disturbed locations and produces a lot of seed. I also added seeds for a couple of perennials, Spotted Beebalm, Monarda punctata, and Butterfly Weed, Asclepias tuberosa, that are known to reseed effectively and have some salt resistance. By starting from seed I am testing whether this site has the right conditions for germination, a critical factor if they are to get established there.

To get some new ideas I turned to the Advanced Search  function on the USDA Plants database. Here I looked for plants that will tolerate full-sun, drought and salt. While not every plant in the database is searchable in this way, it can provide many leads. Among the results was the Seaside Goldenrod that is already thriving there. A new lead that was generated was Beach Sunflower, Helianthus debilis. I’ve been growing this from seed in pots at home for a couple of years, now it’s time to put it to the test in the field!


Monday, January 24, 2011

Native Seeds for 2011

After assessing what did and did not do well last year, I placed my seed orders for native seeds. Here’s a run down on what I’ll be trying this year.

New Plants
Pearly Everlasting (Anaphalis margaritacea) A perennial with white, long lasting flowers. I’ve been frustrated growing the related annual Sweet Everlasting (see below), so I thought I would try a perennial version.

Butterfly Weed (Asclepias tuberosa) This perennial that does well in dryer sunny locations and attracts many pollinators. I’ve seen a few plants commercially available but I wanted to make sure I had some growing this year.

Rosey Sedge (Carex rosea) I was given a small clump of this foot-tall perennial grass for nearly 5 years ago. I thought I should test it out in some different locations. This sedge prefers part to full shade.

Flowering Spurge (Euphorbia corollata) This perennial is also known as Prairie Baby’s Breath. I thought this could be good for general landscape use, with white flowers through mid-summer.

Woodland Sunflower (Helianthus divaricatus) This perennial sunflower grows well in dry shade. It can be weedy in the garden, but I really want to test it out under the Norway Maple. I’ve seen this brightening up shady oak woodlands in the middle of summer.  This is the first year that I have been able to find seed.


Repeats
Alleghany vine (Adlumia fungosa) I’ve written a lot about this biennial vine. I just can’t get enough. Note that these seeds need 90 days of cold stratification, so don’t wait if you want to try this one!

Orange Hummingbird Mint (Agastache aurantica ‘Navaho Sunset’) grew quite well last year and now I need more to try with clients. I really like the scent of the gray-green foliage and the flowers are pretty nice, too.

Rock Harlequin (Corydalis sempervirens) This another plant that I love.  I just need more rocky places to put it.

Sulfur Cosmos (Cosmos sulphureus) This native of Mexico (a part of North America) grows as an annual in the Northeast.  I had a crop that returned for 4-5 years until it got crowded out by some Bidens. I thought I would try to start it up again. While the bloom is similar to that of the swamp marigold (B. aristosa), this Cosmos starts blooming earlier and for a longer time.  Also, the foliage is not as dense.

American Pennyroyal (Hedeoma pulegioides) has been getting established from a planting 2 years ago, but I’d like to try more in some different locations. This will do well along a path.

Spotted Beebalm (Monarda punctata) was pretty successful last year and I need more to try with some clients.

Sweet Everlasting (Pseudognaphalium obtusifolium) has given me trouble on transplanting in the past two years. I’ll try this again, this time seeding directly in the garden in prepared soil (not in compacted turf).

One last try...
These three plants did not germinate for me last year, but I’ll try one more time with a lengthy stratification in moist starter mix.

Fern-leaf False Foxglove (Aureolaria peduculata) This biennial is parasitic on oaks, but, reportedly, does not need them for germination. I also have some of these scattered around a nearby oak. Stay tuned…

Tall Swamp Marigold (Bidens coronata) is an annual, with good-sized yellow flowers. I'm curious to see how if differs from the other Bidens I have around.

Brown-eyed Susan (Rudbeckia triloba) is a short-lived perennial, that while taller, has a more delicate appearance than the typical Black-eyed Susan (R. hirta).  I've posted a number of photos of this species over the past year.

Returning on their own:
I'm sure the Swamp Marigold (Bidens aristosa) will be back, but I will be pulling these up to make room for new plants.  I will have a lot of the biennial American Bellflower (Campanulastrum americanum) in 2011, judging by the large number of rosettes in the 2010 garden.  Also, I will keep an eye out for the return of any of the Texas native annuals: Indian Blanket (Gallardia pulchella), Drummond Phlox (Phlox dummondii) and Scarlet Sage (Salvia coccinea), that bloomed so nicely last year.