Showing posts with label Landscape design. Show all posts

Thursday, June 13, 2019

Designing with Native Plants


Designing with native plants is not that different from designing with any other plant palette.  You still use basic design concepts, using the shapes, colors and textures of plants to create rhythm and flow in the landscape.  What is different is that your selection of plants is more focused on native species, ideally ones that are regionally or locally native.

Advantages


What you gain from using native species in your landscape is greater benefit to the nearby wildlife, better fit with the local ecology and character of the region, and, if your plant selection was right lower maintenance and increased sustainability.

There are North American native plants species that will grow under just about any landscape situation imaginable.  That doesn't mean that any North American plant will grow anywhere in North America.  Beyond the many geographic climate zones there are also differences in soil chemistry, texture, moisture, exposure to sunlight and competition both from other plants as well as animals.

By looking at nearby native plant communities you can get some inspiration about what to combine in your landscape.  At Mount Auburn Cemetery in Cambridge MA they created a meadow using many species of grasses and wildflowers native to the Northeast. 


This constructed 'Northeast Meadow' features showy goldenrod (Solidago speciosa),
little bluestem (Schizachyrium scoparium), New England blazing star (Liatric scariosa), hyssopleaf thoroughwort (Eupatorium hyssopifolium) and brown-eyed Susan (Rudbeckia triloba).


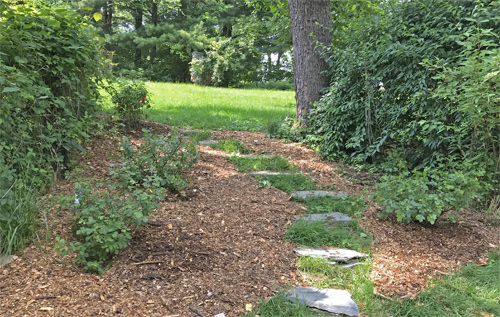
When I was designing a planting for a sloping path I selected some species that I observed along a nearby hiking trail in Maryland Heights.

Bottlebrush grass (Elymus hystrix) and clustered mountain mint
(Pycnanthemum muticum) are major components of this hillside garden.


While I stress about how you need to match plants to their ideal conditions, there are often surprising exceptions.  Test their adaptability by trying a plant or two in unusual locations, they just might catch hold.  This is why I like to use natives that produce a lot of seed, particularly native annuals.  The seed is able to spread around and find new places to grow, some of which will be a good fit.


This pink tickseed was originally planted in a near-by bed but found a better home when seed fell into a crack in the driveway.


Challenges

Some natives are generalists and are able to grow well under a wide variety of conditions.   Others are more specialized, having adapted to some very specific growing conditions.  Some of the frustration of working with natives is that while it is implied that they are adapted to grow in North America, a given native will not necessarily do well everywhere on the continent. 

Another factor to realize is that residential landscapes often have very different soil conditions than near-by natural areas.  Depending on where they are located around a building, light exposure and moisture levels can also be very different from undisturbed areas.  Newer construction areas often have compacted soils.  Many times the native top soil has been removed and replaced with soil from another location.

Reasons for failure of new plantings include competition from other plants, incorrect soil chemistry, texture or drainage, or missing  companion plants.  Also consider age of plants and the original conditions when they were planted.  Many shrubs growing in shade were planted when there was less competition both for light and root space.  Planting new specimens into an established wooded area is more challenging now than when the area was originally planted.  I have been fooled into planting new rhododendrons under established shade trees based on seeing mature shrubs in woodland settings.  In many cases, there is too much competition in the root zone for water and nutrients and too much shade cover for the new plants to get established.  Options here include opening up or raising the tree canopy, clearing a wider root zone (without damaging the existing trees), or  opting for more shade tolerant species.

Sometimes when I see native species dominating some harsh environmental conditions and I think, wow that could grow anywhere.  That is often faulty reasoning.  In many cases these plants excel because they have adapted to those conditions in specific ways to use those harsh conditions to their advantage to out compete other species.  


Rock harlequin will excel in thin rocky soils but does
 not compete well in normal soils against other plants.

One example is rock harlequin (Corydalis sempervirens) a short lived perennial that needs to reseed itself to maintain a garden presence. It's native to rocky slopes in the Northeast where there are shallow pockets of soil and exposure to full sun for a good portion of the day.  When planted in richer soil or 'better' conditions it often fails due to competition from other plants. 

Almost all plants in nature grow in a community of some sort.  There are a few  species that require a host plant to help them grow and develop.  Indian paint brush (Castilleja sp.) tap into the roots of neighboring plants, such as little bluestem or penstemons, for nourishment.  False foxgloves (Aureolaria sp.) are partially parasitic on the roots of oak trees.  And , like many members of the pea family, Texas bluebonnets (Lupinus texensis and sp.) do better when there are specific soil bacteria present to help them fix nitrogen. 


Texas bluebonnets are winter annuals that blanket open fields with their iconic blue and white flowers in early spring.  They are well adapted to the calcareous soils with the assistance of a soil bacteria.  Performance in other regions is erratic. 


Plant Selection and Sources


The nature of native plants are that they are native to particular areas of the country based on climate, soil chemistry and evolutionary history. As such there are very few 'nationally native' plants, nor should there be.  If you search the garden centers you can often find sections devoted to native plants.  The nice thing about many commercially available native plants, though there may not be many of them, is that most have been selected to be commercially viable, that is they work in many residential situations and are fairly robust.  We need to expand the offerings by asking for more of these plants.  American Beauties is one program based in the Northeast that is supplying a variety of native species.  There are also a number of native plant suppliers that you can find on the web.   Izel Plants is a clearing house for a number of native plant nurseries primarily in the Eastern US and has an extensive catalog of native species.  The Plant Native link below also has listings of native plant nurseries by state.   You can also search the web for nurseries in your region that specialize in native plants. 

To help with the selection of which species to use there are a number of websites that allow you to search for plants based on the site conditions.  You can find plant search websites for a given area by using search terms like 'Native Plant Database for  '  My favorite site to search is from the Wildflower Center.  It allow you to search by where a plant is native as well as specific growing conditions and plant attributes such as size and bloom color.  Plant Native is another good site.  While the plant lists are smaller, the plants listed are mostly commercially available.  Missouri Botanical Garden has an excellent search platform, but it is not solely native species.

Strategies for Designing with Native Species

  • Try to match the preferred conditions/habitats of a new plant to your local conditions (much easier than trying to match your conditions to those of a given plant).
  • Start small, when in doubt.  Before doing a massive planting put in a couple of plants as a test to see if they survive.
  • Try a new species in a couple of different locations to see where it grows well. 
  • Don't just drop a new plant into an established bed.  Clear some area to allow for roots to get established without competition.  Also open up the canopy to let in some light.  Water well, but don't feed perennials, shrubs or trees until the roots are established (about one growing season).
  • Build a plant community by learning about which plants grow together in nature.
  • When starting perennials from seedlings, like you get with liners or sizes one quart or smaller, it will take as many as three seasons for them to reach their full glory.  The adage 'sleep, creep, then leap' really does hold true when start from small specimens.


Wednesday, September 19, 2018

New Sloping Path

One area in my lawn has a steep grade, about 28%.  That is a rise of 4.5' over a 16' run.  The lawn tractor could make the climb, but usually left some tracks, particularly if the ground was moist.  Also when walking through that area it was a real chore.  This is a prime area to replace the turf with a lower maintenance planting and to put in some steps to make navigation easier.

When doing a project that involves both planting and hardscape (elements like steps, walls and patios) it is best to put in the hardscape first.  The positioning of plants has greater flexibility and there is usually less heavy lifting than when positions stones.

Overall Plan for this sloping site.  The 9 steps are shown as rectangles,
though in reality they are irregularly shaped.  The highest elevation is at the top,
sloping down about 4.5 feet to the lowest step.  Scale 1" = 3'.
The first step in putting in steps on a hill is to determine the slope of the hill and then position the steps.  Having a consistent rise and step length makes the steps easier to navigate.  The overall rise here was 54".  For a 6" rise/step, that calls for 9 total steps.  At this time you can also move the shrubs around, while they are still in pots, to determine how you would like to position them.

Here, after the steps were installed, you can see the level lines that were used to determine the overall slope
and to guide the installation so that the change in elevation from step to step was about the same.
(In the background you can see the tamper that is used to compact the soil and paver base.)

I try to use a sustainable approach to landscaping whenever possible.  In this case that means using stepping stone materials that were on site, left over from an earlier dry laid stone wall project.  These stones give a naturalistic appearance.  Also by using the same materials the two projects become visually and materially united.  One down side of using irregular stones as steps is that each step needs to be engineered individually to set it on a solid foundation.  Rectangular steps installed in a straight line require less customization.

For steps that get a lot of use a crushed stone base of 6 or more inches is recommended.  Since these steps are only for occasional use, I cut back a bit on the amount of base.  The riser for each step is supported by 2-3 inches of compacted paver base separated from the soil by a layer of landscape fabric over the compacted native soil.  Behind this reinforced riser is compacted fill.  Supporting the riser with a firm base gives the step a firm feel underfoot.  It's much more comfortable to step onto a firm, well seated step than one that wobbles even a little.

Here's a view underneath one of the steps showing the compacted paver base
underneath the the riser and the landscape fabric that is being used to hold the dirt
behind the dry-laid riser.  For some of the steps that were difficult to stabilize I used
construction adhesive to secure the step to the riser.

The standard formula for garden steps is that the tread length be about 26" minus 2 times the step height. 

Tread Length" ≈ 26" - (2 x step height")
So for a 6" step height the tread length should be approximately 14".  The formula is based on a comfortable stride length for the average person.  Had I put he steps in a straight row down the slope it would have been close to this formula.  Instead I spread the steps over a longer, curving course.  I thought that the slightly longer course would have made for an easier, more gentle climb, but instead the longer distance between steps makes the trip feel less certain, especially when going downhill.

However, the way I chose to do it created a more naturalistic look and used materials that were already on hand.  Also by following the existing slope I minimized the changes to the existing grading.  Looking back, if these steps were to be used on a regular basis or in a more formal setting I would have built a deeper foundation, used more regularly shaped stones and followed the formula more closely.

This is the area after scalping the grass with a string trimmer. 
I also used a garden torch (circled) along the edges to burn the areas that had
Japanese stiltgrass in an attempt to kill any new seeds/seedlings. 
Once the steps were in it was time to eliminate the existing grass and weeds.  (This could have been done before installing the steps, but I felt it was less disruptive to the stability of the slope to wait until the steps were in place.)  There were several options for getting rid of the existing turf and weeds:  dig it out, spray it with a broad spectrum herbicide, or cover/smother with cardboard and mulch.  Digging is a lot of work and could destabilize the slope.  Herbicide would be easy and would be less disruptive to the soil surface, leaving roots intact to hold the soil.  I opted for the cardboard smothering/mulching method.  It leaves the soil intact, is non-toxic, and there are limited debris to deal with.

I used thick cardboard from moving boxes to cover the unwanted grass.
After mowing/scalping the existing grass, I covered the slope with cardboard and pinned it in place with landscape staples.  After moistening the cardboard to make is more flexible to conform to the soil surface I covered it with 2" of wood chips.  Most of the lawn will die due to lack of light in a few weeks, but planting can be done sooner by cutting holes through the cardboard, removing all the exiting grass from around the area and inserting the new plant.  The re-exposed soil should be well mulched or recovered with scraps of cardboard to keep the old grass from growing through.

The cardboard was covered with about 2" of woodchips that were left by our
arborist this spring. I started planting about 10 days after spreading the chips. 
For the areas between the steps I dug out the grass by hand since it was hard to get small pieces of cardboard to stay in place and there will be a lot of gaps where the grass can peek out and get re-established.

Now it's time to plant...

The plants I chose for this area are all low maintenance natives that are from the mid-Atlantic area, mostly ones that grow nearby.  I chose plants that area fairly low-growing to minimize the amount of pruning needed to keep the pathway open, both physically and visually.  The selection of plants will have something in bloom from early spring through fall.  You can see the plant list in the drawing at the beginning of this post.

The Grow-Low sumac are at the foreground in this photo, with the Red Sprite holly at the back.
First to go in are the woody shrubs. I put in three Grow-Low aromatic sumac, Rhus aromatica 'Grow-Low' and one of the shorter female cultivars of winterberry holly, Ilex verticillata 'Red Sprite'.  I chose this sumac because it grows under a almost any condition, it only grows to about 3' tall and is a good choice for stabilizing slopes.  In addition it has a nice bright orange fall color and tends to be resistant to deer browse.  The female Red Sprite winterberry holly has a proper male mate in the nearby Jim Dandy.  I also transplanted in some extra black and brown-eyed Susans, Rudbeckia sp., to fill in around some of the newly planted shrubs.

As for flowering perennials, located 1-2 feet from the path, I chose foxglove beardtongue, Penstemon digitalis, short-toothed mountain mint, Pycnanthemum muticum, black cohosh, Actaea racemosa, and aromatic aster, Symphyotrichum oblongifolium. As the grass components I also put in some bottlebrush grass, Elymus hystrix, and wavy hairgrass, Deschampsia flexuosa.  I really like the looks of the bottlebrush grass and it is a species that commonly grows on the woodland edges in this area. Finally around the stepping stones and outer edges I put in the shortest species, two cultivars of moss phlox, Phlox subulata, and Pennsylvania sedge, Carex pensylvanica.

This is the completed installation.  I finished this in mid-July - later than is optimal for planting around here (mid-Jume would have been better).  I added in some old landscape timbers that were taken out from an earlier project to from the upper and lower edge of this garden.  Reusing materials on-site is part of being sustainable (and cheap).
As we are approaching fall the deer have come through and ate back the Penstemon and stripped most of the leaves and berries off of the holly.  I'm surprised about the holly, but our deer usually eat up most new plants no matter what they are, then leave them alone the following year.  Also the cohosh died back early, it may be getting too much sun, we'll see if it comes back next spring.


UPDATE
Here's the path in May 2019.  Everything has come back.  The bottlebrush grass is approaching 3' and all three cohosh have returned!