Tuesday, October 27, 2020

Oh Deer

Even though as winter sets in deer metabolism slows and feeding/browsing damage becomes less obvious, deer still manage to cause some major damage to the landscape


A willow, Salix discolor, that has suffered multiple deer attacks, yet has survived. 
The trunk guards were put on after the fact.


Last February I came to the realization that if I wanted to grow new trees, especially conifers, I would need to protect them from the deer, especially the males during mating season. Here in the Mid-Atlantic November brings on rutting season, the time when white tailed deer mate.  During rutting season male deer rub their antlers against trees and shrubs to remove the velvet from the newly grown horns.  They also will rub trees to mark their territory and to take out their heightened aggressions as mating season kicks in.  What deer prefer for this rubbing behavior are trees and shrubs 1-4” in diameter with smooth bark, like willows and magnolias.  Aromatic cedar and other conifers are also favorites.  Once a tree is marked they will often return to the same one.  At one time I had a nice little Canaan fir, Abies balsamea var phanerolepis,  that I surrounded with chicken wire after it had been rubbed a little.  Two days later all that was left was a bare splinter of a tree.  Now is the time to put up some protection to save some of our precious young plants before they are destroyed.  Following are some of the actions I've taken.

Trunk Protection
Last year I tried horizontal fencing for the first time and did not have great results.  It did not protect a young magnolia from rubbing, but a number of small evergreens did not take any damage.  Based on the photos I have, the deer appeared to skirt the areas with fencing lying on the ground. 
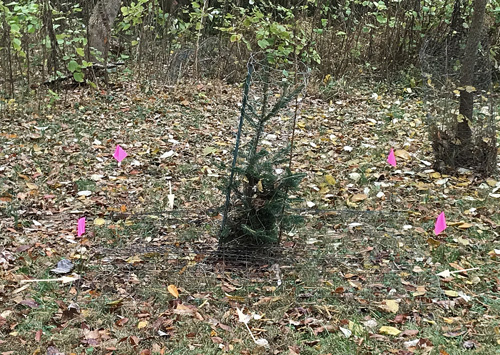
The pink flags indicate where I have put 2"x4"welded wire fencing on the ground around this little Canaan fir tree. 
The idea is that it creates unstable footing that the deer don't like.  The flags help me avoid the fence when mowing. 
I want to add some block underneath to lift the fencing further off the ground.

This year I have plastic mesh poultry fencing wrapped around the trucks of most of the stag-susceptible trees.  For others I have a heavier duty  4” drain pipe around the trunk.  (I’m a little concerned about heat build up under these black tubes.  For that reason I drilled ¾” holes every 6”to aid in ventilation.)  I also used some paper tree wrap on some smaller specimens.  One product that looks very good to me is a white spiral plastic.  It looks like it will protect the bark from rubbing and is open enough to prevent heat build up and not harbor insects.  I haven't bought any of that, yet.  A welded wire barrier surrounding the tree trunk has also proven very effective.  This is most efficient with single trunked trees with few lower branches.  Chicken wire may do a good job of limiting browsing but I've seen it ripped away from small trees that had been rubbed by a buck.

I wrapped the trunks of this fringe tree, Chionanthus virginicus, with plastic poultry fencing. 
It's easy to cut and can be tied together with zip ties or wire.  This material should protect the bark,
but will not support the trunk.


Here I am using a spiral cut 4" drain pipe to protect the trunk of this persimmon tree,
Diospyros virginiana.  I drilled holes in it every 6" to reduce heat build up.  This is
pretty tough material and should hold up to attack.


This Sassafras is being protected with a conventional welded wire cage. 
It's been here 4 years, but now it's of prime size for a deer attack. 
Hopefully the large size cage will be a good deterrent. 
I pulled the cage away during the summer to strengthen the trunk.  
  
Except for the open mesh materials it is a good idea to remove bark protection in the spring.  Heat and moisture build up can damage the bark and in some cases can harbor insects.  Also too much rigid support can keep a tree from developing a strong trunk.  I found this with my young sassafras.  It was getting floppy and the truck was not able to support the top growth on its own.  I pulled away the support this past spring and now the truck is much firmer.

Here  on this willow I'm comparing a variety of protection devices. 
On the right is a paper tree wrap.  Not sure how that would hold up versus a buck.


Repellents
In winter deer’s metabolism slows down, but they are still out there browsing.  Evergreens, branch tips and leaf buds are at risk.  Fencing and cages are effective at keeping deer far enough away to prevent browsing.  Burlap warps that are used to prevent winter burn on arborvitae should also work.  Repellents are also helpful.  In colder weather taste-based repellents have an edge because they do not need to be volatile.  It is often recommended to alternate among different repellants through the season so that deer don't get used to any one of them.   So far I haven't done that.  

Reading about all the different recommendations for deer repellants, as well as deer resistant plants, it has become clear that not all deer are the same in regards to their likes and dislikes. Be flexible and try different recipes and products.  I've had good success using Bobbex which contains a variety of taste and odor deterrents. 


Planning Ahead
I’ve seen a number of people on Facebook ask about starting gardens in areas with lots of deer.  My deer seem to test every new plant that goes in the garden.  For new shrubs I usually put a chicken wire cage around them.  As far as planning an new large planting, I like the advice I’ve read in ‘Deerproofing Your Yard & Garden’ by Rhonda Hart.  She recommends fencing in the new garden space before doing any planting.  This is because deer are creatures of habit.  If they have never found anything of interest in an area, then they are not likely to return.  But, once they have found something tasty there, they will make every effort to return.


On the Bright Side?
Deer browsing results in some unsightly damage to many landscape plants.  It is not uncommon to find hedges of arborvitae and junipers chewed back up to about four feet off the ground.  There are some aspects of deer browsing behavior that could be considered beneficial.  The following two photos show where deer have pruned away branches from the lower 4 feet of a yew and a rhododendron.  This sort of pruning opens up the ground plane for lower growing herbs to fill in. In the absence of deer these would be mounds of foliage.  I've also seen this with spicebush, Lindera benzoin, in the woods. This can happen when there is not excessive deer pressure.  Had there been more deer here say 10 years ago these shrubs may not have grown more than a foot tall before being destroyed, unless they were being protected with cages and repellants.

The lower branches of this yew have been munched away over the years.

This rhododendron has been 'limbed up' by deer.

What methods have worked for you during rutting season?  I'd love to hear about them.


Tuesday, October 13, 2020

2020 Stiltgrass Wrapup

As we are coming to the end of stiltgrass season for 2020 I wanted to review what I’ve learned about controlling this invasive species on my Mid-Atlantic property over this year. 

Pulling 
Pulling Japanese stiltgrass, Microstegium vimineum, is an effective means for controlling this annual grass, but it is extremely labor intensive.  While its primary germination period is mid-spring it does continue to germinate into summer, particularly if more openings appear in a previously shaded area.  So you may find that you need to redo areas in late summer that you thought had been taken care of earlier.  This was the case in a shaded woodland where I thought I did a pretty good job clearing the stiltgrass at the end of July.  When I returned to that place in mid-September it was in need of more pulling.  Apparently I left enough scraps around that they were able to regrow.  So if you only want to pull stiltgrass once in a season get every bit out the first time, or wait until just before it goes to seed, maybe early September (depending on local conditions) and then pull out all that you can. 


This was the initial condition, before any clearing in 2020.

This was after clearing in late July, by September this area was
overgrown again with stiltgrass.  This time it only took about 10 minutes
to clear the area.  The underlying Rosey sedge, Carex rosea, still looked good.

While searching for more information about the cleistogamous seeds in stiltgrass (those seeds hidden in the stem), I found a Master’s thesis by Samantha Nestory of the University of Delaware.  There it was noted that Japanese stiltgrass grown in sunnier locations had more cleistogamous seed than in shade, 47% vs 28%.  It also pointed out that, at maturity, there is a cleistogamous flower stalk at nearly every joint along the stem. After reading this I checked out some of the stiltgrass that was ripening.  Sure enough, nearly every joint had a flower stalk hidden or nearly hidden within.  In the woodlands I did not find as many of these hidden flower stalks.  Another observation about JSG is that it is able to put out roots wherever a leaf node, or joint, touches the ground.  By this means a single stiltgrass seedling can cover a large area.  Also residual fragments can quickly reestablish.  I’m not sure what this means for stiltgrass that is pulled then dropped back on the ground.  Will it reroot? 

Next to my finger you can see the flower stalk that was hidden under the leaf sheath. 
In sunny locations by early fall there can be one of these at each joint.

This brings up the topic of how to allocate our most precious resource, time.  While I often dive into some of the most thickly infested areas and rip out the biggest plants, it is actually more effective to begin in less densely infested areas and clear them completely.  After those areas are clear, move on to thicker areas.  The idea is that if an area is totally clear you won’t need to come back to redo it as much.  Whereas while you are battling a thick infestation, the lightly infested area is getting worse and then you end up with twice as much heavily infested space. 

Here's a small scale example of complete removal of Japanese stiltgrass. 
Ideally, I won't have to come back again this year and can spend my time elsewhere. 

Lawn 
This year I was late on reseeding the lawn.  I didn't get out there until early October.  I typically use a bow rake to tear our residual stiltgrass, then overseed with an appropriate cool season turf grass in mid-September.  (We are near the southern limits of where cool season grasses are preferred.)  Overseeding helps to fill in the gaps in the lawn that would otherwise be filled by more stiltgrass.  By seeding in fall these cool season grasses can get established and not be affected when I apply a pre-emergent herbicide in the spring to kill the stiltgrass.  I should have raked out the stiltgrass much earlier, before the seed was ripening.

Herbicides
I’ve had great success controlling stiltgrass in the lawn using pre-emergent herbicides in early spring.  Most products labelled for pre-emergent use to control crabgrass are effective.  I have noticed that the amount of hairy cress, Cardamine hirsuta, has also been reduced (this is due in part to mowing at least once in mid-spring to cut off the flowers before they can set seed.) While the pre-emergent works very well in the lawn, it is not as effective in the rougher meadow areas.


In this mini-meadow I have started to use the pre-emergent herbicide Dimension™
to augment pulling of Japanese stiltgrass.  Naturally occurring species that are flourishing
here include deer tongue and purpletop grasses, wingstem (Verbesina alternafolia)
and wild blackberry.  I have also planted in some panic grass, wild bergamot and brown-eyed Susan.


After two years of treatment in small meadow I have opened up enough space to get some more desirable plants established like wild beebalm, Monarda fistulosa, black-eyed and brown-eyed Susans, Rudbeckia sp.,and grasses like Virginia wild rye, Elymus virginicus, and panic grass, Panicum virgatum.  I noted this year that, in addition to a decrease in stiltgrass, the nonnative invasive bull thistle, Cirsium vulgare, was largely absent this year.  This thistle is a short lived annual or biennial species so is susceptible to control by pre-emergent herbicides.  I have been watching for other changes in the species mix because of the pre-emergent treatments.  Since I have put in some black-eyed Susans, which depend on reseeding to survive, I will not use pre-emergent in that area next spring to see if I can get them to come back on their own.  Ideally I would like to build up a strong network of native species that can exclude the stiltgrass on their own. 

I have not been using post-emergent herbicides on Japanese stiltgrass, but they do have their place in the arsenal. I found research that indicated that the use of grass selective herbicide can be effective, without causing damage to non-grass species.  Fluazifop-p-butyl is a selective post-emergent herbicide that can adequately control M. vimineum with minimal effect on the non-graminoid native plant community (Judge et al. 2005b). Fenoxaprop-p-ethyl, is a selective post-emergent herbicide that provides excellent control of M. vimineum and can maintain or even increase cover and richness of native species post-treatment (Judge et al. 2005a, b, Judge et al. 2008, Pomp et al. 2010, Ward and Mervosh 2012).  Fenoxaprop is not effective on sedges or cool season perennial grasses, like red fescue, so that would be a good thing, since there are many sedge species occupying my woods.  However there are also many shade tolerant grasses like bottlebrush grass, deer tongue grass and mannagrasses that could be affected.  So I would be hesitant to use these useless it was in a very targeted fashion.

 Fire
These past few years I’ve been using fire, primarily from a garden torch, to control Japanese stiltgrass.  I’ve found that fire is good for clearing a space prior to planting, but not for clearing without a plan for back fill with desirable species.  In some areas I’ve burned the stiltgrass seedlings in early summer only to have the area recovered with more stiltgrass; mostly from rooted stems coming in from nearby plants. Fire alone is more effective in late in season (August) when there is not enough time for new JSG to germinate and reach maturity.  It can work particularly well if there are well rooted perennials in the area.  These perennials are able to resprout after their tops have been singed off.  Cool season perennial grasses are a good example of these.


Here I used my garden torch to burn away the stiltgrass. 
Then I planted some plugs of switch grass, Panicum virgatum
.

This year I also used fire to dispose of late season stiltgrass that was full of seed.  After realizing just how much seed is contained in a stiltgrass stem, I decided that rather than moving piles of stiltgrass around I would burn what I had in a central location.  Fortunately, I live in an area with plenty of space and that allows burning.  The key to getting stiltgrass to burn well is to allow it to dry out.  I allowed my big piles [photo] of stiltgrass to dry about 2 weeks to get it dry enough to burn rapidly,  In all I estimate I had nearly 2 cubic yards of stiltgrass stems plus thatch from where I reseeded.  This was reduced to less than 2 cubic feet of smoldering ash. [photo].  When burning remember to follow all local regulations.  Don’t burn on windy days, keep the flames under control, and have water on hand to put out any unintended fires and dowse the ashes when done.

These piles of ripe stiltgrass, plus some additional thatch raked out of the lawn,
were reduced to a couple of cubic feet of ash.


Native Competitors
A more exciting aspect of stiltgrass control is finding native plants to fill in or even resist Japanese switchgrass.  Many people, myself included, have noted that golden ragwort, Packera aurea, is very effective at excluding JSG.  

In the woods nearby is a large dense patch of mayapples, Podophylum peltatum, a spring ephemeral.  I have noticed that during garlic mustard season (April to June) there is no garlic mustard growing there.  This year I also realized that there was not any stiltgrass there either, even though the ground is essentially bare save a few sedges and Virginia creeper, once the mayapple has retired for the summer.  I recently saw a post on Facebook where there was a patch of wild ginger, Asarum canadense, that was relatively free of JSG.  These two species spread extensively by rhizomes.  May there’s something to that?  


In early through spring the area circled is covered with mayapples. 
This dense cover seems to have excluded both garlic mustard and Japanese stiltgrass.


There are also grasses that maybe useful.  River oats, Chasmantheum latifolium, grows in dense stands and I have found stiltgrass only on the outer edges.  In the woods the rosy sedge, Carex rosea, has done very well with just a little help from me. In a moist wooded area I noticed that I had an early season grass that excluded the stiltgrass until it went to seed in June.  I’m pretty sure it was a species of mannagrass, Glyceria sp.  (I keyed it out as American mannagrass, G. grandis, but that is a rare species in Maryland, so I will double check when it blooms again next spring.)  In late summer while pulling stiltgrass I came across another patch of grass that had just a very few stiltgrass stems.  Currently unidentified, it seems to block the stiltgrass with a dense layer of thatch from a previous season’s growth.  This is another one to try to identify come spring.

This small, yet unidentified grass seems to have repelled an invasion of stiltgrass.

Next Year:
  • Continue with the pre-emergent treatments on the lawn and in limited areas in the meadows.
  • Focus my efforts in areas to achieve 'complete' removal before moving on to new areas.
  • When burning to clear an area have something ready to fill in.
  • Identify those grasses and see what else is holding its ground.
If you have any additional ideas or know of other competitive native species I'd love it if you could share that here!


Sunday, September 20, 2020

Some Planting Dont's

As we are moving into fall planting season it got me thinking back on some planting don’ts.  This was initially brought on by a sourwood tree that was planted here before we moved in.  Over seven years here it never got much bigger and for the past two years it was showing definite signs of decline.  I tried feeding it and acidifying the soil (it prefers a pH of 4.5-6) to no avail.  When it was finally dead this year I went to dig it out of the ground and found that I could lift it out of the soil with relatively little effort.  It turns out that even after over 7 years in the ground its roots never expanded outside the size of its original nursery container.  I suspect that the roots found it easier to stay within the original nursery mix rather than venture outward.  When I pulled it out of the ground there was very little soil left within the root ball.  Over the years the nursery mix broke down and dissolved away leaving nothing around the roots.

Here's my dead sourwood as it was
pulled out of the ground.


Sourwood trees usually produce deep lateral roots.  
Here the larger roots have circled back.  Also,
 there was little real soil within the root mass.


When planting a container grown plant you need to tease out some of the roots from the original container shape.  This is particularly important when dealing with a pot-bound plant.  In severe cases it may be necessary to cut the roots to encourage them to expand outward.  This was a case where it looked OK for a while.  Planting dos: the hole should be no deeper than needed so that its crown is just above the soil level.  The hole should be about twice as wide as original ball/container; and, back fill the hole with native soil, not more than half amendments, if any at all.  For compacted soils a wider hole is needed.  It also helps to make some jagged cuts to the sides of the hole rather than making it a smooth circle.  In this way when a growing root encounters the compacted soil interface it may be forced to penetrate it rather than just veering off to the side.  The goal is to get the roots growing outward and downward into the native soil-not to create a mirco-environment that the roots will never leave. Check out this link for more information on proper planting techniques.

Another thing to watch out for, especially in container grown plants, is circling roots.  These are thicker roots that reached the edge of the pot and curving around the edge of the pot.  Left uncorrected these roots will form a barrier to expansion of the trunk as the tree matures, eventually choking off the flow of sap up and sown the tree.  The best option is just not to buy a tree or shrub with circling roots.  If you already have one you can try to untangle the circling root, or it may be better just to cut it off for the long term health of the plant.

Sometimes the effect of poor soil contact is seen faster.  Because moisture moves from coarser to finer soils by capillary action, a container grown tree or shrub inserted into finer textured soils may dry out unless there is intimate contact between its roots and its new soil home.  This is because there is little tendency for soil moisture to migrate from the fine textured native soil to the coarser bark/peat moss/compost mix that the containerized plant comes in.  When planting container-grown plants I usually knock away a good portion of the planting mix to expose as many roots as possible and then put these roots in direct contact with the native soil.  I use the freed up planting mix as the ‘soil amendment’ to blend with the back fill.


The rounded crown of this once beautiful specimen has been
decimated to reduce problems with the power lines.  It's interesting that
the more upright trees (oaks, I think) located just a few feet back are not
interfering with the wires to the same degree.

Another factor that affects long-term plant survival is siting.  By this I don’t mean proper soil and light conditions, I am referring to location with respect to buildings and utilities, both above and below ground.  Planting big tree too close to a house can cause a multitude of problems ranging from root damage to the foundation and falling limbs to aesthetic problems like being out of scale with the house or blocking views.  Cultivars come in handy when working in a defined space.  These plants have predictable sizes and shapes thus reducing the effort to keep them the right size.  Utilities are another consideration.  You may get away with planting too close to them for a number of years, but when utility work needs to be done, your prized plants will be sacrificed for the sake of keeping the lights on or the water flowing.  Probably the most commonly encountered problem is planting large plants too close to overhead wires.  This conflict is often exasperated by the desire to have street trees and the first place we look to is the often too small strip between the sidewalk and street.  Utility companies publish guides and many communities have regulations about planting under utility wires [for example see this link from Baltimore Gas and Electric].  The general guidelines are to limit the mature size of trees and shrubs under wires to 25’ and not to plant larger materials within 25’ of the wires.  Larger plants should be located such that, when mature, their branches will not interfere with the overhead utilities.  Recommended plants will vary by region, but here in the Mid-Atlantic, good native candidates include Dogwoods, Redbuds and Hawthorns. 

This Bradford pear is starting to interfere with the power lines
and the lower branches on the street side have been damaged
by passing trucks.  This is just not a good location for a tree. 

Passing traffic is another factor to consider with street trees.  I had a Bradford pear planted too close to the road (planted by the city) that was repeatedly clipped by passing trucks and delivery vans.  It was also growing up into the power lines.  Perhaps the plan was that the Bradford would die or otherwise fall apart before it got to be much of a problem.  (Note that Bradford pears are proving to be invasive species as well as structurally unsound, and in my opinion are a very poor choice in any North American landscape)


The root flare is probably about 6" below the top of this volcano.  
An ideally planted tree would have no mulch within 3" 
of the root flare and the flare would be only an 
inch or two above the native soil level.

Mulch volcanos.  Fortunately these are showing up less often, but still many trees get this treatment.  Mulch mounded up and covering the root flare at the base of a tree will encourage bark rot and, more perversely, surface roots.  These are roots encouraged to grow in the loose, moist mulch, rather than deeper in the soil.  They are more susceptible to physical damage, can  dry out easily and many cases will circle and cross close to the tree truck.  As the tree matures, these crossing/circling roots choke off the main trunk from expanding outward, weakening the tree after 10 or 15 years of blissfully ignorant growth.


By putting a little extra thought into site planning and in helping plants get better rooted you can avoid a lot of disappointments in your long-term landscape investment.

Tuesday, August 25, 2020

Grasses are tough


Grasses are tough, not only do they grow just about everywhere, they can be very difficult to identify.  Unlike so many flowering forbs, grasses tend to all look about the same to the casual observer.  This situation is reinforced by our tendency to mow grasses down on a regular basis so that all we see are a collection of short green leaves.  In the US there are 169 genera and 1,398 species of grasses.  In the Northeast there are roughly 600 species growing in the wild.  Over the past couple of years I’ve making an effort to identify grasses growing on and around our property here in central Maryland.   

The first level of grass identification is to determine whether you are looking at a true grass (Poaceae) rather than a sedge (Cyperaceae) or rush (Juncacaeae).  You can make a quick distinction using the rhyme:  Sedges have edges, rushes are round, and grasses have knees (joints) and bend to the ground.  Sedges have triangular stems; when observed end-on the leaves will project out 120 deg apart.  The stems of rushes are round.  The stems of grasses have joints or knobs where each leaf blade originates.  In addition grass stems are hollow while those of sedges and rushes are solid.

While there are a few grasses that can be identified with some reliability on sight, most require close examination of the flowers and leaf surfaces with a hand lens to determine the grass down to the species.  Some easily identifiable species include the very popular little bluestem, Schizachyrium scoparium, and invasive species like Japanese stiltgrass, Microstegium vimineum, and Johnson grass, Sorghum halpense.  But for the most part you need to do a close examination to really determine a grass down to the species level.  There are a number of dichotomous keys for grass identification down to the species level.  Some rely heavily on flower (spikelet) characteristics, while others include other characteristics.  These keys ask a sequence of yes-no questions about the plants to slowly lead you to a result that matches the characteristics of the plant in question. 


Little bluestem is particularly recognizable in fall when the stems turn bronze
and the fuzzy seeds catch the light.  In summer the stems have a bluish green cast.


Johnson grass is a non-native weedy species that is often seen
 on the edges of fields and drainage areas.  It is tall 3-7'
and kind of looks like skinny corn stalks.  


Japanese stiltgrass in an invasive grass species, particularly in the
eastern United States.  It can be distinguished by the silvery midrib
on the elliptical leaves and its lax habit with many joints along the stems.


The Native Plant Trust (formerly the New England Wildflower Society) has developed an on-line key called GoBotany that allows one to enter a variety of plant characteristics simultaneously and provide a best fit.  This is particularly useful if you are trying to do an identification at a time when no blooms are available.  The plants in this database include grasses, forbs and woody species, but are limited to those found in the New England states. 

 To do a grass identification you’ll need an identification key and a hand lens (10x).  A camera is also useful to document your observations.  Since I made a commitment to ID some of my grasses I’ve been gathering a few different resources.  The Manual of Vascular Plants of Northeastern United States and Adjacent Canada, by Gleason and Conquist is a very technical key (in small print) that, while challenging to use, does provide detailed descriptions of each species. Grasses an Identification Guide by Lauren Brown is easier to use and well illustrated.  It also includes some common sedges and rushes in addition to grass species.  Its drawback is that it describes only the more common grasses.  Both of these references contain species found in the northeastern quarter of the US.

One resource I haven’t used much (yet) is Manual of the Grasses of the United States by A. S. Hitchcock.  This two volume set describes all of the grasses found growing in the US.  It does include some illustrations which makes it somewhat friendlier than Gleason and Conquist.  I’ve been intimidated by the size of this collection (especially large considering this includes only grasses, no rushes or sedges).

Here in the Mid-Atlantic region an easier to use key is the Field Guide to Grasses of the Mid-Atlantic by Sarah Chamberlain.  This guide includes botanical sketches of plants, and plant parts, to aid in the identification and includes only true grasses that are found in the Mid-Atlantic States (VA to PA).  So you don’t wade through extra species that are not likely to be present.  It includes many more grass species than Lauren Brown’s book, though it lacks the sedges and rushes. 

An additional book that I have found critically useful in all plant identifications is Plant Identification Terminology by Harris and Harris.  It provides illustrations and definitions of all the plant parts that are described in botanical Latin terms in the keys. 

Going through a dichotomous key can be time consuming, especially early on as you are wrestling with botanical Latin.  A drawback of many keys is that it is difficult to go backwards when you get something wrong, i.e., you get to the end of the key and your sample is nothing like the choices in the key.  Some of the more formal keys are easier to back up on when each step is numbered.  I’ve found with some of the book formats that they do not number the steps (choices) so that going backwards involves leafing through a lot of pages.  Perhaps putting some sort of bookmarks, like post-its, in the book would make it easier to retrace my steps. 

When I do go through a key and end up without a match I will go back to a point where I was not absolutely certain about my choice and then run down that new path.  Sometimes you just don’t have a good example of the feature that they are asking about; like size or shape of a seed, the number of veins on a lemma, or a surface is slightly or very hairy. 


Here you can see the individual florets of switchgrass.  This species has
only one floret per spikelet. Highlighted here are the glumes,
bracts that enclose the floret(s).  One of the florets is in full bloom
 with the anthers and stigma projecting out of the floret.

After getting frustrated about not getting satisfactory results I found it helpful to practice on some known species.  That way you can get some confidence with identifying botanical structures.  I had examples of switchgrass, Panicum virgatum, and purple top, Tridens flavus, that I could practice on.  After that I worked on an unknown grass that was a little past bloom, the flowers were a little tattered but mostly recognizable.  I found that one of my problems is counting florets in dried flowers.  Sometimes they just look like a bunch of chaff.  With a little practice I’m getting better at recognizing the flower parts.  I was able to ID the unknown as the relatively common, though non-native, smooth brome, Bromus intermis.

Here's the flower stalk for purple top.  The spikelets, which contain
4-9 florets, are deep purple in color.  Hence the common name.

One thing that surprised me in keying out grasses is that plants that are close together in a key may not look that much alike when viewed at a distance.  That is because many keys focus in on differences that are not easily seen rather than on obvious features like height or size of leaf blades.  While not part of some keys, knowing things like bloom season or habitat can be very useful in confirming an identification. 

In addition to running through keys, working with people who are familiar with grasses can be of great help.  For many, once you know and recognize a plant you don’t need to run through a key to identify it, they just know.  In this time of COVID-19 it is even more difficult to find and work closely with a grass expert.  I did recently find a Facebook group focused on identifying grasses called Grasses,Sedges and Rushes of the Northeastern USA.  They have been helpful in pointing me in the right direction when I have been adrift. 

The American mannagrass grows vigorously in early spring
 and is in full bloom by the end of June.

This was the case when I thought I had ID’ed a grass as drooping woodreed, Cinna latifolia.  This was thrown in doubt when I saw that the grass was going dormant in mid-summer while Cinna normally blooms in mid-summer.  Based on a lead I got from the Facebook group, I redid the ID using a different key and came up with American mannagrass, Glyceria grandis.  On reviewing the keys it appeared that I had totally messed up characterizing the flower (spikelet) parts by overlooking some of the less developed florets.  On a side note, it was interesting to see that areas that were thick with mannagrass had very little Japanese stiltgrass filling in in late summer.


Friday, July 31, 2020

July 2020 What to do about Japanese Stiltgrass NOW


In late July through early August Japanese stiltgrass, Mircostegium vimineum, puts on a major growth spurt prior to blooming.  This presents an opportunity for removing a large amount of this invasive annual grass before it blooms and begins to set seed for the following years.  There are several methods that can be used now, which is best depends on the particular situation. 


Pulling  This is my method of choice in areas of mixed species. In late summer stiltgrass can grow to 3-4 feet tall.  At that height it is above many desirable plants and you don’t need to bend over too far to pull it out.  By using a loose grip and grabbing higher up on the plant mass I can selectively pull out the stiltgass and leave most perennial and more deeply rooted plants in place. By wiggling the grass side to side as I’m pulling the relatively weak roots are broken and the stems remain intact.  

Here stiltgrass and the native grass nimblewill, Muhlenbergia schreberi, are growing together.

Pulling the stiltgrass with a light touch leaves the well rooted nimblewill in place.

I usually leave the piles of stiltgrass to dry out in the sun for a couple of days before disposing of it.  If the grass is not setting seed I’ll put it in a brush pile or in a segregated location where it can break down but will not accidentally be spread elsewhere.  If the grass has bloomed it will need to be bagged or put into an isolated location where the seed cannot escape.  This is the number one reason for pulling before bloom!

This is a woodland area where I have been pulling stiltgrass of 2-3 years. 
Though it looks dense there are not that many individual plants.


After 20 minutes of pulling I was able to clear this area of stiltgrass. 
What remains is a ground cover of mostly rosy sedge, Carex rosea.


Low Mowing  Mowing as close to the ground as possible in late summer (just before bloom) is a common recommendation for combating stiltgrass.  This prevents blooming and seed set in the upper stems.  Unfortunately stiltgass will also set seed in the stem at the base of the plant, 1-2 inches above ground level.  These cleistigamous flowers are difficult to remove without cutting really close to the ground.   If you wait too long to mow, after seeds begin to develop, mowing may only serve to spread seed unless you have a well fitting grass catcher on your mower.  ( In that case you should dispose to the clippings in a way that the seed will not escape into the environment.)  These extra flowers make stiltgrass very difficult to remove from turf areas.

Late summer mowing had been used in this area for 2-3 years.  Here it is in 2017. 
There is a lower density of stiltgrass, but still a lot.

I’ve been trying to remove stiltgrass solely by timed mowing in one area but have made only minor progress over 3-4 years.  What I have found to be most effective in lawns is to use a pre-emergent herbicide, marketed for crabgrass, in early spring.

Here is the area in 2020.  In addition to late mowing I treated this area with the
preemergent herbicide Dimension.  Above the line has been treated for
two consecutive years, below the line only once in spring 2020.


Weed whacking  Using a weed whacker can be effective where you can selectively cut down to ground level to remove those stem flowers. It can get tedious if you are trying to preserve desirable plants intermixed with stiltgrass.  You can leave the cut stems in place if the grass has not begun to bloom, but if it has you should consider raking out the debris.  (If plants are beginning to set seed weed whacking will likely spread more seed than doing nothing.)

I had good success in a woodland edge area using this method.  Starting out, the area was nearly a monoculture of stiltgrass so I did not have to be too careful.  In the second and third years I also raked out the cut stems.  I have also seeded the area with Virginia wild rye, Elymus virginicus, a shade tolerant native grass.  Now six years later I can manage that area with just a little pulling. 


Fire  Because stiltgrass is a weakly rooted annual burning at ground level can be an effective means for killing it.  I have been experimenting with burning stiltgrass at various times during the year.  Burning in early and mid spring reduces the amount of stiltgrass seedlings but does not eliminate its presence.  This is in part due to the extended time over which stiltgrass can germinate in the spring.  Burning in late spring seems to thin out the amount of stiltgrass but can also reduce the amount of desirable vegetation.  In one spot where I did a mid-spring burn the area was overgrown with stiltgrass by the end of July.  On removing that stiltgrass there were very few other plants growing there. 

This is a small area of lawn dense with stiltgrass that I burned with a garden torch
two days ago.  It's not necessary to consume the entire green plant with fire,
just burn the roots at the soil surface.  Perennial grasses should
bounce back in a week or two.


In this area I pulled most of the stiltgrass then used the torch to burn the surface
to kill any remaining vegetation.  I was then able to immediately plant several
plugs of switch grass, Panicum virgatum.


Where burning has proved very effective is in hard to reach areas where clear ground is desired, such as pathways and fencelines.  Burning stiltgrass is particularly effective in late summer. In lawns with cool season grasses you can burn areas infested with stiltgrass with a garden torch.  The cool season grasses are dormant because of the hot weather and dry conditions.  As the weather cools in September the clumps of cool season perennial grasses will resprout, without the presence of stiltgrass.

Here is the garden torch in action, burning the roots of some 3 foot tall stiltgrass. 
I can stick the torch through the openings in the fence the get to hard to reach areas.


It is interesting to note that heat is conducted better in slightly moist soil than in dry. While burning stiltgrass leaves no chemical residues you must use great caution to keep flames under control and not allow any fire to spread out of control.  There may also be local rules to follow.  


Herbicide   While I have had very good results from using preemergent herbicides in early spring to get stiltgrass out of the lawn, I have not had personal experience using postemergence herbicides to control Japanese stiltgrass.  Based on information provided by a number of university agricultural extensions there are several herbicides that can be used in summer time (up to the onset of flowering)  to control stiltgrass.  Low levels of the broad spectrum herbicide glyphosate, about half the normal concentration, are reported to be effective against Japanese stiltgrass.  Glufossinate is another broad spectrum herbicide that is effective against stiltgrass. 

I pulled this from the Rutgers Cooperative Extension (NJ) site:

Glyphosate and Glufossinate (various trade names) can be used to spot treat Japanese stiltgrass in gardens and planting beds. Both are broad spectrum herbicides that should be applied only to the unwanted plants. If applied to the foliage, stems, or woody portions of desirable plants, it could damage them as well.

Sethoxydim (tradename Bonide Grass Beater Over-the-Top Grass Killer®) and Fluazifop-P-Butyl (Ortho Grass B Gon Garden Grass Killer®) are selective herbicides that can be applied to growing stiltgrass in landscape beds. When used according to the label, these herbicides will not damage most non-grass ornamental plants. Be sure to follow the label closely and heed all precautions.

According to the labels on the Bionide and Ortho products these products are not effective on sedges.  That is a good feature for use in woodland edge habitats since native sedges are a major component of the ground covers growing there.  I not sure if that means that those, mostly desirable species would be unharmed, or, just not killed at a high rate.  I noticed that the label on the Bionide product indicated that it could be used safely on lawn with red and Chewings fescue.


Here is another example of the effectiveness of a preemergent herbicide. 
To the left of the line I applied dithiopyr (Dimension) in mid-March,
to the right is untreated.  


Sunday, July 5, 2020

Getting More Fruits

Sassafras blooms in the first part of spring. 
This photo was taken on April 12th.

I have been planting more native trees and shrubs with the goal of increasing the amount of food available for birds.  Particularly fruits that are available in fall and winter.  In many cases these plants are dioecious. That is, an individual plant of the species is either male or female.  To get berries you need at least one male to fertilize the female flowers.  Sometimes getting male and female plants is easier when you are buying cultivars.  It is often documented somewhere (but not always) if a cultivar is male or female.  When buying seed-grown natives it is difficult to tell unless they happen to be in bloom when you are shopping.  If plants are not in bloom the recommended approach is to get 5 random plants so that there will be a good chance that you will get at least one of each.

This year I have spotted some firsts in my campaign to produce more native berries.  The first success that I noted was that my newly planted sassafras tree, Sassafras albidum, was a female [note structure of female flower].  There is a number of wild sassafras in the area, but the flowers are way up in the tree so I have not been able to distinguish their gender.  About a month after blooming I noted that there were a couple of berries forming.  They are green right now, but will turn dark blue when ripe.
Female flowers have 6 sterile stamen (staminodia) surrounding
a central pistil.  Male flowers have 9 stamen.
Here at the beginning of July you can see the green berries.  When ripe these berries
will turn dark blue and the pedicels will turn red.


The second species I spotted with fruit forming was persimmon, Diospyros virginiana.  There has been male tree on the property for some time.  I don’t know if it’s wild or was planted by the previous owners.  When I moved 7 years ago I planted a number of native persimmons all of unknown gender.  To improve the chances that I had at least one female I planted 6 new plants.  Last year one of them bloomed that proved to be a male.  This year two additional trees bloomed, both of which were female.  Shortly after the flower petals fell off I noticed that two of the female flowers had swollen ovaries.  Now I can hope that they survive long enough to ripen.  I may need to build a little fence around them to keep the deer away.  
Female flowers are usually solitary and have 8 sterile anthers around the pistil.
 On male trees flowers are clustered and are typically packed with 16 anthers.

About a month later this persimmon is developing. 
Green now it will turn orange when it ripens in the fall.


Another recently planted native tree that is now showing some berries is fringe tree, Chionanthus virginicus.  Fortunately these bloomed the second year after planting.  The first three of these I planted either appeared to be females or had not bloomed after two years.  The following year in early June I was in a native plant nursery when these were in bloom.   I was able to identify one specimen as a male (paddle-shaped anthers in throat of flower) and bring it home for the girls.  Now 4 years later I’ve spotted the first berries on the fringe trees.  Like with the sassafras these start out green then turn dark blue when ripe. 
This green berry on the fringe tree will turn dark blue when it ripens in early fall.


Two years ago I replaced some invasive leatherleaf mahonia, Mahonia bealii, with some inkberries, Ilex glabra.  I wasn’t able to get a male cultivar locally.  I found a suggestion on the internet that other hollies could fertilize inkberries.  To try this I planted an early blooming winterberry holly, Ilex verticillata ‘Jim Dandy’ nearby.  After planting my collection of inkberries including the ‘Nigra’ and ‘Shamrock’ cultivars I took a close look at the flowers.  While the flowers on ‘Nigra’ were exclusively female, ‘Shamrock’ appeared to have both male and female flowers.  Unfortunately this year I forgot to take a close look at these flowers to confirm my earlier observations.  I can say that this year I am seeing a lot of berries developing on the ‘Nigra’ plants, as well as on a single wild-type plant.  The ‘Shamrock’ cultivars bloomed this year but are lacking berries.  They had a lot of berries in their first year here.  
This female flower has a large central ovary surrounded by six sterile stamen. 
In male flowers these stamen will have yellow pollen on the anthers.

Also on the holly front, this year I added another winterberry holly, ‘Winterred.’  This is a later blooming female.  Its blooming cycle is perfectly timed with the male, ‘Southern Gentleman.’  While it was still in its pot I placed the ‘Winterred’ next to the ‘Southern Gentleman’ until the blooming period was nearly completed.  This should ensure some berries as long as it doesn’t get stressed too much from being planted out in late June.

Some other species that are not dioecious have mechanisms that encourage cross pollination. This ranges from clever flower construction that prevents self-pollination, to offset timing of pollen release and receptivity, to outright rejection of pollen with the same genetic material as the ovary.  To encourage fruit and seed production you should have at least two genetically distinct individuals within pollination range. 

This is what I’m thinking about my single American plum, Prunus americana.   Despite several years of impressive blooming I have not seen any fruits on this tree.  I don’t know how long these need to mature before they are ready to bear fruit.  To help with cross pollination I’ve planted several bare root American plums in the area but I think it will be a few more years before these begin to bloom.

Another fruit-bearing native that has appeared on my property is black raspberry.  I’d like to think that these have been encouraged by the removal/reduction of invasives like Japanese stiltgrass, wineberry and garlic mustard.
Black raspberry has round stems and first year canes are glaucous. 
Flowering occurs in mid-May

The black fruits ripen around the end of June and have a distinctive sweet flavor. 
These ripen a week or two before the wild blackberries, which are much tarter.