Showing posts with label Native Grasses. Show all posts

Tuesday, August 25, 2020

Grasses are tough


Grasses are tough, not only do they grow just about everywhere, they can be very difficult to identify.  Unlike so many flowering forbs, grasses tend to all look about the same to the casual observer.  This situation is reinforced by our tendency to mow grasses down on a regular basis so that all we see are a collection of short green leaves.  In the US there are 169 genera and 1,398 species of grasses.  In the Northeast there are roughly 600 species growing in the wild.  Over the past couple of years I’ve making an effort to identify grasses growing on and around our property here in central Maryland.   

The first level of grass identification is to determine whether you are looking at a true grass (Poaceae) rather than a sedge (Cyperaceae) or rush (Juncacaeae).  You can make a quick distinction using the rhyme:  Sedges have edges, rushes are round, and grasses have knees (joints) and bend to the ground.  Sedges have triangular stems; when observed end-on the leaves will project out 120 deg apart.  The stems of rushes are round.  The stems of grasses have joints or knobs where each leaf blade originates.  In addition grass stems are hollow while those of sedges and rushes are solid.

While there are a few grasses that can be identified with some reliability on sight, most require close examination of the flowers and leaf surfaces with a hand lens to determine the grass down to the species.  Some easily identifiable species include the very popular little bluestem, Schizachyrium scoparium, and invasive species like Japanese stiltgrass, Microstegium vimineum, and Johnson grass, Sorghum halpense.  But for the most part you need to do a close examination to really determine a grass down to the species level.  There are a number of dichotomous keys for grass identification down to the species level.  Some rely heavily on flower (spikelet) characteristics, while others include other characteristics.  These keys ask a sequence of yes-no questions about the plants to slowly lead you to a result that matches the characteristics of the plant in question. 


Little bluestem is particularly recognizable in fall when the stems turn bronze
and the fuzzy seeds catch the light.  In summer the stems have a bluish green cast.


Johnson grass is a non-native weedy species that is often seen
 on the edges of fields and drainage areas.  It is tall 3-7'
and kind of looks like skinny corn stalks.  


Japanese stiltgrass in an invasive grass species, particularly in the
eastern United States.  It can be distinguished by the silvery midrib
on the elliptical leaves and its lax habit with many joints along the stems.


The Native Plant Trust (formerly the New England Wildflower Society) has developed an on-line key called GoBotany that allows one to enter a variety of plant characteristics simultaneously and provide a best fit.  This is particularly useful if you are trying to do an identification at a time when no blooms are available.  The plants in this database include grasses, forbs and woody species, but are limited to those found in the New England states. 

 To do a grass identification you’ll need an identification key and a hand lens (10x).  A camera is also useful to document your observations.  Since I made a commitment to ID some of my grasses I’ve been gathering a few different resources.  The Manual of Vascular Plants of Northeastern United States and Adjacent Canada, by Gleason and Conquist is a very technical key (in small print) that, while challenging to use, does provide detailed descriptions of each species. Grasses an Identification Guide by Lauren Brown is easier to use and well illustrated.  It also includes some common sedges and rushes in addition to grass species.  Its drawback is that it describes only the more common grasses.  Both of these references contain species found in the northeastern quarter of the US.

One resource I haven’t used much (yet) is Manual of the Grasses of the United States by A. S. Hitchcock.  This two volume set describes all of the grasses found growing in the US.  It does include some illustrations which makes it somewhat friendlier than Gleason and Conquist.  I’ve been intimidated by the size of this collection (especially large considering this includes only grasses, no rushes or sedges).

Here in the Mid-Atlantic region an easier to use key is the Field Guide to Grasses of the Mid-Atlantic by Sarah Chamberlain.  This guide includes botanical sketches of plants, and plant parts, to aid in the identification and includes only true grasses that are found in the Mid-Atlantic States (VA to PA).  So you don’t wade through extra species that are not likely to be present.  It includes many more grass species than Lauren Brown’s book, though it lacks the sedges and rushes. 

An additional book that I have found critically useful in all plant identifications is Plant Identification Terminology by Harris and Harris.  It provides illustrations and definitions of all the plant parts that are described in botanical Latin terms in the keys. 

Going through a dichotomous key can be time consuming, especially early on as you are wrestling with botanical Latin.  A drawback of many keys is that it is difficult to go backwards when you get something wrong, i.e., you get to the end of the key and your sample is nothing like the choices in the key.  Some of the more formal keys are easier to back up on when each step is numbered.  I’ve found with some of the book formats that they do not number the steps (choices) so that going backwards involves leafing through a lot of pages.  Perhaps putting some sort of bookmarks, like post-its, in the book would make it easier to retrace my steps. 

When I do go through a key and end up without a match I will go back to a point where I was not absolutely certain about my choice and then run down that new path.  Sometimes you just don’t have a good example of the feature that they are asking about; like size or shape of a seed, the number of veins on a lemma, or a surface is slightly or very hairy. 


Here you can see the individual florets of switchgrass.  This species has
only one floret per spikelet. Highlighted here are the glumes,
bracts that enclose the floret(s).  One of the florets is in full bloom
 with the anthers and stigma projecting out of the floret.

After getting frustrated about not getting satisfactory results I found it helpful to practice on some known species.  That way you can get some confidence with identifying botanical structures.  I had examples of switchgrass, Panicum virgatum, and purple top, Tridens flavus, that I could practice on.  After that I worked on an unknown grass that was a little past bloom, the flowers were a little tattered but mostly recognizable.  I found that one of my problems is counting florets in dried flowers.  Sometimes they just look like a bunch of chaff.  With a little practice I’m getting better at recognizing the flower parts.  I was able to ID the unknown as the relatively common, though non-native, smooth brome, Bromus intermis.

Here's the flower stalk for purple top.  The spikelets, which contain
4-9 florets, are deep purple in color.  Hence the common name.

One thing that surprised me in keying out grasses is that plants that are close together in a key may not look that much alike when viewed at a distance.  That is because many keys focus in on differences that are not easily seen rather than on obvious features like height or size of leaf blades.  While not part of some keys, knowing things like bloom season or habitat can be very useful in confirming an identification. 

In addition to running through keys, working with people who are familiar with grasses can be of great help.  For many, once you know and recognize a plant you don’t need to run through a key to identify it, they just know.  In this time of COVID-19 it is even more difficult to find and work closely with a grass expert.  I did recently find a Facebook group focused on identifying grasses called Grasses,Sedges and Rushes of the Northeastern USA.  They have been helpful in pointing me in the right direction when I have been adrift. 

The American mannagrass grows vigorously in early spring
 and is in full bloom by the end of June.

This was the case when I thought I had ID’ed a grass as drooping woodreed, Cinna latifolia.  This was thrown in doubt when I saw that the grass was going dormant in mid-summer while Cinna normally blooms in mid-summer.  Based on a lead I got from the Facebook group, I redid the ID using a different key and came up with American mannagrass, Glyceria grandis.  On reviewing the keys it appeared that I had totally messed up characterizing the flower (spikelet) parts by overlooking some of the less developed florets.  On a side note, it was interesting to see that areas that were thick with mannagrass had very little Japanese stiltgrass filling in in late summer.


Thursday, March 7, 2019

Eastern Bottlebrush Grass

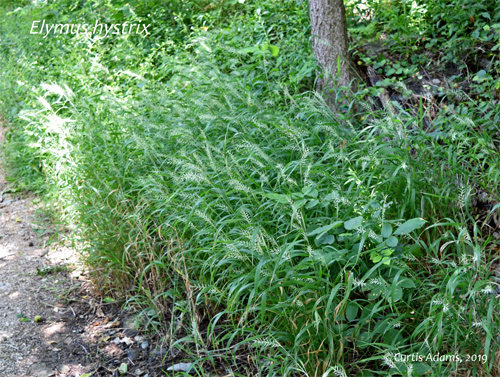
Bottlebrush grass, Elymus hystrix, is a pretty common native species found in open shade and woodland edges in Maryland.  Its native range is from Maine to Georgia and westward to the Great Plains.   It is a cool season grass, meaning that it begins grows actively when soil temperatures are between 50 and 65 F.  Attractive seed heads are produced in June and these often persist into the fall.  Like most cool season grasses it shuts down in the heat of summer, but comes back to life in the fall, sometimes staying green all winter.  I am looking at using this grass to help fill in the woodland edges after removing the invasive Japanese stilt grass, Microstegium vimineum.  Ideally once it gets established it will grow up and shade the ground before the stiltgrass germinates later in the spring.

Eastern Bottlebrush Grass at the end of June growing along a trail near Harper's Ferry, WV

Rather than buying new seed, I harvested some from my existing plants last October and stored them dry in a refrigerator at about 42-45 F.  They were left there until I planted them in mid-February under lights.  Bottlebrush grass seeds do not require moist stratification to get them to germinate, just cold storage for a few months.


Since I have had less than stellar success with starting seeds I thought I would compare different ways of planting the seeds and see how well each germinated.  This was a limited study with only 8 seeds under each of 8 conditions.  All were planted in a soil-less seed starting mix and put on a warming pad to give a soil temperature between 65 and 70 F.  The long awns on the seeds, which give the brush effect, are not easily removed.  I pulled the awns off of each individual seed.  For these I planted one set vertically, and the next horizontally, each about a quarter inch deep.  The third set I planted vertically about a half inch down.  I repeated these conditions using seeds with the awn still attached.   


Here's the first leaf of Eastern Bottlebrush Grass.  The inital shoot has a reddish
 tinge that makes it harder to spot on the dark background. 
The last set of seeds were moved to a colder refrigerator for about a month.  I thought this might simulate winter conditions better.  One set of these I cleaned and planted horizontally, and the other was with the awn attached and planted vertically. 

Seeds began germinating after 9 days.  Rather than going into too many details the results indicated that seeds that were cleaned germinated more quickly, but after a month there was little difference between cleaned and uncleaned seeds.  Where I did see a difference was with colder storage.  Seeds stored in the back of the refrigerator germinated at half the rate of the others stored at about 44 F.  I suspect at the back of the frig, where the coldest air comes in, temperatures would sometimes drop below 32 F.


Now I have about 30 plugs of a native grass that I can grow on to use in my battle against stiltgrass.

Sunday, May 28, 2017

Learning My Sedges

Identifying grasses is tough.  While each species is different in some way, these differences are often subtle and often evident only when the grass is in bloom or when the seeds are ripe.  Looking out on a meadow or fallow field we often see 'grass', but in North America there are about 5000 species of plants that look like grass.  Most of these can be lumped into 2 groups.  The largest is the grass family (Poacea), with over 3000 taxa in North America followed by the sedge family (Cyperaceae) with about 1400 North American taxa.  Common characteristics of grasses are that they have round hollow stems and there are joints, or a thickening, at the leaf nodes.  Most sedges have triangular stems that you can often feel when you roll the stem between your fingers.  When viewed from above the leaves are 120 deg. apart, corresponding to the triangular stem.  Unlike grasses these stems do not have joints.

On our property in rural Maryland we are blessed with a number of different sedges.  Most of these have eluded identification because I have been looking at them in mid-summer when the foliage was big and strong but there were no flowers or seeds in sight.  Last fall when I renovated a garden bed I transplanted in several of these 'mystery' sedges.  Now, closer to the house I could keep an eye on them and catch them in bloom.

The bloom time for the sedges varies by species and growing conditions.  This year they started in early spring and some are still going strong in late May.  Some species that bloom early in the season are Pennsylvania sedge (Carex pensylvanica), Appalachian sedge (C. appalachica), and white-tinged sedge (C. albicans).  Among the sedges that bloom in mid-spring are rosy sedge (C. rosea) and broad loose-flower sedge (C. laxiflora).  Sallow sedge (C. lurida) is one that blooms in early summer.

In the past I have used a book by Lauren Brown, Grasses, an Identification Guide, to try to figure out what I had.  This book is nice in that you can get close to an identification without dissecting the plant.  However, it is limited in the number of species it covers.  This year I used the on-line key at GoBotany developed by the New England Wildflower Society.  I was pretty useful but it requires that you have detailed information about the flowers or seeds to make much progress through the key.  It also provides links to botanical terms and has good photos of each species when you get to the end.  It's limitation is that it only covers species native to the New England states, but that is still an awful lot of plants.

Here are some of the species that I am pretty sure I've identified or confirmed this year:

Rosy sedge is a reliable shade tolerant sedge.  Here its growing in a
woodland bed with strawberry bush (Euonymus americanus)
and American alumroot (Heuchera americana).

Rosy Sedge (C. rosea) is one I have been pretty sure about, but I just wanted to confirm.  It grows really well in moist shady areas and its mounds of fine textured foliage create a peaceful mood.  It's growing along a path that is used by both humans and deer. It can handle a little foot traffic and somewhat compacted soils.

Broad looseflower sedge name becomes clear
when it is allowed to go into flower.  Its leaves
get wider and the flowing culm flops over as it grows.
Broad loose-flower sedge (C. laxiflora) is very common here.  It is essentially evergreen and seems to survive out in the lawn even with weekly mowings.  This year I finally caught it in bloom and was able to run it through the identification key.  What stands out to me is that the leaf blade is folded along 3 veins giving it 'W' shape in cross-section.  In the past I may have ID'd this one as spreading sedge (C. laxiculmis).

Here, some smooth sheathed sedge is in flower in open shade.
The other grass at ground level is nimblewill (Muhlenbergia schreberi)
and a mayapple (Podophyllum peltatum) that was added in, is behind.
Smooth sheathed sedge (C. laevivaginata) is unassuming when not in bloom.  Its foliage resembles that of loose-flowered sedge in that it has a 'W' fold. In bloom it has a tall stalk topped with several tightly packed florets.


This group of weak stellate sedge is growing in an upland meadow/woodland edge
partly shaded by a mulberry tree and many taller perennials.
Weak stellate sedge (C. seorsa) looks like a much larger version of rosy sedge early in flower development (early May).  As the seeds develop they get much larger.  My sample looked similar to photos on the internet, but there some minor differences, such as lacking a bract (narrow leaf) just below the lowest floret.  I am 80% sure of this assignment.


Growing next to the stellate sedge is what appears to be pale sedge (C. pallescens).   This one stood out from other nearby sedges because the spikelets are on short stems rather being held tightly to the main stem.  This is a more northern species, not too common in Maryland.  For that reason I am a little skeptical about this assignment.

An important feature to note when using this identification key is where do the male flowers appear.  They can be on a separate spike at the top of the stem, they could be mixed in a spikelet with the female flowers, either above or below, or they could be on separate plants.  Another important feature to note is whether the pericarp (where the seed is formed) is divided into sections of two or three.

I often get too wrapped up with trying to name a plant.  Sometimes I just need to chill out and enjoy the plants for how they look and how they work in the garden.


Tuesday, December 1, 2015

Fall's Second Season

Even though all the blossoms are gone there are still sights to delight the eye in the fall garden.  Rather than the purples and golds of aster and goldenrod flowers, we get whites and silvers from the seeds and seed heads of many of these same plants.  The lower angle of the winter sun magnifies this effect, causing them to nearly glow with reflected light.

This photo was taken on a mid-November morning.  Some of the plants from
left to right are little bluestem, New England aster, purple top (grass) and Canada goldenrod.

Sweet everlasting, Pseudognaphallium obtussifolium, has a particularly long-lasting presence in the garden.  Even after the seeds are dispersed the white, star-like sepals remain intact well into January.  This plant is an annual and depends on this seed finding a spot on the ground to continue its presence in the garden.

The spent flowers of sweet everlasting show off well in front of a dark back ground.
Mixed in here are the seed stalks of the native grass, purple top, Tridens flavus.


Virgin's bower, Clematis virginiana, is one of our native clematises.  It has a very long vining habit, growing to about 20 feet in sunny location in one season.  Many consider it weedy because its thin stems go just about anywhere.  I like it because it does a good job of covering  fences  with foliage without becoming heavy and damaging like the exotic sweet autumn clematis.  The flowers in the second half of summer are small and rather subtle compared to many cultivated clematises.  Where this plant shines (or glows) is in the fall when the feathery seed heads form.  


After the fluffy white seeds of New York ironweed are dispersed
these rust colored capsules will remain for several months.
Another fall star is New York ironweed, Vernonia novebaracensis.  By the end of October the magenta flowers are all gone, replaced with the rust-colored seed heads.  As winter wears on these breakdown and become less fluffy; however the star-like sepals remain into the new year.


Besides all these flowering plants, the grasses also make a graceful contribution to the fall and winter garden.  Last fall I wrote a blog post about fall grasses.  I won't go into a lot of detail again, only to say that some of them really do use the winter light to great effect, such as pink muhly (Muhlenbergia capilaris) and little bluestem (Schizachyrium scoparium).


Little bluestem also takes on a distinct copper hue that makes it easy to spot at a distance.  Northern sea oats (Chasmantheum latifolium) also has a distinctive form with its dangling seed heads and rich brown hues.  Also on the property I have several large patches of deer tongue grass (see last fall's post).  What I noticed this year was that, while not particularly beautiful in form, the stiff dried leaves made a very pleasant rustling sound when there was just a little breeze.


While leaving perennials and grasses standing over the winter offers some visual interest to an otherwise flat landscape, it is also a good practice for the ecologically minded gardener.  Seed heads left standing provide food for migrating and non-migrating birds.  Standing twigs provide winter cover for many small animals and insects.  The larvae of many butterflies over winter in the leaf litter.  Many insect predators overwinter in the ground cover.  By providing space for them you will have a leg up come spring on your pest control.  (There are situations were fall clean up is advised, particularly for plants battling a fungal or bacterial infection where spores can overwinter in the leaf layer.)


Appreciating plants in the fall is not just an outdoor activity.  We brought in a few to enjoy as a table center piece.  While pretty this has proven to get a little messy.  The seeds  on the little bluestem stick quite tightly to the table cloth and the hosta seed head is still shedding seeds.  Our biggest problem is that our cat likes to get in and rearrange things, even the spiny branches of the invasive wineberry (Rubus phoenicolasius).
Some of the plants from left to right, Northern sea oats, a wineberry stem, little bluestem,
false indigo pods, tall ornamental garlic, hosta and wild bergamot.


Sunday, November 30, 2014

Swags from Nature

It's late November here in Pleasant Valley, MD and most of the leaves are gone.
For the past couple of years we have been going out to the backyard for our holiday decorations.  It's a great time to get the family out to explore nature in the off-season and get a little creative too.  With an impending pre-Thanksgiving snowstorm we moved up our timetable for collecting materials that could be used in holiday swags.

This year we didn't have a lot of colorful berries to use.  One reason is that I have been diligently cutting or removing the invasives like oriental bittersweet, Japanese barberry, winged euonymus and multiflora rose all with colorful fruits that were overly abundent in past years.  The native 'replacements' I've put in, like winterberry holly, chokeberry and smooth sumac, are still maturing. There are still many different textures and evergreens out there that work well together.

Here's what we gathered from around the property.  While it was easy
 to stuff the cuttings into the bag, getting them out without
damaging the delicate seed heads was pretty tricky.
Rather than starting with a preconceived plan for our decorations we just headed out to take cuttings of anything that looked interesting.  The base for most of our swags is some sort of evergreen, so our first stop is to get some pine branches.  You could also use things like yews, holly and rhododendrons.  The broad leaves of the Rhody offer a real contrast in texture from the other smaller leafed plants.

Types of plant material we harvested were:
  • Grasses, provide browns, tans and gold shades, some with interesting seed heads.  Deer tongue grass and little bluestem have a lot of structure to them.  The foxtails are large enough to show up at a distance.
  • Seed heads provide detailed texture.  Monardas, agastache, ironweed, asters, goldenrods, cone flowers and members of the mint family are good examples smaller flowers. The dried heads of larger flowers like annual sunflower, milkweeds, hydrangea and tree peony can really stand out.  Pine cones, of course, are classic wreath material.
  • Berries and Fruits are a great source of color.  Holly berries are a regular addition to winter decorations.  Berries from various Hypericum, roses and beautyberry are some other possibilities.  We also harvested some crabapples for color; although these may not be a good choice for indoors, since they may begin to rot. As I mentioned I have removed many of the brightly colored invasives, like bittersweet and barberry, from our property.  
  • Leaves add a different texture.  This year we were able to get some leafy branches off of the Beech trees.  Some species of oaks also retain leaves that could work well in a swag/wreath.  We also picked up some individual leaves off the ground that had good color in them.  We bundled them in a little sachet, but they could also be used individually.
  • Branches can add a unique structure.  We took some from our winterhazel (Corylopsis) which has a zig-zag stem.  Red twig dogwood would be another good choice having both color and texture; however our plants are are a bit too small to cut back yet.
  • Vines can be used in several ways.  Bundled together they can form the basis for a wreath.  Singly they can add a free flowing element to the design.  Most of the vines we have available are from invasives like oriental bittersweet and Japanese honeysuckle.  We also have some native river grape and Virginia creeper.  I caution you about harvesting the Virginia creeper since, without leaves, it is difficult to distinguish from poison ivy.
When I first started doing this I only wanted to use native species.  But then I decided that I should take this as another opportunity to remove these plants for the property.  I just need to remember to dispose of those plants properly when we take down the decorations.

We covered the table with some large pieces of paper so that the debris could be bundled up more easily.

The basic swag-building tools are clippers, wire cutters (don't use your pruners for cutting wire) and some flexible wire.  I use copper wire for binding together the larger branches and a thinner steel wire to attach the smaller materials.  What I like about swags is that they are so easy to build.  First bind together the thicker stems at one end with some wire. This creates a bundle of stems that form the base or background.  Then layer other materials on top of the base, tying them in with wire.  More details can be added as desired.  You can also push single stems into the bundle as accents, the tightness of the bundle will usually hold them in place. Finally tie in a loop of wire at the main bundle to use as a hanger.

The swags you create can be simple with just a few different materials, or more elaborate with a variety of shades and textures.  Here are some photos of what we made this year:

Here we started with a bundle of white pine and attached a wide variety
 of seed heads on top, such as virgin's bower (Clematis virginiana),
garden phlox, tree peony, annual sunflower (at top) and various grasses.
  To finish we tied in a wide branch of beech to the back.

This one used the same technique, but fewer materials.
Here there are a variety of grasses including deer tongue grass
and purpletop, on top of the bundle of pine branches.
At the tie off point there is a small bundle of maple leaves and some rose hips
Here, some of the branches point up, others down.
Also a rhododendron branch in the center changes the texture of the swag.   
These next two were constructed by my sister using a lighter touch.

Here she created a circular wreath using Japanese honeysuckle.
Then she tied in a little bundle of of beech leaves, foxtails,
cone flowers on a base of white pine.
Since we had so much interesting material left over my wife suggested putting it into a pot.  This was so easy to put together.  To help things to stand up better I put a 6" short log in the center, then wedged the branches between it and the pot.

Here we put in some of the left overs including some Corylopsis branches,
 a wild mint, spotted beebalm, a wild onion and rhododendron branches.
When the holidays are over most to these can be put into the composting, after removing the wire bindings.  I will separate any fruits or seeds from the invasive plants that were used (oriental bittersweet and multiflora rose, in these examples) and put them in the trash to keep them from spreading.

We had a great time making our natural decorations.  Hope you all have a great holiday season!!


Wednesday, November 19, 2014

Fall Grasses

We've had a long and relatively mild fall here, that is until this week when overnight temps got to the low 20's.  Many trees held onto their leaves for a long time wait for a real cold snap to trigger leaf drop.  The Fothergilla I planted last season finally turned the fluorescent orange that I was hoping for.

As the temperature dropped the leaves of this
 Fothergilla 'Mt. Airy' changed to this intense orange color.
It got me thinking about my plant selection.  I am always looking out for plants with exciting fall foliage, reds, golds and oranges.  It got me to thinking that these are more effective when contrasted with cooler or muted colors like pale yellow, green or tan.

One class of plants to fill that role are the native grasses. Late or warm season grasses that produce flowers and seeds in the fall are particularly effective.  The low angle of the sun late in the year really plays off the seed stalks, bringing them to life.  I usually leave these stalks standing through the winter to get the most out of them.  I'll clean up what remains in the spring.

Another benefit of these grasses is as a food source for birds and as shelter for many insects and overwintering animals.


Here are some of the grasses I have that are showing off nicely this fall.

I have planted inland sea oats (Chasmanthium latifolium), aka, Northern sea oats and several other names, along a sloping area by the house subject to erosion.  This grass produces a dense fiberous root system that holds the soil well.  While its native habitat is in moist shady locations it will also tolerate dry shade.  It sprouts early in the spring and can spread, both by expanding clumps and seeds, to form dense stands.

The broad leaves of Inland Sea Oats has a bamboo-like appearance.
These copper colored seeds will persist into winter.


The plan is for this Pink Muhly to fill in along this fence.
When they open the flowers look like exploding fireworks.
Another grass that I have added to the property is Pink Muhly Grass (Muhlenbergia capillaris).  This species is native to the eastern US and the gulf coast, but you're not likely to find it naturally in the mountain regions where I am.  The reason I put this in was the light-catching effect of the flower plumes.  At first I was concerned that this effect would not be strong because I didn't have a good angle for the backlighting. But that's not a problem.  The photo above was taken at 2 PM and there is penty of light being scattered by the flowers even though the sun is still rather high in the sky.

I've found this plant to be slow to establish here. Some of that has to do with competition from the surronding plants. Clumps of pink muhly will expand, but it is not an aggressive spreader.  Larger masses should be mown or burned back in late winter to clean up the clump.


This clump of little bluestem is easily identified
by the silvery seed tufts along the stem..

These next three species are growing wild around my home.  Little Bluestem (Schizachyrium scoparium) is a common native species around here.  It is well suited to dry sunny sites.  It grows well in poor soils.  In excessively rich soils it puts on too much growth and flops over.  As a warm season grass it grows to 2-3 feet by mid-summer.  In the fall it turns golden and produces fuzzy white seeds along the upper stem.  These catch the light and envelop the stem in a silvery glow.  Some selections of little bluestem take on redder shades in the fall.   Small birds feed on the seeds, so I leave these up all winter.


One of the more distinctive grasses I have is Deer-tongue grass (Dichanthelim clandestinum, formerly Panicum clandestinum).  It has relatively broad leaves compared to other grasses.  It is a cool season grass, producing terminal spikelets in early to mid-summer.  Unlike most other cool season grasses, branching and growth continues through the summer.  The name, deer-tongue grass, refers to the shape of the inch-wide leaves, not to any preference for deer to eat it.


Deer-tongue grass persists well into fall, here as a deeply textured mass.
No longer colored, the seeds of Purpletop still catch the light.

Another common pasture grass here is purpletop (Tridens flavus).  When it first blooms in late summer it has a reddish purple color.  When distributed through a field, these blooms cast a purplish haze over the scene.  As the seeds mature the color is lost and the seed stalk becomes a brownish-gold.  As a pasture grass it is very palitable to livestock.  It is also a larval host to a variety of butterflies.

I have not seen purpletop used in any designed plantings, though it does have some interesting features.  The red colored flowers are best appreciated en masse and at a distance.  What might be useful in a smaller garden is to use the 3-4 foot tall flower stalks as a translucent screen between plantings.  Since the leaf blades are concentrated in the lower half of the plant they would not block a view across a planting.  Purpletop grows well on dryish soils in part to full sunlight.

Saturday, October 18, 2014

Making a Plan to manage Japanese Stiltgrass


My wife and I have been on a campaign against invasive plants on our property.  Our two main targets are garlic mustard and Japanese stiltgrass, Microstegium vimineum.  The spring time is when our focus is on garlic mustard, when the ground is soft and before it begins to flower.  In late summer our focus switches to stiltgrass.  I am trying to come up with a program that works for me: how can we eliminate as much stiltgrass with the least amount of work and without causing too much collateral damage. 

This is a shady area that used to be mowed.  The stilt grass has moved into
the gaps and is crowding out the native vegetation.
We've been pulling plants from planting beds as they appear (compulsive behavior), pulling larger plants and weed whacking in late summer.  Recently a friend pointed out how much stiltgrass was growing in the lawn.  I realized that this lawn weed may be creating a large mass of seed that could easily recontaminate the surrounding woodlands.  So I'm now including the lawn in the project. 

The Plan

As the weather has gotten cooler I could see how stiltgrass has taken over large swaths of the lawn.  This effectively creates bare spots that are prime territory for stiltgrass to resprout in the spring.  Remembering that one of the best to control lawn weeds is to have a thick turf, I decided that I should be more aggressive about filling in those bare spots with desirable plants. My general plan is as follows:
  • Pull in early August.  This allows a second crop to germinate, but not enough time to mature before frost.
  • In natural areas minimize disturbance to soil and encourage existing native species.  Cut stiltgrass low when flowering starts, about mid to late August to early September.
  • In disturbed areas (lawn) try to add more competitive ground covers, like cool season grasses to get established before stiltgrass germinates in mid-April (WVa).  
This will be a 5+ year program to get rid of the current crop of seeds already in the ground.  There will be continued outside pressure from surrounding areas infested with stiltgrass. 

Japanese stiltgrass is turning brown in the lawn early October.
This thatch can be slow to break down,
leaving a gap for more to germinate in spring.

In late fall and winter stiltgrass appears as a persistent golden-brown thatch.  The usual invasion route is into areas of disturbance in an otherwise natural space.  Deer are also vectors for the spread of stilt grass.  They often bed on top of stiltgrass infested areas, then carry the seed with them, dropping it along their paths.  While they will sleep on stiltgrass, deer do not feed on it.  Instead they feed on native vegetation, further helping stiltgrass to outcompete native species.

In late August/early September a flush of growth is a signal that stiltgrass is maturing and seed production is about to commence.  Waiting to cut the grass at this time does the maximum damage to its reproductive cycle.  Early season mowing or whacking of stiltgrass stimulates early flowering and a lower, harder to remove growth habit.  Pulling stiltgrass early in the season creates openings that allows additional germination.  By waiting until late in the season these late germinated seedlings will not have time to mature before they are killed by the colder temperatures. I really like the idea of tricking it into germinating late in the season.  Also plants pulled out before the seed has matured can be left to decompose.  After the seed has ripened in mid- to late-September plants should be bagged and landfilled to prevent spreading of the seed.

I found this recommendation by West Virginia forester, RussAnderson:
"If the area where stiltgrass control is desired includes a lawn that is infested, all regular mowing of that portion of the lawn should cease around July 15 and allowed to grow for a month before mowing again. Normally, during this 30 day period the stiltgrass will significantly  outgrow all other lawn cover making it both easier to identify and easier to kill. To ensure the highest proportion kill possible in the stiltgrass the best option is to mow the lawn, especially where the stiltgrass is present at the lowest blade setting. Completing the mowing during the hottest and driest conditions possible will further enhance the kill in the stiltgrass. If the mowing of the lawn is successful, regular lawn grass will begin to fill in the dead spots almost immediately. If the stiltgrass is mowed before it is allowed to go to seed the number of stiltgrass seedlings on the lawn will greatly decline in succeeding years."

It's hard to leave an area of lawn unmown.  But if this works, consider all the labor and chemicals saved compared to removing stiltgrass by other means.  Also this can be a positive step by NOT doing something (mowing for a month), rather than continually mowing. 

Here's that same shady area after weed whacking and raking up the cut stiltgrass (upper left).
Pink flags indicate the location of desired native species left in place.

Weed whacking stiltgrass from hard to mow areas should be done in this late August period.  Cutting as low as possible removes both the upper flowers as well as the lower cleistogamous flowers hidden in the stems.  If there are native species going to seed in the area, waiting until they mature can help reestablish native populations.  In some smaller areas I surveyed for native species and flagged them so that they could be avoided while whacking the stiltgrass.  

Cool season turfgrasses

Since each fescue plant is so small the seeding rate
 is fairly high, 5 lb/1000sf, to get good coverage.
Tall fescue is a good choice for high traffic sunny areas, but this is not a North American species.  Since my focus is on using native vegetation and natural appearance, I am using a mostly native fine fescue blend. (Eco-grass from Prairie Moon) of red and creeping fescues for the shadier areas.  In the wilder areas I am trying a blend of native grass species.  This is an experiment to see if I can get good cover with these prairie species used in a lawn-like environment.  However, a prairie is managed much differently than a lawn and there is a good chance that this approach will not be successful.  Many of these native grasses need a year or two to put down roots before top growth takes off.  Ideally these species should be allowed to mature for a season or two before they get chopped back, by mowing or grazing.

For sowing, I first used an iron rake to clear out the stiltgrass thatch.  (Looking back, if had done this in early September I could have limited the stiltgrass seed production even more.)  This also loosened the soil surface.  Then I broadcasted the seed.  Finally I used the flat edge of the rake to push the seed in closer contact with the soil.  To get good germination and establishment of the seedlings the ground should be kept moist.  I usually try to time fall seeding with the weather forecast to take advantage of rainfall to get the grass started.

About 10 days after seeding with Eco Grass a fine green haze is covering this previously barren area.
Most commercial turf grass blends contain annual and perennial ryes which are fast growing and fill in quickly.  The fine fescues used here do not grow as quickly and it will take longer to have that full look.

Native Grasses

With that in mind I decided to try this as an experiment.  I selected species that tolerate grazing, where they would be eaten back to 3-5 inches, since mowing it is a similar action.  Since I am fall sowing I selected mostly cool season grasses, with the hope that they will get established before the stiltgrass germinates in the spring.  Also, there are warm season species in the mixture to try and fill in the gaps when the weather warms.  The grasses I selected where mostly native to Maryland or the mid-Atlantic region.

Name
Botanical Name
Season
Exposure
Seeds/pound
Sun mix ratio
Shade mix ratio
Canada rye
Elymus canadensis
cool
Part
100K
8
4
Virginia rye
Elymus virginicus
cool
Part
100K
4
2
Side Oats Grama
Bouteloua curtipendula
warm
Full
150K
6
1
June Grass
Koeleria macrantha
cool
Full
2000K
1
0
Fall or Beaked Panicgrass
Panicum anceps
warm
Part
--
0
1
White clover
Dalea candida
--
Full
260K
4
0


I made up two seed blends one for full sun and the other for part shade.  The majority of the seeds are cool season grasses.  The weight ratios for each are listed in the table above.  When making up a seed blend you need to account for the number of seed per pound and the seed viability, usually listed as pure live seed (PLS) which is seed purity times the germination rate.  This is my first time trying this so I can't be sure that it will work.  I did put some seed into a new meadow area that will not be mowed regularly.  This will serve as my 'control' group.

A better way to sow these native grass seed would be to use a seed drill and put them in 1/4 to 1/2 inch deep.  Instead, I sowed them the same as I did for the fine fescue, but at a much lower rate (pounds/sf).  The recommended rate for Eco Grass is 5 lbs/1,000 sf while for Canada rye it is on the order of 3 oz/1,000 sf.  Since the ryes and other native grasses are much larger plants when mature, compared to a single fescue plant, it takes only a few seeds to get the same coverage.

June grass has a seed similar fescue is size;
however, the resulting plant is much larger

Side oats grama has a lot of husks included, but
these are accounted for in the PLS calculation  

Virginia and Canada ryes look similar.  


If I don't see sufficient germination by next spring I will go back to a standard turf grass blend.  It's better to fill in with something than leave space for stiltgrass.

15 days after seeding I'm seeing some new grass growth in some of the sunnier areas.
The shade areas are not showing definitive signs of new grasses.


We were surprised to find this obedient plant
blooming late in the season.  I don't know if this is indigenous
 or if it escaped from an earlier planting by a previous landowner.

Other strategies

Broad spectrum (glyphosphate) and grass specific herbicides are effective on stiltgrass, but they may impact surrounding vegetation.  I found a mention of using a dilute solution of Fusion® (grass specific herbicide) to kill stiltgrass with relatively little collateral damage to native perennials and grasses.  Another tool is the use a preemergent herbicide in spring.  However, since stiltgrass continues to germinate throughout the spring and summer, a single treatment alone would not be effective.  A preemergent would also suppress germination of other desired species.


One of the side benefits while pulling stiltgrass is that it gets you looking closely at plants and nature.  We've spotted a number of interesting plants this year while thinning out the overgrown edges of the woodlands.  Most recently I spotted a dark pink Obedient Plant among the grasses.

References

The following are some additional websites with useful information on dealing with Japanese stiltgrass: