Showing posts with label vegetable garden. Show all posts

Friday, December 31, 2021

Why Won't My Garden Grow?

 I’ve noticed that I’ve been having less success growing vegetables from seed in my garden over the past few years.  That is particularly the case for small seeded crops like lettuce and chard.  This is in spite of increased organic fertilization.  True, I don’t water as much as I should for seedlings, but I never do.  I tend to rely on rain.  Still I have become suspicious that something else may be going on.  This has led me to consider allelopathy.  My question is whether there is something that is growing or has grown recently in the garden is affecting the ability of new seeds to germinate and develop?

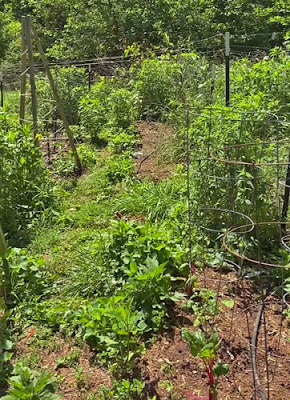
Garden in mid-June: Vegetables still small in
 relatively clean beds, but Monardas
and Rudbeckias are coming on strong.

Allelopathy refers to the beneficial or harmful effects one plant has on another. It arises from the release of allelochemicals from plant tissues though leaching from leaves or roots, volatilization or decomposition of plant parts in or on the soil.  Through these allelochemicals one plant is able to suppress germination or development of other plant species in the immediate area.  In some cases these chemicals may have a beneficial effect on some neighboring species while having a negative effect on others.  There is a lot of research in this area, particularly to find crop plants that are able to produce their own weed suppressive chemicals rather than relying on added herbicides.

There are a couple of non-traditional practices that I have been employing in my vegetable garden that I am beginning to question.  One is that I allow native species to run rampant along the edges and between the rows of vegetables, particularly wild bergamot (Monarda fistulosa) and black- and brown-eyed Susans (Rudbeckia hirta and triloba).  The other is that I leave the roots of the previous year’s plants in place.  I just cut the old plants off at ground level and throw them into the compost pile.  I do this as a means of increasing the organic matter in the soil and reducing soil disturbance. 

Following the adage, “a month in the laboratory can often save an hour in the library” (Frank Westheimer) I decided to do a little research first.  I searched the internet for information on the allelopathic potential of all the native and non-native species that are growing in my vegetable garden.  After searching those, that I turned to looking at the vegetable themselves. 

The tables below list many of the weeds, native species and lastly the vegetables that are common in my garden along with the existence of any documented evidence that these plants possess any allelopathic properties.

Garden Weeds:

Common Name

Botanical name

Evidence of Allelopathy

Chickweed

Stellaria media

        Yes

Ground ivy

Glechoma hederacea

        Yes

Hairy bittercress

Cardamine hirsuta

        No

Indian strawberry

Duchesnea indica

        No

Mulberryweed

Fatoua villosa

        No

Ladies thumb

Polygonum persicaria

        Yes

Nut sedge

Cyperus esculentus 

        Yes

Persian speedwell

Veronica persica

        Yes


Native Annuals & Perennials:

Common Name

Botanical Name

Allelopathic?

Annual sunflower

Helianthus annuus

        Yes

Common Milkweed

Asclepias syriaca

        Yes

Butterfly weed

Asclepias tuberosa

        No?

Common and Daisy Fleabanes

Erigeron philadelphicus and annuus

        Yes

Honeyvine

Cynanchum laeve

        No

Wild Bergamot

Monarda fistulosa

        No

Scarlet beebalm

Monarda didyma

        Yes

Purple Coneflower

Echinacea purpurea

        Yes

False sunflower

Heliopsis helianthoides

        No

Goldenrods

Solidago sp.

Yes (some species, at least)

Browneyed Susan

Rudbeckia triloba

        No

Wild Blackberry

Rubus sp.

        ?

Sealheal

Prunella vulgarus

        No

Pennsylvania smartweed

P. pensylvanicum

        Yes

Wingstem

Verbesina alternifolia

        No*

*Golden crownbeard, V. encelioides, a native of western North America does have allelopathic properties.

Garden Vegetables:

Vegetable

Botanical Name

Allelopathic?

Arugula

Eruca vesicaria ssp. Sativa

        No

Basil

Onicum basilicum

        Yes

Collards

Brassica oleracea var. viridis

        Yes

Cucumber

Cucumis sativus

        Yes

Green Beans

Phaseoleus vulgaris

        Yes

Lettuce

Lattuca sativa

        No

Peppers

Capsicum annuum

        Yes

Squash

Cucurbita pepo

        Yes

Swiss chard

Beta vulgaris var. cicla

        Yes

Tomato

Solanum lycopersicum

        Yes


While doing these searches I came across some interesting studies on the potent allelopathic effects of many invasive species.  This is one of the factors that allow invasive species to outcompete native ones.  One study treated radish seeds with the aqueous extracts from leaves of a number of invasive species.  The radish seeds were then evaluated for germination rate and root growth.  The following list is ranked in order of negative effect on germination, most to least:  Ailanthus altissima, > Microstegium vimineum, Alliaria petiolata, Celastrus orbiculatus,> Ligustrum vulgare, Rosa multiflora, Rubus phoenicolasius, and Acer platanoides.  There are multiple studies that document the allelopathic effects of Japanese knotweed, Polygonum cuspidatum.  It seems that many species of the genus Polygonum have some allelopathic character.

From this research it looks like the fleabanes (Erigeron annuus and philadelphicus) and purple coneflower would be the most likely allelopathic culprits among the native species in my garden.  However, most of the allelopathic candidates on these lists are from the weeds and garden vegetables.  Of these, ground ivy, nut sedge and ladies thumb are the most prolific weeds in my garden.  Among the vegetables in my garden, collards, peppers and cucumber are the most likely suspects to be causing some troublesome effects.

Allelopathy experiments.  In general experiments that measure allelopathy are tricky to interpret.  Many are based on bioassays, where the allelopathic effect is measured by such things as the germination rates and root growth of a target species.  In many cases radish or lettuce seeds are used.  Many of these studies use extracts of leaves, stems or roots of the species being studied applied at various concentrations to isolated seeds of the target species in a Petri dish.  Another approach is to test the soil itself.  Due to the complex nature of plant-soil and plant-plant interactions, most studies on allelopathy are correlative rather than causative. 

To help me understand whether there was a problem with the soil (and all the things that come with it), or the cultural effects like moisture and sunlight, I decided I would try a bioassay comparing surface soil samples from various parts of the yard and garden.  I tested to see how each of these soils affected germination and growth of some lettuce seeds which had performed well when started indoors this past spring.

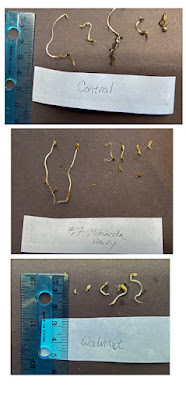
Germinated seeds:  Control (top);
near wild bergamot (middle);
 under English walnut (bottom)
I adapted a procedure from Environmental Inquiry/Cornell University for performing lettuce seed bioassays using materials I had on hand.  I took three samples of surface soil, 0-1/2” deep, from each area of interest.  This is the zone that I normally plant small seeds like lettuce in.  I mixed the soil samples in a baggie then pulled out about a tablespoon’s worth.  This was put into a fresh baggie (as I didn’t have any Petri dishes) and moistened with a few drops of water to make the soil damp, but not wet.  I disinfected the lettuce seeds in dilute bleach, according to the procedure, and then put 8 seeds into each baggie.  The baggies were sealed, put into the dark for 5 days at 60-80°F.  I used a moistened, peat-based seed starting mix as the control.  Samples were taken in November so there was no active growth of vegetables except for the sample near actively growing collards.  I tested the following areas: 1) garden soil under green beans, near daisy fleabane; 2) garden soil under wild bergamot; 3) garden soil near where tomatoes and cucumber had grown; 4) garden soil near collards; 5) typical lawn soil (fescue and weeds); 6) under an English walnut with vinca groundcover.

After five days I separated out the germinated lettuce seeds, counted the number of germinated lettuce seeds and measured the length of the roots.  I found I was able to pluck out the germinated seeds from the soil in the baggies by suspending the entire sample in water with a little dish soap.  This allowed the soil to fall away from the roots without damaging them.  The root growth measurements had a lot of variation.  This is not too surprising considering the many uncontrolled variables, like variable soil moisture and soil contact within each baggie, and small sample size.


Graphical comparison of various soil samples on germination and root
growth of 'New Red Fire' lettuce seeds.

Results and Conclusions

While the differences in root length and germination rate among these samples are not highly significant, due to the small samples size, there is an indication that the soil around the collards is not as favorable to seed germination and growth as any of the other garden samples and is on the order of that for soil under an English walnut tree.  (English walnut, Juglans regia, is much less allelopathic than our native black walnut.)  These results also indicate that the presence of wild bergamot (Monarda) is not detrimental to the initial stages of seed growth.  Another indication was that root growth in the soil around the green beans was less than the control sample.  This is consistent with a study that looked at the effect of leaf extracts of several lines of common beans on seedling growth, including lettuce.  That study made no mention of the effect on seed germination.

Lettuce or radish seed bioassays are also good for checking for herbicide residues in soils and mulches.  General information about testing whole soil samples for herbicide residues can be found at this link from NC State.

Based on the literature it seems like many of the plants in my garden have some degree of allelopathic behavior.  This brings up another important question; how long does that effect last.  The sense I get is that it’s more on the order of weeks than months.  In field trials some brassica family cover crops have shown allelophatic effects on the order of weeks to months after being tilled in. I found another post discussing the use of cover crops, many of which are allelopathic.  It suggested waiting 3 weeks after tilling them in before planting.  Leaving allelopathic plant residues in place as a mulch, will increase the time over which they have the suppressive effect.

 So, based on my little experiment and all the literature I scanned, it seems there is no single clear cut culprit exerting a negative influence on my gardens fertility.  This research has led me instead to a list of suspects and actions to control their effects.   It may be that my practice of leaving roots in the ground, particularly the collards, over the winter may be negatively affecting my gardens ability to grow grow directly from seed. I will need to dig these out at least a month before planting in the spring.  I will also pull out any remaining roots of the curcurbits and chard which remain, as well.  The ubiquitous weeds, particularly chickweed, ground ivy, and ladies thumb need to be removed, especially during the growing season.  As much as I like the prolific flowers of the native daisy fleabane, I will be removing those from the vegetable beds, as well.

Another less traditional garden practice I have been using is flame weeding.  This involves using a hand-held propane torch to kill weed seedlings before they can establish.  This was done prior to planting, or transplanting crops.  An advantage of this practice is that it doesn’t disturb the soil surface.  I have not looked into any literature on possible negative effects of this practice, but for next year I will not use this method in the growing beds themselves. 

So with these changes we will see if I get any better results in the garden, or will I need to dig deeper?

Wishing you all the best for the New Year!!!

Saturday, February 2, 2019

Garden Trellis

My vegetable gardening style is on the wild side.  I give maybe too much weight to reseeded native flowers over food producing plants.  I start out with grand expectations of neat rows, but inevitably weeding the garden becomes less important as other tasks loom.  In fact this year I got things nicely cleaned up with weeded and fertilized beds and mulched paths.  Unfortunately reality struck with a cool wet spring that offered few pleasant days to keep the garden neat and clean.

I got the garden all cleaned up in April of 2018 with great intensions
 for keeping it neat, but ...
One way to bring order to the garden is to add visual structural elements.  These add focal points or visual anchors that rise above the clutter.  In past years I've used fallen limbs to create tripods to support beans, cucumbers and tomatoes.  Since these were not well anchored, they end up falling over as the season wears on.  This year I decided to build some semi-permanent tripods that could be left standing for a couple of seasons and could be easily repaired if and when the time comes.

Schematic for my garden trellis.  Parts include 2x2 wooden legs, 3" diameter PVC pipe,
 6" wood square, some 2.5" deck screws and a bag of coarse sand.

I liked the idea of using tripods.  They are easy to build and structurally sound.  Here is a schematic plan that I came up with for my tripod trellises.  I wanted to build it out of 2 by 2 cedar, but it was not readily available in long lengths.  Being somewhat impatient I got 2 by 8 pressure treated boards that I ripped into 3 1.75" wide pieces about 7.5' long.  Before ripping into thirds, I cut off a 6" piece (actually 6" x 7.5") to make the top support.  I trimmed this rectangular piece into a hexagon on the band saw and angled 3 of the faces at 12° to match the angle of the tripod (see the diagram).


Completed intallation of tripod legs.  Having the PVC sleeve
 above the soil level helps keep the sand clean.
 Rather than driving the trellis directly into the ground, where constant contact with wet soil would accelerate rotting of the wood, I put in a length of 3" PVC drain pipe that I would later fill with sand to make well draining fill that would also hold the trellis firmly in place.  (Note that the thinner schedule 40 PVC drain pipe can be used rather than schedule 80, since you are just forming a soil barrier.)  To further improve the weatherability I also painted the lower 2 feet of the wood with a water seal coating. 

My biggest mistake last year was getting started too late in the season, after the garden had started growing. To put in the PVC liners in the established garden I used a trenching shovel (about 3" wide) to dig a fairly narrow hole in at a roughly 12° angle and 16-18" deep.  I then used the PVC tube itself to remove the last bits of the soil and get a firm fit.  The other two liners were put in 31" away from the first to form an equilateral triangle (see the diagram). 

The top support is attached to the legs
with 2.5" deck screws.  These are easily removed
 if I needed to replace one of the legs.
After the liners were in, it was time to position the legs of the tripod.  With the 3" lined holes there was sufficient wiggle room to get the legs to align.  The top hexagonal support was attached to the legs with 2.5" deck screws. The screws were prepositioned about 9" from the ends of the legs so that I only had to drill them into hexagonal support (into the angled faces).

The completed trellis, with a spiral of twine,
is ready to support these cucumbers.
With the top support attached and the legs in their PVC sleeves I filled in the space between the sleeves and legs with coarse sand.  First I put in about an inch of sand as a base under the legs then finished by back filling with sand to the top of the sleeve with occasional tapping to make sure the sand was evenly and firmly distributed. It took a little over a half cubic foot of sand to to do 4 tripods (12 holes).

Even with this late start I was able to train the tomatoes and cucumbers onto the trellises that I had built around them.

I tied some rubber balls to the blunt top ot the tripod using fishing line. 
The lightweight balls won't damage the plants if they fall off.

Now I am again getting ready for a clean start in the garden.
It's February and the trellis are ready to go.  Well, maybe in a couple of months.


Wednesday, April 25, 2018

Preping the Garden

Last year's garden did not do so well.  On reflection there are a number of reasons, some of which are in my control.  Others, not so much.  To do well all plants need sunlight, nutrients and water.  And in my location, protection from pests.  In my mind I was providing all those, but in practice I was coming up short.

Here's the garden half-way through: last year's growth raked out, garden mowed low,
3 beds weeded with scuffle-hoe and rake.  Note the log pile just beyond fence,
all that remains of the big box elder, Acer negundo.

I have been adding compost, shredded leaves and a little organic fertilizer in the past. Last spring I sent samples for a soil test and learned that levels of most nutrients were too high: phosphorus, potassium, calcium and magnesium.  On the positive side, there was an increase in the organic content and cation exchange capacity (a measure of fertility). So this year I will only add an organic nitrogen fertilizer to the soil.  Of the organic choices that had minimal phosphorus and potassium I considered soybean meal and feather meal, both with about 7% nitrogen.  I opted for the soybean meal because I could by it from the feed store for about 25 cents a pound.  One warning with the soybean meal that I read was that it could inhibit the germination of small seeds.  So I'm not using that in the beds where I am planting lettuce, collards, chard or arugula.  I'm hoping that the beans, peas, spinach and others will be OK.  I got all the fertilizer down now (mid-April) and that should give it some time to be digested by the soil biota and have food ready for the bulk or the planting in mid-May.

As far as sunlight goes, I thought that I had good exposure.  That may have been the case 5 years ago, but the trees have been growing taller and eventually cutting a couple of hours of direct sun from the garden area.  While I hate to remove trees, there was a big box elder just south of the garden that appeared to be causing most of the trouble.  Since box elders are pretty common here, it was only with a little difficulty to say good-bye to that tree.

We usually have good rain here and I have a soaker hose to put in place for supplemental water.  So for moisture, I should be in good shape.

The last problem is the critters.  Every time I think I have a solution, they seem to adapt, or another problem crops up.  The double fencing seems to keep the deer at bay and the buried chicken wire slows the ground hog down; however I think it can still climb over the chicken wire when it really wants to.  Last year many seedlings were getting eaten and I'm not sure who to blame.  This year I have a motion activated trail camera to use so I can get a clue as to what is getting into the garden.  I am also expecting that the thicker layers of wood chip mulch will make it more obvious where any burrowing is taking place.

Other garden preparations:
I cut back the long tips of the wild blackberries growing on the outer fence. 
This improves fruit quality and gives more space to move around.

I've allowed wild blackberries to grow along the outer fence of the garden.  This re-enforces that area against deer.  I've read that by pruning the side branches to 4-8 leaf buds the fruit quality is improved.  I've been doing that for a couple of years now and it seems to be true.  The 'managed' wild blackberries have larger, sweeter fruits than the unmanaged plants nearby.


Rather than cutting to the ground I left 1-2' of the hollow
Monarda stems as potential bee nesting habitat.

Another plant growing along the fence line is wild bergamot, Monarda fistulosa.  These grow up about 4' and are very attractive to bees in early to mid-summer.  The hollow stems can provide nesting sites for small bees, like mason and leaf-cutter bees.  Since these bees build their nests in summer and develop there through the fall and winter, these stems need to be left intact for over a year.  When I did the garden clean-up I cut most of these stems to leave 1-2' intact.  These old stems will disappear into the new growth by the end of spring.  I just need to remember to leave them alone for the next year. 

As a result of a lot of tree work done here this spring, I have a large supply of wood chips.  This year was therefore the year to replenish the garden paths with fresh chips.  Many folks don't like to use fresh chips in the garden because they take up nitrogen from the soil as they decompose.  Since I want to suppress growth on the paths and garden perimeter, these fresh chips are just the thing to use.  (This loss of nitrogen from the soil only occurs where the mulch touches the soil and does not significantly affect the root zone unless the wood mulch is dug into the soil.)

The gardens all ready for plants:  freshly weeded, fertilized and mulched. 
I ran out of mulch for the last two beds...we'll call this an experiment. 
The remaining greenery are mostly native perennials like
beebalm and coneflowers to attract pollinators.
One new thing I am trying this year is to put down a wheat straw mulch over the bare soil.  This should help with moisture retention and reduce the number of weeds, or at least those from new seeds being blown into the garden.  I am expecting that wheat straw is much lower in weed seeds than is regular hay.

Now it's (past) time to plant those peas!!!