One area in my lawn has a steep grade, about 28%. That is a rise of 4.5' over a 16' run. The lawn tractor could make the climb, but usually left some tracks, particularly if the ground was moist. Also when walking through that area it was a real chore. This is a prime area to replace the turf with a lower maintenance planting and to put in some steps to make navigation easier.
When doing a project that involves both planting and hardscape (elements like steps, walls and patios) it is best to put in the hardscape first. The positioning of plants has greater flexibility and there is usually less heavy lifting than when positions stones.
 |
Overall Plan for this sloping site. The 9 steps are shown as rectangles,
though in reality they are irregularly shaped. The highest elevation is at the top,
sloping down about 4.5 feet to the lowest step. Scale 1" = 3'. |
The first step in putting in steps on a hill is to determine the slope of the hill and then position the steps. Having a consistent rise and step length makes the steps easier to navigate. The overall rise here was 54". For a 6" rise/step, that calls for 9 total steps. At this time you can also move the shrubs around, while they are still in pots, to determine how you would like to position them.
 |
Here, after the steps were installed, you can see the level lines that were used to determine the overall slope
and to guide the installation so that the change in elevation from step to step was about the same.
(In the background you can see the tamper that is used to compact the soil and paver base.) |
I try to use a sustainable approach to landscaping whenever possible. In this case that means using stepping stone materials that were on site, left over from an earlier dry laid stone wall project. These stones give a naturalistic appearance. Also by using the same materials the two projects become visually and materially united. One down side of using irregular stones as steps is that each step needs to be engineered individually to set it on a solid foundation. Rectangular steps installed in a straight line require less customization.
For steps that get a lot of use a crushed stone base of 6 or more inches is recommended. Since these steps are only for occasional use, I cut back a bit on the amount of base. The riser for each step is supported by 2-3 inches of compacted paver base separated from the soil by a layer of landscape fabric over the compacted native soil. Behind this reinforced riser is compacted fill. Supporting the riser with a firm base gives the step a firm feel underfoot. It's much more comfortable to step onto a firm, well seated step than one that wobbles even a little.
 |
Here's a view underneath one of the steps showing the compacted paver base
underneath the the riser and the landscape fabric that is being used to hold the dirt
behind the dry-laid riser. For some of the steps that were difficult to stabilize I used
construction adhesive to secure the step to the riser. |
The standard formula for garden steps is that the tread length be about 26" minus 2 times the step height.
Tread Length" ≈ 26" - (2 x step height")
So for a 6" step height the tread length should be approximately 14". The formula is based on a comfortable stride length for the average person. Had I put he steps in a straight row down the slope it would have been close to this formula. Instead I spread the steps over a longer, curving course. I thought that the slightly longer course would have made for an easier, more gentle climb, but instead the longer distance between steps makes the trip feel less certain, especially when going downhill.
However, the way I chose to do it created a more naturalistic look and used materials that were already on hand. Also by following the existing slope I minimized the changes to the existing grading. Looking back, if these steps were to be used on a regular basis or in a more formal setting I would have built a deeper foundation, used more regularly shaped stones and followed the formula more closely.
 |
This is the area after scalping the grass with a string trimmer.
I also used a garden torch (circled) along the edges to burn the areas that had
Japanese stiltgrass in an attempt to kill any new seeds/seedlings. |
Once the steps were in it was time to eliminate the existing grass and weeds. (This could have been done before installing the steps, but I felt it was less disruptive to the stability of the slope to wait until the steps were in place.) There were several options for getting rid of the existing turf and weeds: dig it out, spray it with a broad spectrum herbicide, or cover/smother with cardboard and mulch. Digging is a lot of work and could destabilize the slope. Herbicide would be easy and would be less disruptive to the soil surface, leaving roots intact to hold the soil. I opted for the cardboard smothering/mulching method. It leaves the soil intact, is non-toxic, and there are limited debris to deal with.
 |
| I used thick cardboard from moving boxes to cover the unwanted grass. |
After mowing/scalping the existing grass, I covered the slope with cardboard and pinned it in place with landscape staples. After moistening the cardboard to make is more flexible to conform to the soil surface I covered it with 2" of wood chips. Most of the lawn will die due to lack of light in a few weeks, but planting can be done sooner by cutting holes through the cardboard, removing all the exiting grass from around the area and inserting the new plant. The re-exposed soil should be well mulched or recovered with scraps of cardboard to keep the old grass from growing through.
 |
The cardboard was covered with about 2" of woodchips that were left by our
arborist this spring. I started planting about 10 days after spreading the chips. |
For the areas between the steps I dug out the grass by hand since it was hard to get small pieces of cardboard to stay in place and there will be a lot of gaps where the grass can peek out and get re-established.
Now it's time to plant...
The plants I chose for this area are all low maintenance natives that are from the mid-Atlantic area, mostly ones that grow nearby. I chose plants that area fairly low-growing to minimize the amount of pruning needed to keep the pathway open, both physically and visually. The selection of plants will have something in bloom from early spring through fall. You can see the plant list in the drawing at the beginning of this post.
 |
| The Grow-Low sumac are at the foreground in this photo, with the Red Sprite holly at the back. |
First to go in are the woody shrubs. I put in three Grow-Low aromatic sumac,
Rhus aromatica 'Grow-Low' and one of the shorter female cultivars of winterberry holly,
Ilex verticillata 'Red Sprite'. I chose this sumac because it grows under a almost any condition, it only grows to about 3' tall and is a good choice for stabilizing slopes. In addition it has a nice bright orange fall color and tends to be resistant to deer browse. The female Red Sprite winterberry holly has a proper male mate in the nearby Jim Dandy. I also transplanted in some extra black and brown-eyed Susans,
Rudbeckia sp., to fill in around some of the newly planted shrubs.
As for flowering perennials, located 1-2 feet from the path, I chose foxglove beardtongue,
Penstemon digitalis, short-toothed mountain mint,
Pycnanthemum muticum, black cohosh,
Actaea racemosa, and aromatic aster,
Symphyotrichum oblongifolium. As the grass components I also put in some bottlebrush grass,
Elymus hystrix, and wavy hairgrass,
Deschampsia flexuosa. I really like the looks of the bottlebrush grass and it is a species that commonly grows on the woodland edges in this area. Finally around the stepping stones and outer edges I put in the shortest species, two cultivars of moss phlox,
Phlox subulata, and Pennsylvania sedge,
Carex pensylvanica.
 |
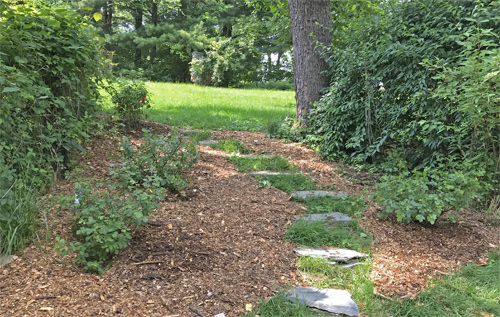
| This is the completed installation. I finished this in mid-July - later than is optimal for planting around here (mid-Jume would have been better). I added in some old landscape timbers that were taken out from an earlier project to from the upper and lower edge of this garden. Reusing materials on-site is part of being sustainable (and cheap). |
As we are approaching fall the deer have come through and ate back the Penstemon and stripped most of the leaves and berries off of the holly. I'm surprised about the holly, but our deer usually eat up most new plants no matter what they are, then leave them alone the following year. Also the cohosh died back early, it may be getting too much sun, we'll see if it comes back next spring.
UPDATE
Here's the path in May 2019. Everything has come back. The bottlebrush grass is approaching 3' and all three cohosh have returned!